目次
FMADIOの操作のための開始マニュアルとクイックスタートガイド10Gbit/20Gbit/40Gbit/100Gbit イーサネット・パケットキャプチャアプライアンス。
- 概要
- ハードウェアのセットアップ
- 梱包内容
- ポートとインターフェイス
- 設定
- Webネットワークコンフィグレーション
- CLIネットワークコンフィグレーション
- ファームウェアのアップデート
- ホスト名の変更
- RAID5 コンフィグレーション
- RAID0 コンフィグレーション
- iSCSI configuration
- NAGIOS SNMP configuration
- クロックシンクロナイザー
- SSHのENV設定
- Configuration Save/Restore
- Configuration ReadOnly
- Configuration Push
- Inline Packet Capture
- Flush to Disk
- 操作
- キャプチャ 開始・停止: Web
- キャプチャ 開始・停止: CLI
- キャプチャ スケジュール
- キャプチャ 24/365
- キャプチャ プレフィルタ
- PCAPのダウンロード: Web
- PCAPのダウンロード: CLI
- PCAPのアップロード: CLI
- ポストキャプチャパケットのフィルタリングと分析
- Filter Scripts
- トラブルシューティング
- システムログファイル
- IPMIポートアクセス
- IPMIシリアルポート
- IPMI電源リブート
- IPMI電源オフ
- IPMI電源オン
- API
- Capture Start
- Capture Stop
- Capture Status
- List Captures
- Split Captures by Size
- Split Captures by Time
- Single PCAP Download
- Single PCAP Download with Compression
- Download PCAP with Time Range
- Download PCAP with BPF Filter
- Download PCAP with BPF Filter and Time Range
- Download PCAP with RegExFilter
- System Device Status
概要
FMADIO10
FMADIO10パケットキャプチャ装置は、パケットキャプチャやパケットスニファ装置をキャッシュ・メモリーに保存するために10Gbit回線のキャプチャを十分に維持した入門レベルです。 7.4ナノ秒の解像度を持つハードウェアパケットタイムスタンプとPVPv2またはGPSを使った100サブナノ秒の世界時間精度を特徴とするコンパクトな深さ650mmの1Uシャシーです。さらに、高帯域幅SSDフラッシュ容量1TBがあります。これは、RAW磁気ディスク装置16TBに書き込まれています。システムは、最大ディスク容量を使って最大限のコスト節約をするため、また全くパケットドロップしない1TB相当の回線のキャプチャを可能にするためにSSD容量とHDD容量のハイブリッド型アーキテクチャを合わせもった独自のものです。

仕様:
- 1TBキャッシュのための10Gbit回線のキャプチャを維持
- コンパクトな1Uフォームファクター
- ハードウェアパケットタイムスタンプ
- 100サブナノ秒の精密な世界時間シンクロナイザー
- PTPv2 時間シンクロナイザー
- PTPv2+PPS時間シンクロナイザー
- GPS+PPS時間シンクロナイザー
- ホットスワップディスク容量16TB
- 高速SSDキャッシュ1TB
- x1 10G SFP+キャプチャポート
- x1 10G SFP+管理ポート
- x1 1G RJ45管理ポート
FMADIO20
10Gbps全二重回線のキャプチャのために、FMADIO20パケットキャプチャ装置は、2つの10GSFP+ 10Gbeポートを使って20Gbit回線のキャプチャを維持することを提供します。7.4ナノ秒の解像度を持つハードウェアパケットタイムスタンプとPVPv2またはGPSを使った100サブナノ秒の世界時間精度を特徴とするコンパクトな深さ650mmの1Uシャシーに収容されています。この20Gbeパケットキャプチャ装置は、20Gbps+以上のIOスループットを備えた高帯域幅SSDフラッシュ容量2TBをもっています。この2TBのキャッシュはRAW磁気ディスク容量16TBに書き込まれています。このシステムは、中頻度の20Gbps 全二重回線パケットキャプチャに最適です。

仕様:
- 2TBキャッシュのための20Gbit回線のキャプチャを維持
- コンパクトな1Uフォームファクター
- ハードウェアパケットタイムスタンプ
- 100サブナノ秒の精密な世界時間シンクロナイザー
- PTPv2 時間シンクロナイザー
- PTPv2+PPS時間シンクロナイザー
- GPS+PPS時間シンクロナイザー
- ホットスワップディスク容量16TB
- 高速SSDキャッシュ1TB
- x2 10G SFP+キャプチャポート
- x1 10G SFP+管理ポート
- x1 1G RJ45管理ポート
梱包内容
FMADIO10/FMADIO20
システムは次の項目を含みます:
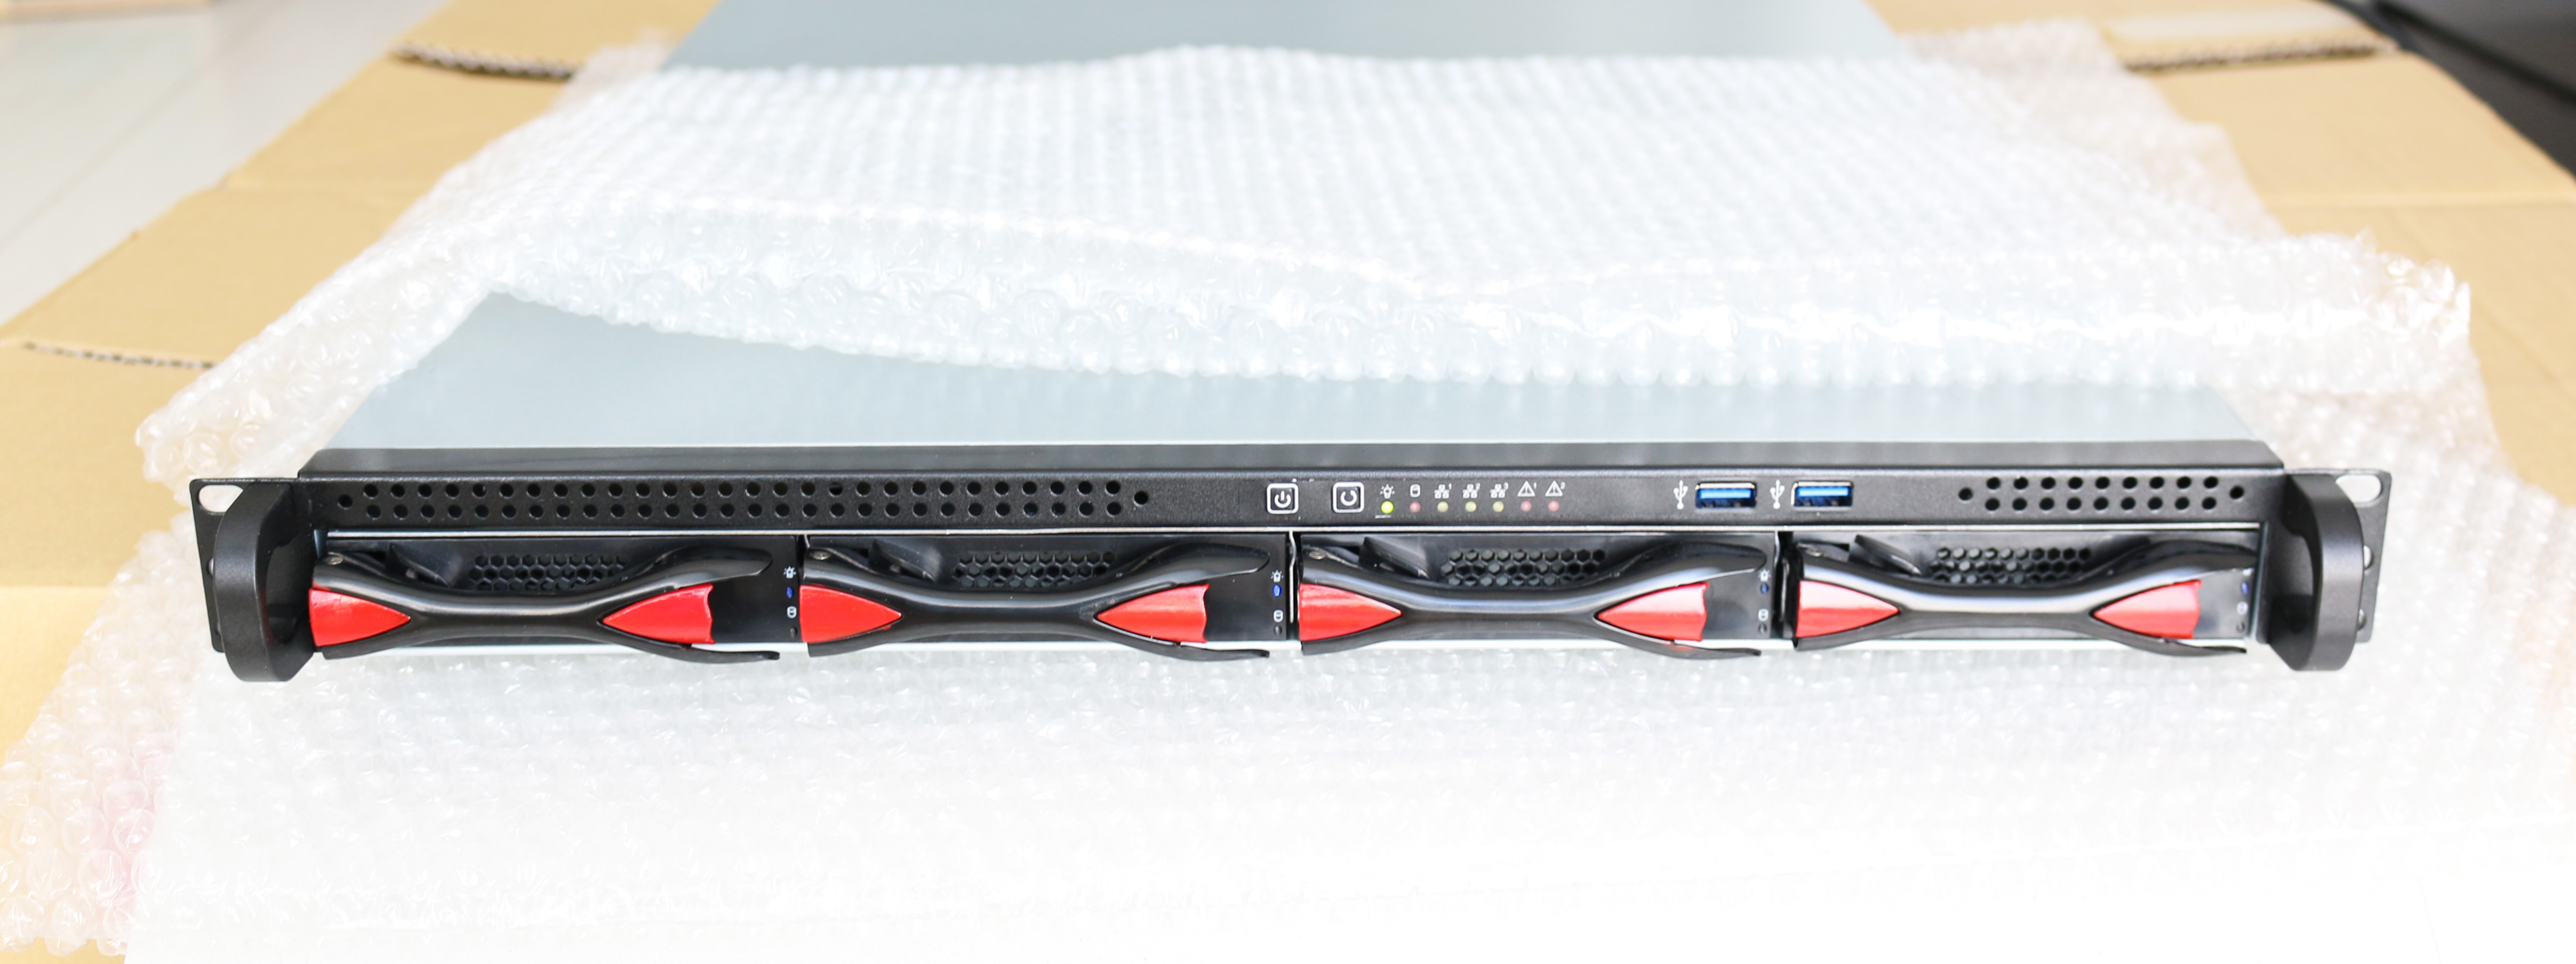
- x1 1U FMADIO10またはFMADIO20パケットスニファシステム (A)
- x1 GPS PPS > PPS In SMA同軸ケーブル (B)
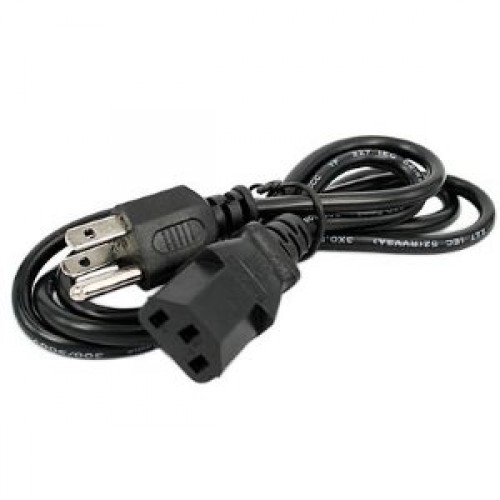
- x1 110V日本またはアメリカの電源コネクター (C)
- x1 ラックマウント用レールキット(オプション) (D)
1U FMADIO10またはFMADIO20パケットスニファシステム
(外側のシャシーは両方のモデルに一致します)
110V 日本またはアメリカの電源コネクター
ラックマウント用レールキット(オプション)

ハードウェアのレイアウト
フロントポート
シャシーの前面にあるハードウェアインターフェイスは下記の通りです:

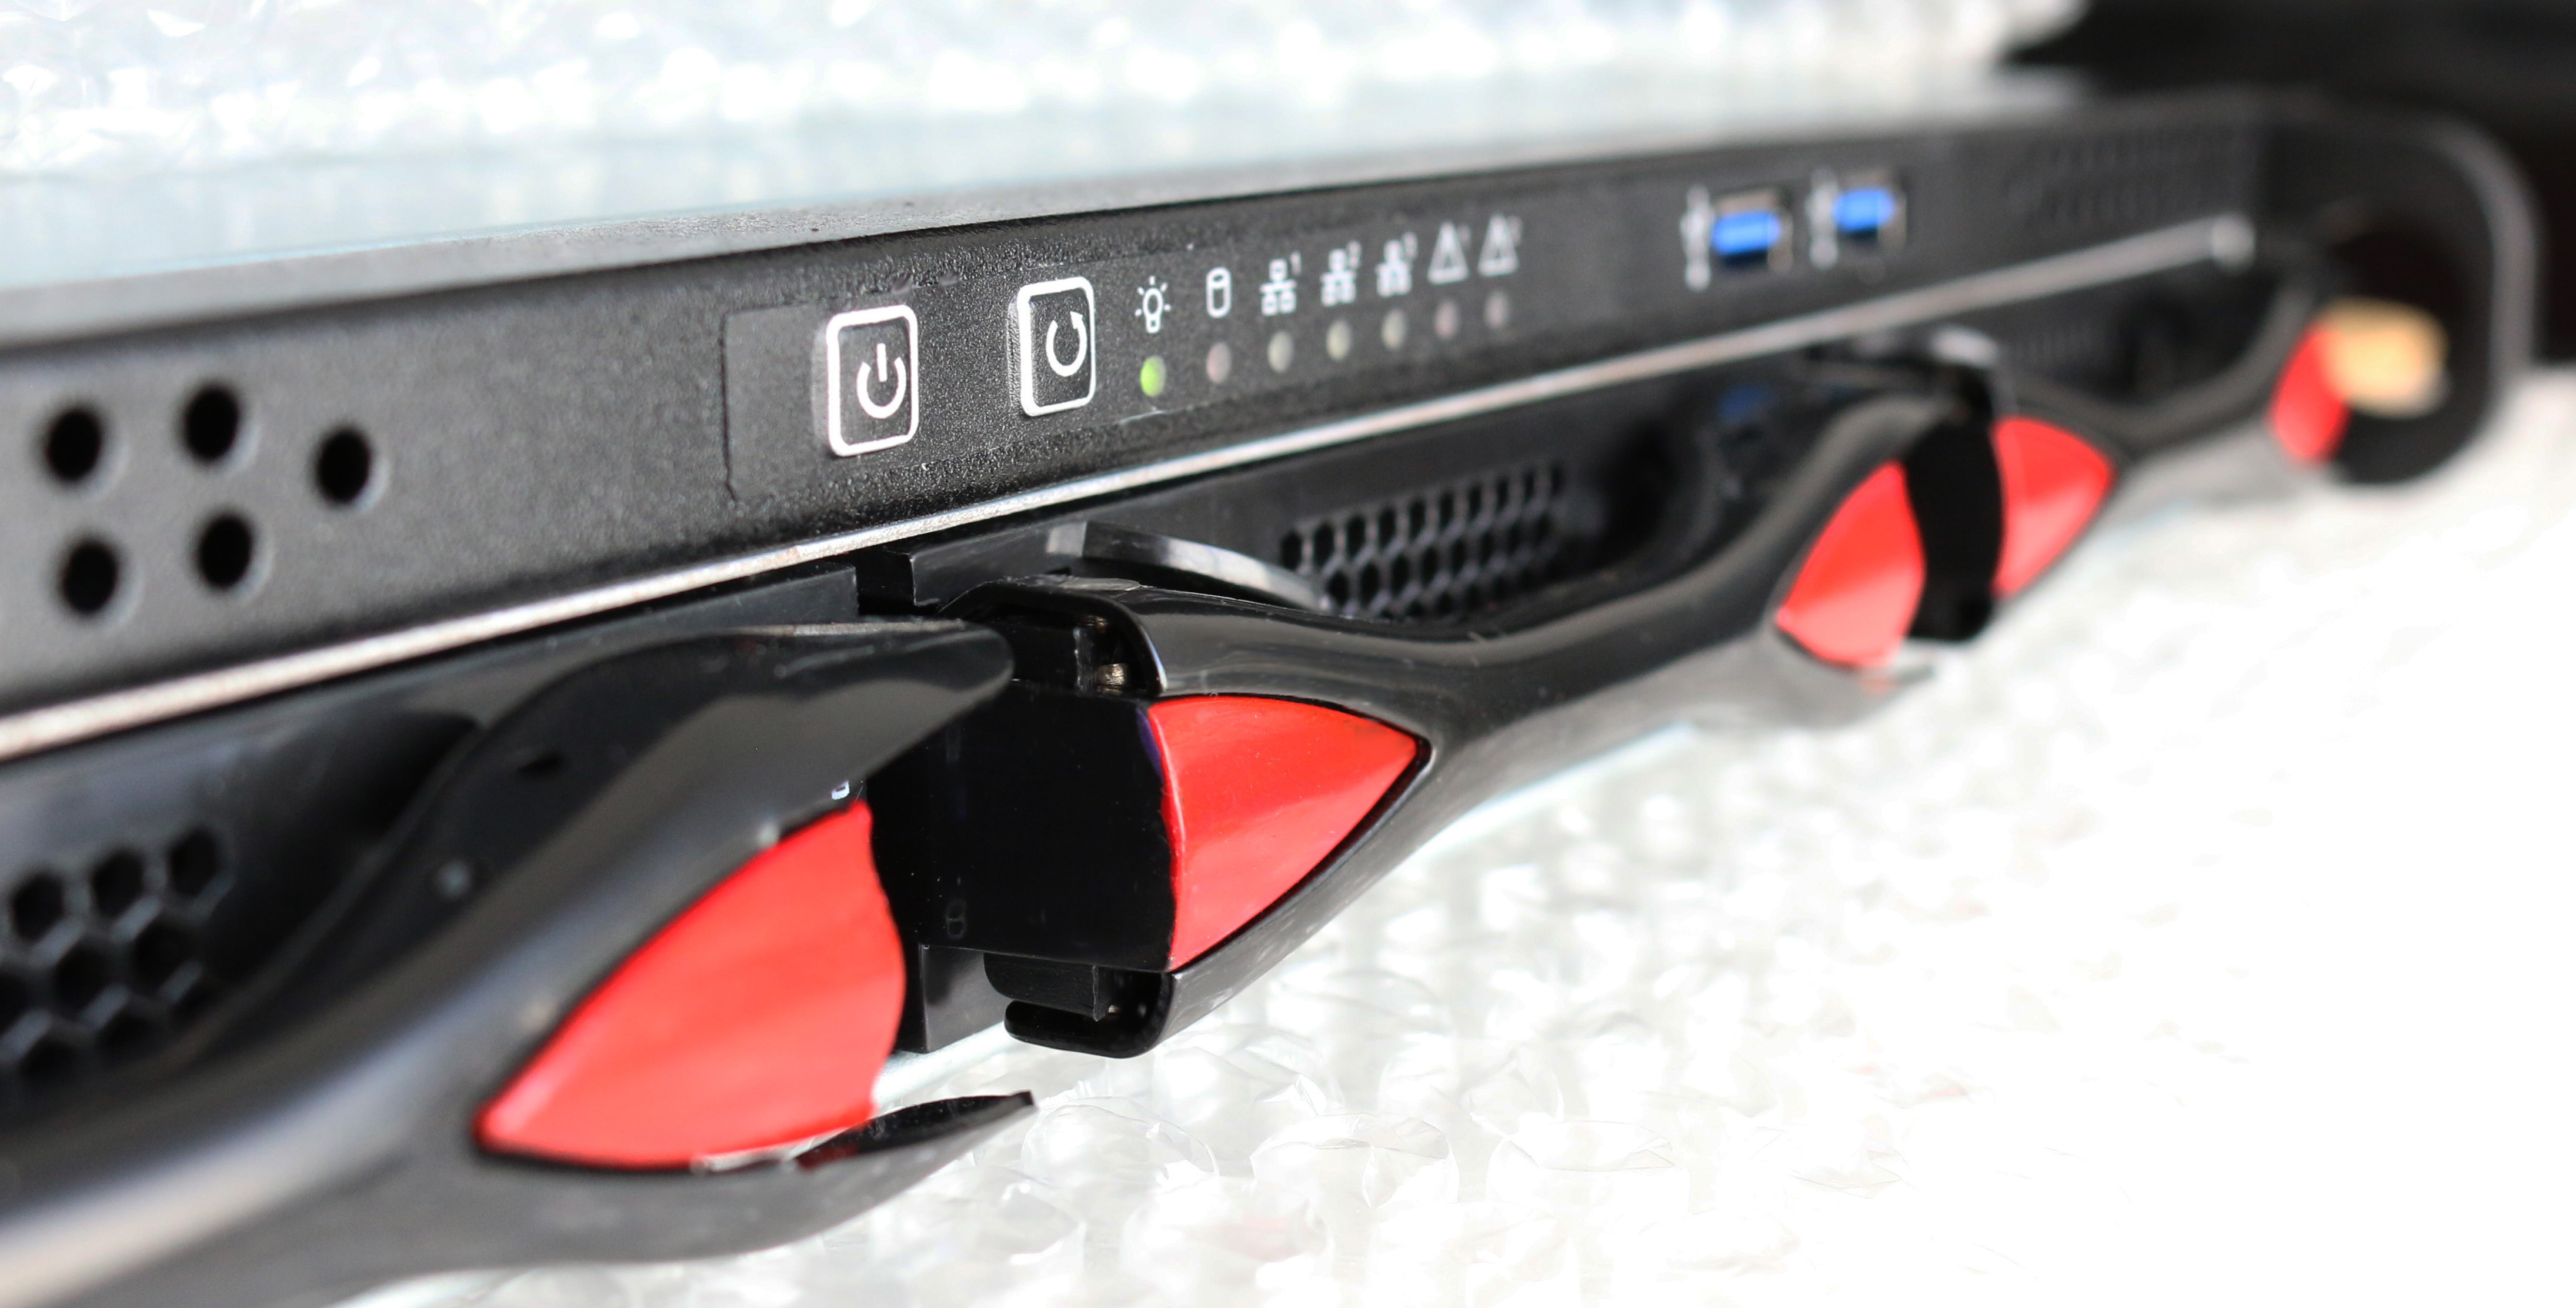
スワップ3.5"ドライブとは
RAID5内部アレイの標準ホットスワップ3.5" SATAドライブ。これらにRAW磁気ディスク容量16TBになるToshiba 4TB SATAドライブが取り込まれます。ホットスワップドライブベイの拡大写真
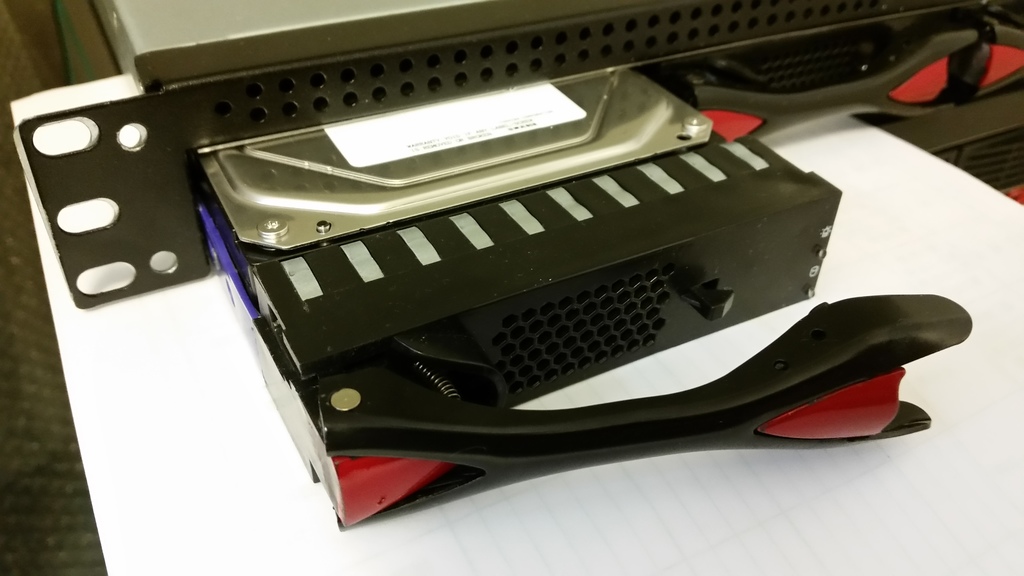 ホットスワップドライブベイの拡大写真
電源ボタン
装置を起動するための電源ボタン。強制終了するためには10秒間ボタンを長押ししてください。
リセットスイッチ
ハードシステムのリセットボタンで、すぐに作動します。
USB 3.0 ポート
USB 3.0シングルポート。
リアポート
シャシーの背面にあるハードウェアインターフェイスは次の通りです:
(FMADIO10とFMADIO20はほんの少ししか違いがないポートですので注意してください。)
FMADIO10

FMADIO20

それぞれのポートの説明は以下の通りです:
IPMI
IPMIポートはアウトオブバンド管理用の10/100/1000M RJ45イーサネットネットワークポートです。シリアルポートアクセスというシステムモニタリングを提供し、 シリアルポートアクセス、そして、SSHまたは Webインターフェイスを通してリモートマシンの再起動を可能にします。
1G管理
プライマリRJ45管理 / 速度10M/100M/1Gbitのこの装置のためのユーザーインターフェイス。アクセスはHTTP/HTTPSとSSHを通して提供されます。
10G SFP+/SFP管理
高速SFP/SFP+管理 / 10Gbpsで動くユーザーインターフェイス。これは1G SFPモジュールと10G SFP+の両方を可能にするデュアルモードの SFP/SFP+ポートです。アクセスはHTTP/HTTPとSSHを通して提供されます。
10G SFP+/SFPキャプチャ
これらは10Gbitキャプチャインターフェイスです。これもお客様のご要望に基づいて1Gと10Gキャプチャを可能にしたデュアルモードのSFP/SFP+インターフェイスです。FMADIO20は2つのキャプチャインターフェイスを持っていますが、FMADIO10は1つのキャプチャインターフェイスをもっています。
PPS出力
非常に精密な(10ナノ秒以下) 1PPS (1パルス毎秒) 信号。FMADIO10/20の非常に精密な世界時間に外部装置を同期することを可能にする高精密なTXCO(温度調整型水晶)から信号が出ます。 これは、開始1秒を示す立ち上がりエッジという5V CMOS PPS信号で、8マイクロ秒作動しています。コネクター型はSMAメスコネクターです。
PPS入力
開始1秒を示す立ち上がりエッジの信号と同時の1PPS (1パルス毎秒)を推定しています。電気特性は、地面に対し50Ωの抵抗に5Vの電圧です。これは、タイムグランドマスターのような外部装置を使った非常に精密な時間シンクロナイザーを伴う非常に精密なパケットタイムスタンプを可能にしています。シンクロナイザーの精密さは、一般的に1020ナノ秒です。これはSMAメスコネクターです。
GPS PPS出力
GPS (全地球測位システム) 1PPS (1パルス毎秒)は対地同期軌道にある同時観測の22の衛星から生成される非常に精密な世界時間を提供します。この高精密な世界時間は、他の装置にエクスポートすることができ、または付属のSMAコネクタケーブルを使って"PPS入力"を"GPS PPS出力"ポートに接続することでFMADIO10/20キャプチャシステムに接続し返すことができます。これはSMAメスコネクターです。
GPSアンテナ
GPS (全地球測位システム)外部アクティブアンテナSMAメスコネクター。時間を最大限に精密に収得するために、このアンテナは180度の空の見晴らしが必要です。
ネットワーク設定
ネットワークポート設定はa) Webインターフェイス、 b) SSH コマンドラインインターフェイス(CLI)を使って達成できます。Webインターフェイスの使用が最も簡単な方法ですが、非常に制限されたネットワーク環境では、純粋なCLIベースの構成がより簡単でしょう。
Webインターフェイス: ネットワーク設定
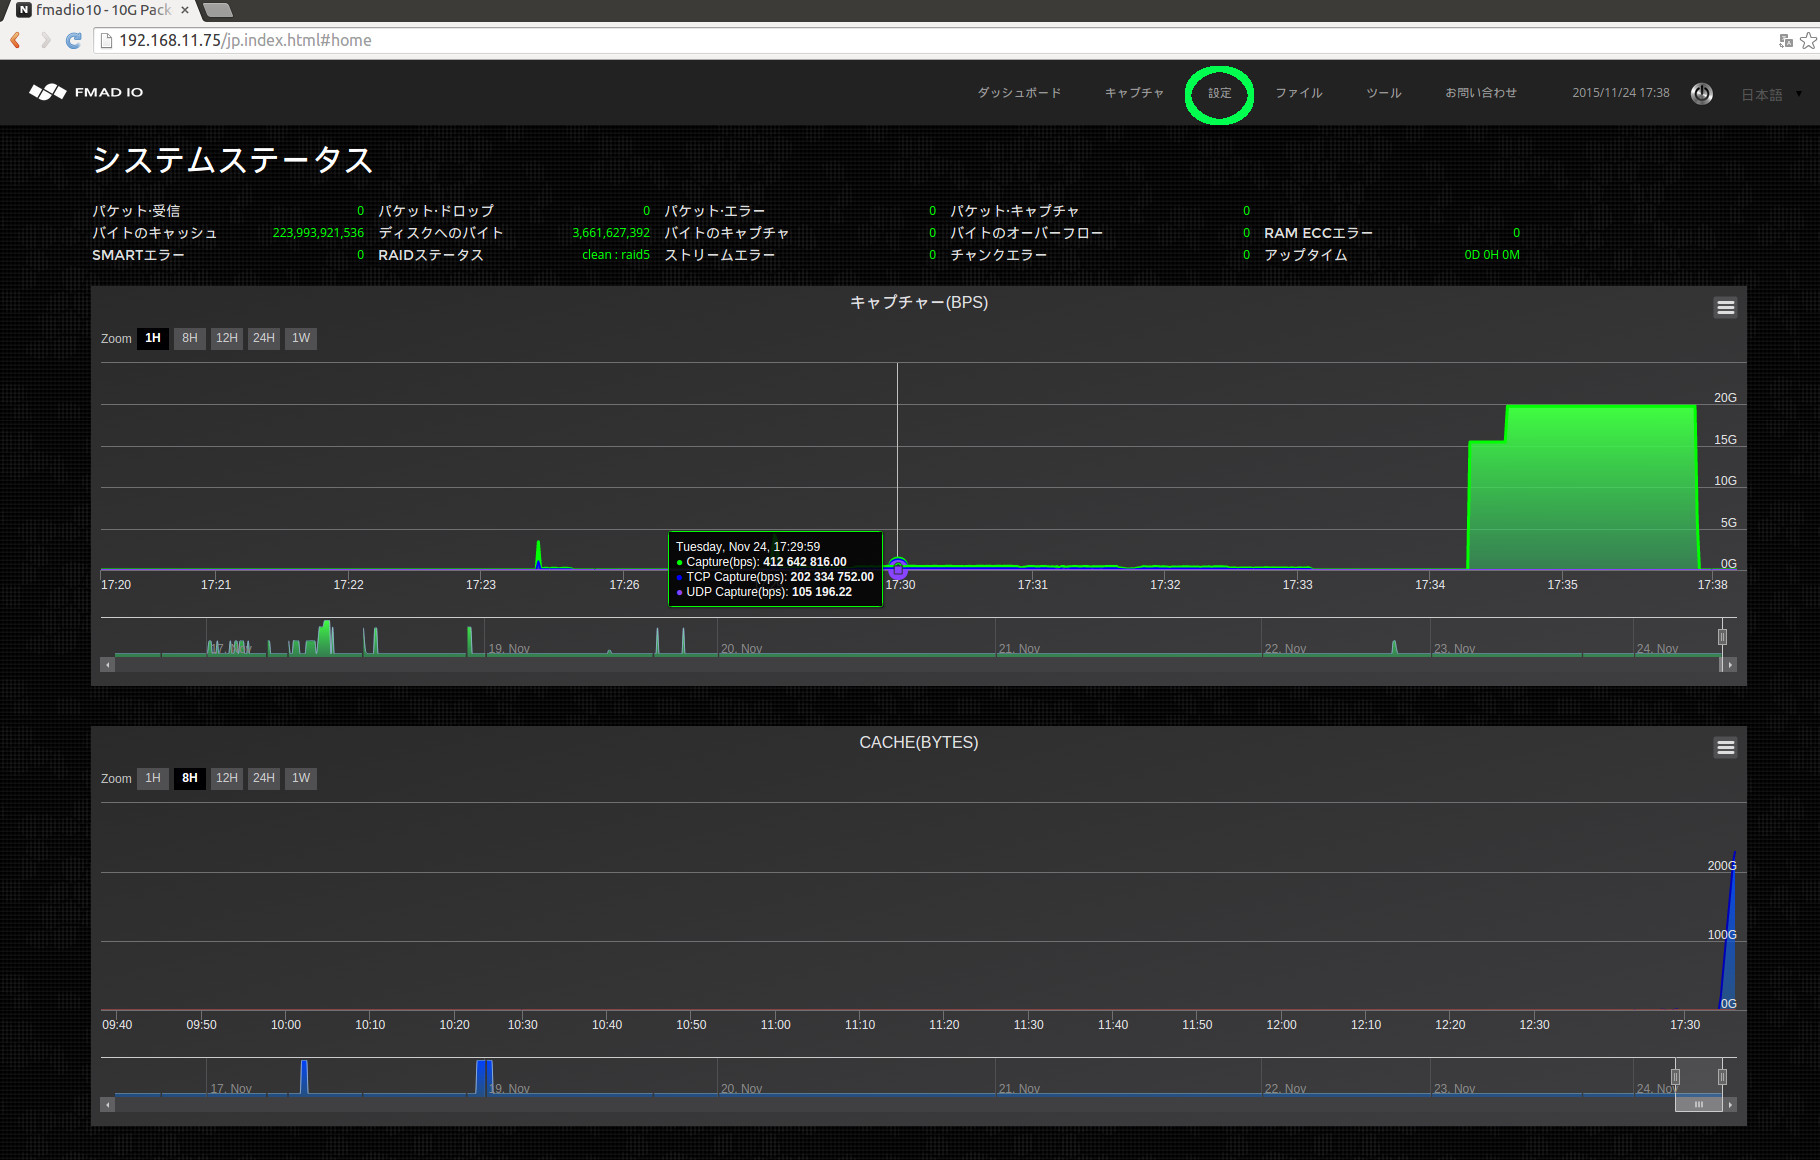
ダッシュボードページから、以下に示しているところ(緑で印をつけている)からコンフィグレーションメニューオプションを選択して始めてください。
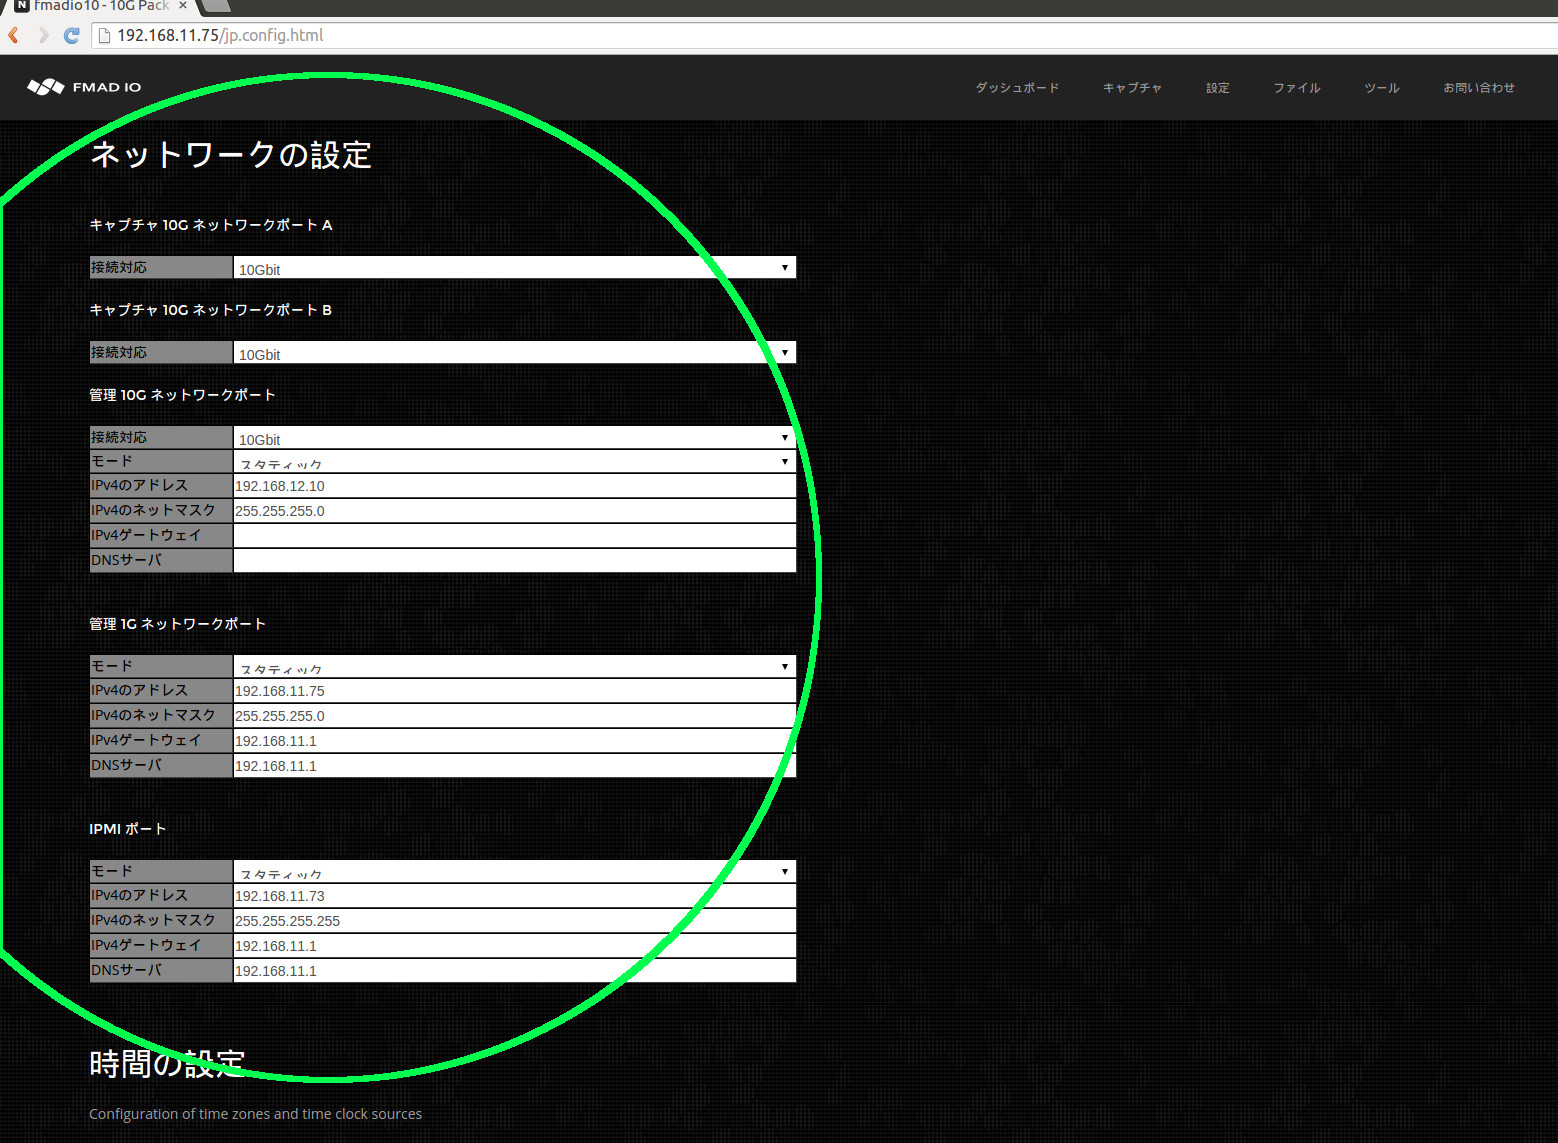
それから、下の画像に示しているようにネットワークコンフィグレーションのIP/ネットマスク/ゲートウェイ/DNSの設定を編集してください。それぞれの分野が編集されると、システムが自動的にシステム設定を保存し、アップデートします(セーブボタンは必要ありません)。アップデートが完了した後に、新しい設定を確認するためにWebページを更新してください。
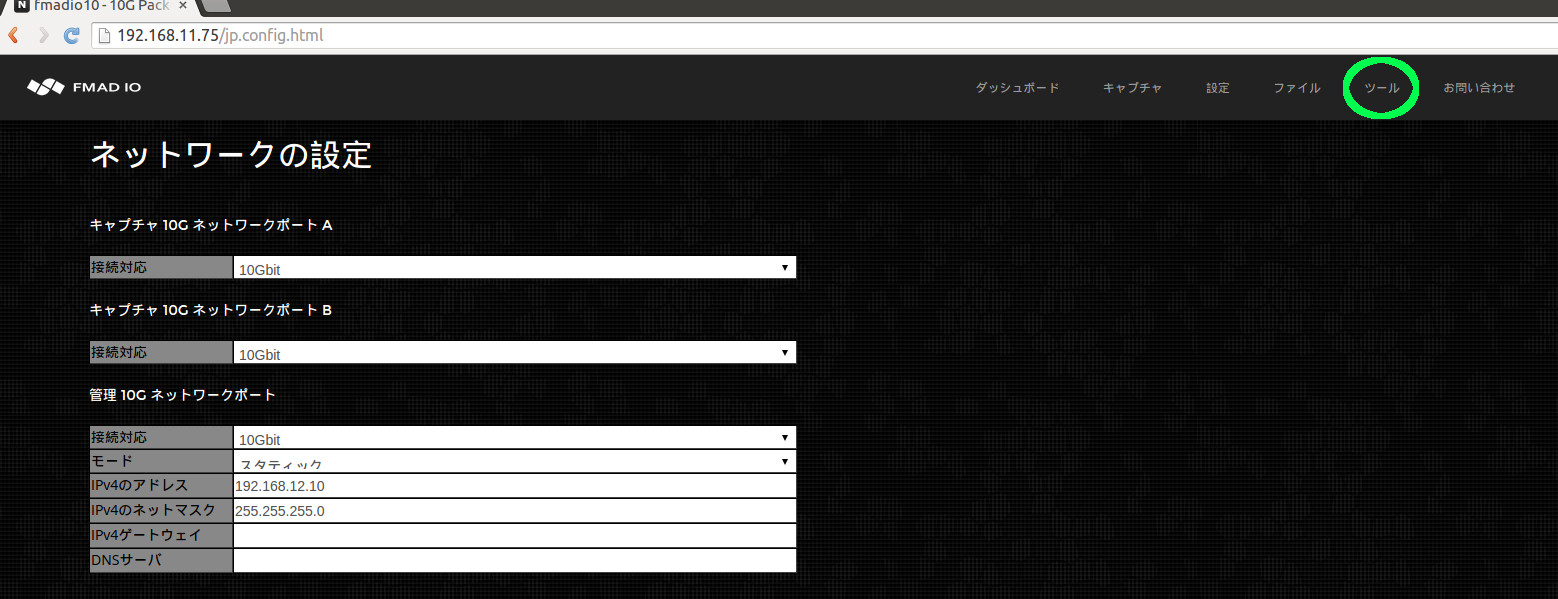
下の画像に示しているように、上部のツールバーからツールメニューを選択してください。
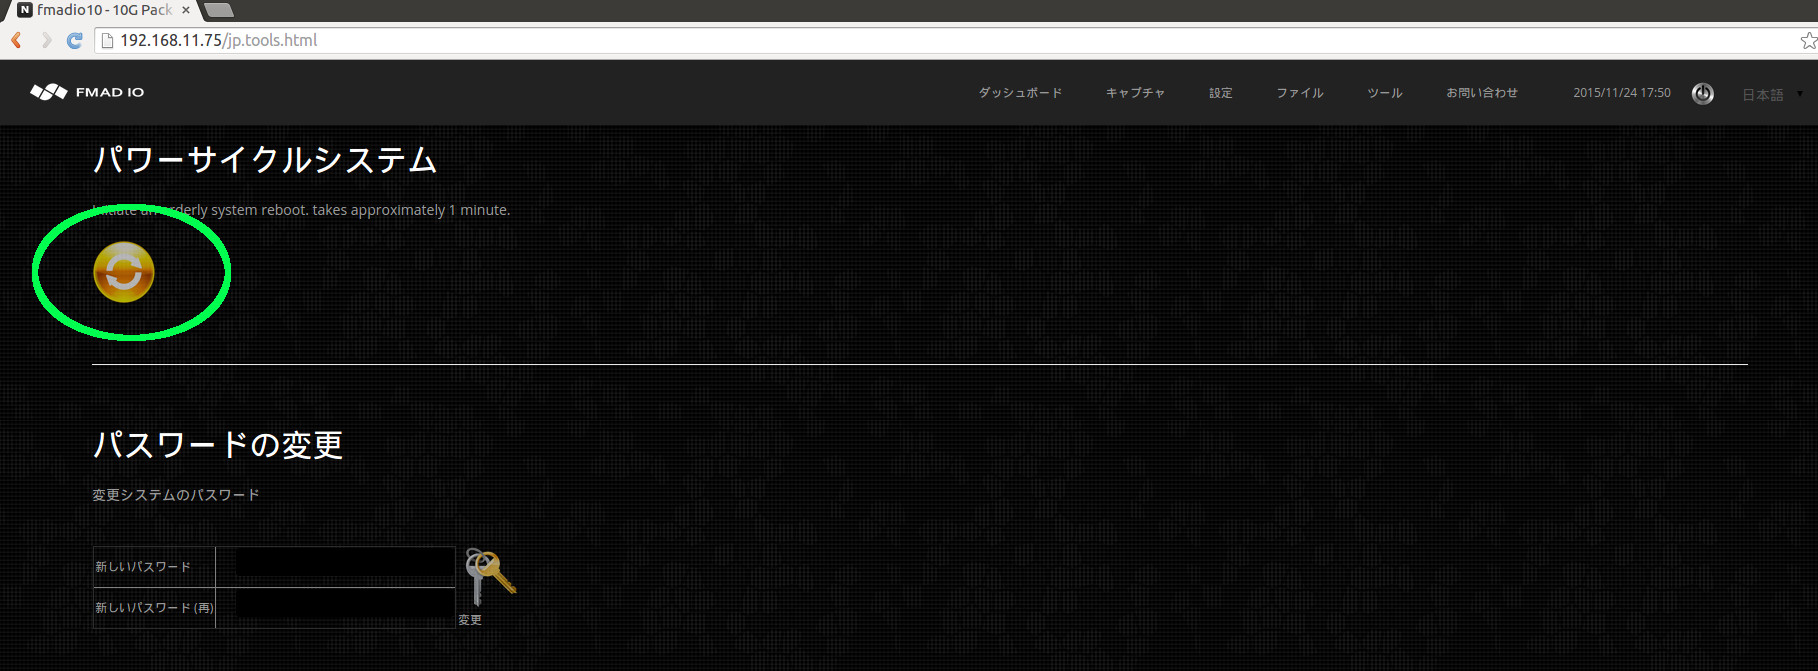
そして、最後にシステムを再起動するためにパワーサイクル/再起動ボタンを選択してください。
CLIインターフェイス: ネットワーク設定
制限されたコロケーション環境でのネットワーク設定の変更は、コマンドラインを使って達成するのがはるかに簡単でしょう。最初の手順は、システム中のSSHで、以下に示しているように指定のディレクトリに変え、現在のネットワーク設定を見てください。
aaron@display0:/tmp$ ssh fmadio@192.168.11.75
fmadio@192.168.11.75's password:
  _____                    .___.__      10G
_/ ____\_____  _____     __| _/|__|  ____
\   __\/     \ \__  \   / __ | |  | /  _ \
 |  | |  Y Y  \ / __ \_/ /_/ | |  |(  <_> )
 |__| |__|_|  /(____  /\____ | |__| \____/
            \/      \/      \/
============================================
  -+ no user serviceable parts inside +-
fmadio@fmadio10-049:~$ cd /mnt/store0/etc
fmadio@fmadio10-049:/mnt/store0/etc$ cat network.lua
-- auto generated on Tue Apr 14 10:38:13 2015
local Config =
{
["sf0"] =
{
    ["Mode"]    = "disabled",
    ["Address"] = "192.168.1.2",
    ["Netmask"] = "255.255.255.0",
    ["Gateway"] = "192.168.1.1",
    ["DNS"]     = "192.168.1.1",
},
["sf1"] =
{
    ["Mode"]    = "static",
    ["Address"] = "192.168.12.10",
    ["Netmask"] = "255.255.255.0",
    ["Gateway"] = "192.168.12.1",
    ["DNS"]     = "192.168.12.1",
},
["eth0"] =
{
    ["Mode"]    = "static",
    ["Address"] = "192.168.11.75",
    ["Netmask"] = "255.255.255.0",
    ["Gateway"] = "192.168.11.1",
    ["DNS"]     = "192.168.11.1",
},
["bmc"] =
{
    ["Mode"]    = "static",
    ["Address"] = "192.168.11.73",
    ["Netmask"] = "255.255.255.255",
    ["Gateway"] = "192.168.11.1",
    ["DNS"]     = "192.168.11.1",
},
}
return Config
上のコンフィグレーションの例では、ネットワークポートは次のように描かれています。
sf0 -> 10G SFP/SFP+ キャプチャ
sf1 -> 10G SFP/SFP+ 管理
eth0 -> 1G RJ45 管理
bmc -> 1G RJ45 IPMI
上の例でわかるように, sf1 -> 192.168.12.10/24, eth0 -> 192.168.11.75/24, and IPMI -> 192.168.11.73
これはifconfigコマンドを使って確かめられます。
fmadio@fmadio10-049:/mnt/store0/etc$ ifconfig
eth0      Link encap:Ethernet  HWaddr 00:25:90:FC:88:3C
          inet addr:192.168.11.75  Bcast:192.168.11.255  Mask:255.255.255.0
          inet6 addr: fe80::225:90ff:fefc:883c/64 Scope:Link
          UP BROADCAST RUNNING MULTICAST  MTU:1500  Metric:1
          RX packets:3779 errors:0 dropped:14 overruns:0 frame:0
          TX packets:4466 errors:0 dropped:0 overruns:0 carrier:0
          collisions:0 txqueuelen:1000
          RX bytes:756557 (738.8 KiB)  TX bytes:4443144 (4.2 MiB)
          Memory:fbb00000-fbb7ffff

lo        Link encap:Local Loopback
          inet addr:127.0.0.1  Mask:255.0.0.0
          inet6 addr: ::1/128 Scope:Host
          UP LOOPBACK RUNNING  MTU:65536  Metric:1
          RX packets:32962 errors:0 dropped:0 overruns:0 frame:0
          TX packets:32962 errors:0 dropped:0 overruns:0 carrier:0
          collisions:0 txqueuelen:0
          RX bytes:10438860 (9.9 MiB)  TX bytes:10438860 (9.9 MiB)

sf0       Link encap:Ethernet  HWaddr 00:0F:53:26:B9:10
          inet6 addr: fe80::20f:53ff:fe26:b910/64 Scope:Link
          UP BROADCAST RUNNING MULTICAST  MTU:9216  Metric:1
          RX packets:200000000 errors:0 dropped:0 overruns:0 frame:0
          TX packets:8 errors:0 dropped:0 overruns:0 carrier:0
          collisions:0 txqueuelen:1000
          RX bytes:13600000000 (12.6 GiB)  TX bytes:680 (680.0 B)
          Interrupt:26

sf1       Link encap:Ethernet  HWaddr 00:0F:53:26:B9:11
          inet addr:192.168.12.10  Bcast:192.168.12.255  Mask:255.255.255.0
          inet6 addr: fe80::20f:53ff:fe26:b911/64 Scope:Link
          UP BROADCAST RUNNING MULTICAST  MTU:9216  Metric:1
          RX packets:3976753 errors:0 dropped:0 overruns:0 frame:0
          TX packets:117267670 errors:0 dropped:0 overruns:0 carrier:0
          collisions:0 txqueuelen:1000
          RX bytes:280799142 (267.7 MiB)  TX bytes:176538287574 (164.4 GiB)
          Interrupt:44
手動でネットワークコンフィグレーションを変更する手順:
- 1) mnt/store0/etc/network.luaコンフィグレーションファイルを適切な設定に変更/編集してください。
- 2) 作動してください。
$ sudo network_config.lua --nocal --updatebmcこれは内部スクリプトとIPMIコンフィグレーションフラッシュをアップデートします。 - 3) システムを再起動してください。
$ sudo reboot
再起動すると、システムは現状でアップデートされたネットワーク情報に設定されています。 注、IPMIインターフェイス上で、シリアルポートを使ってシステムにログインすることでネットワーク設定を変更するのが最も良い方法です。次の例はシリアルコンソールを通したログイン方法を示しています。
$ ssh ADMIN@192.168.11.73
ADMIN@192.168.11.73's password:
ATEN SMASH-CLP System Management Shell, version 1.05
Copyright (c) 2008-2009 by ATEN International CO., Ltd.
All Rights Reserved
-> cd system1/sol1
/system1/sol1
-> start
/system1/sol1
press
ファームウェアのアップデート
ファームウェアのアップデートはシンプルかつ簡単で、最新のアップデートとシステムフィーチャを可能にします。システムをアップデートするためにこれらの手順に従ってください。
手順1) 最新のファームウェアをダウンロードしてください。
最新のファームウェアイメージをサポートWebサイトからダウンロードしてください。
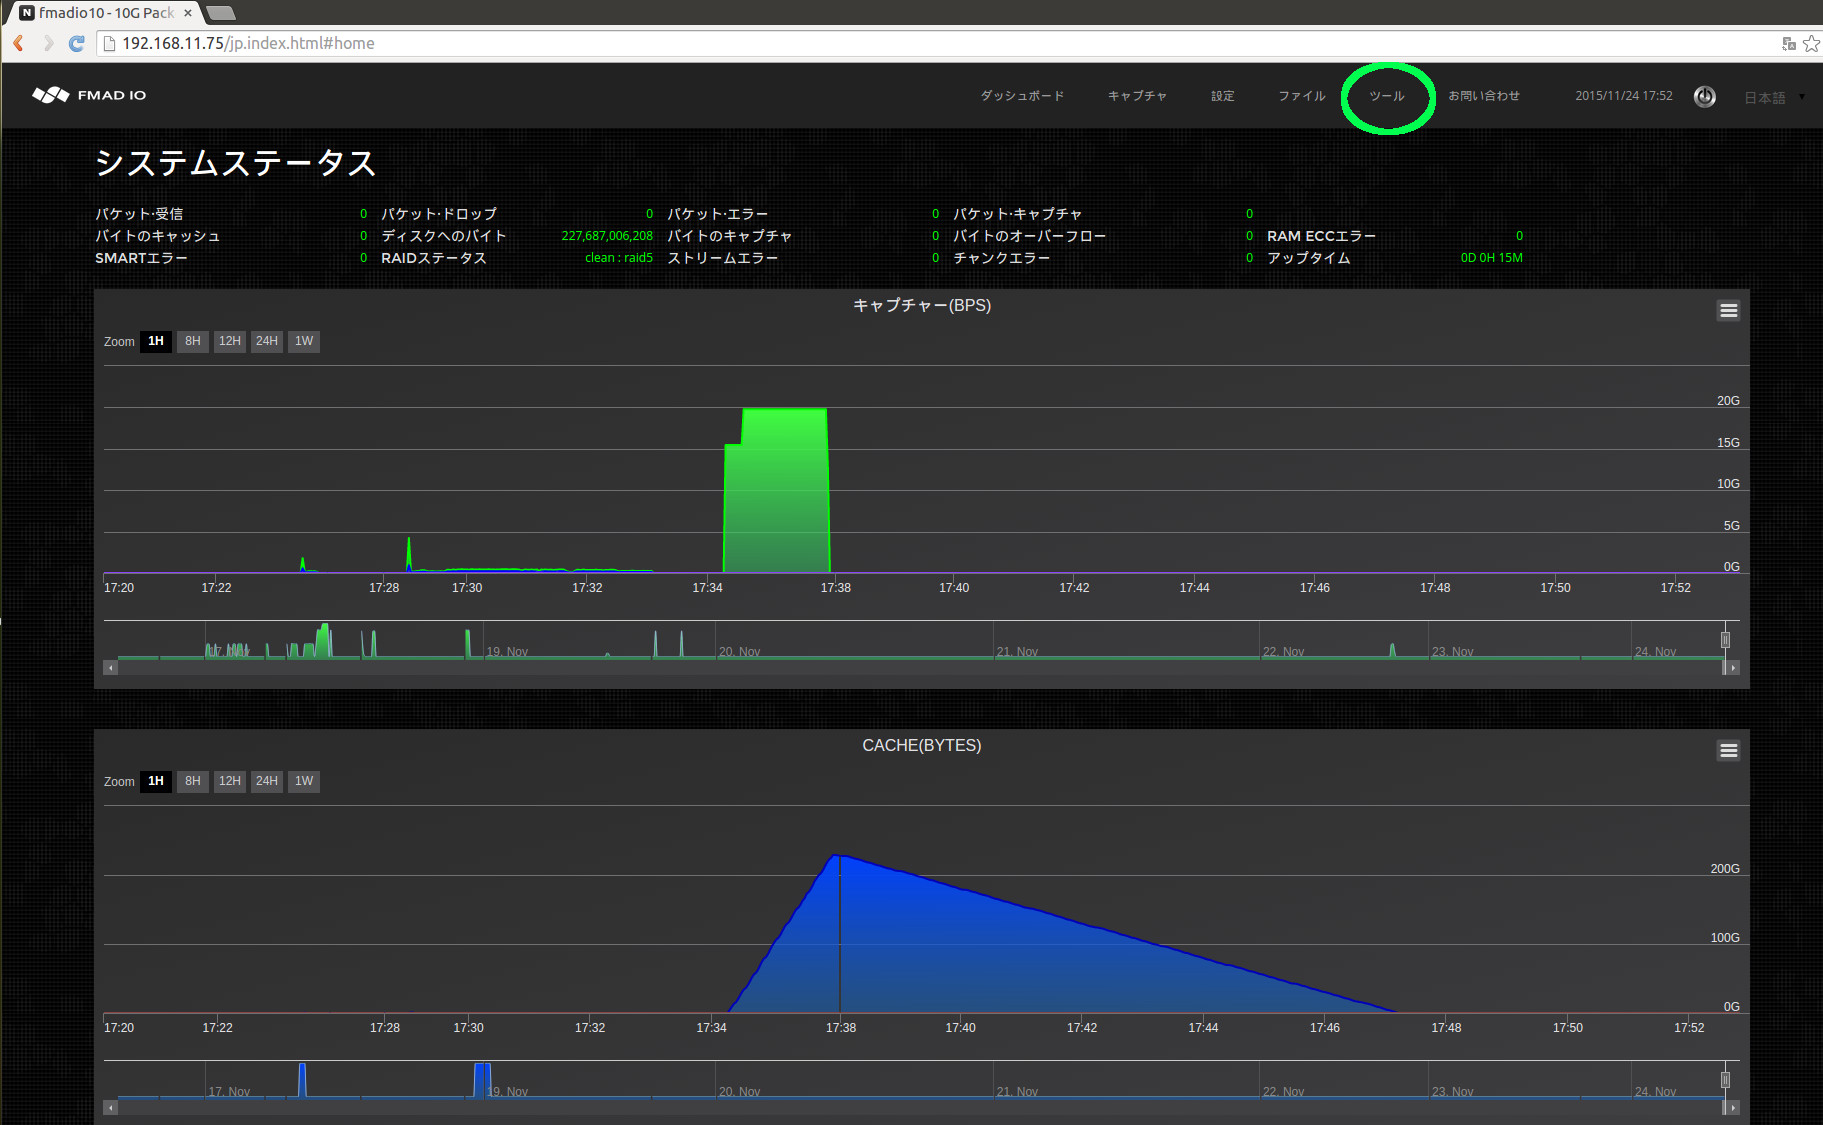
手順2) ファームウェアのWebページを選択してください。
下の画像に緑で印をつけているように、キャプチャ装置のWebページ上の"Tools"ページに進んでください。
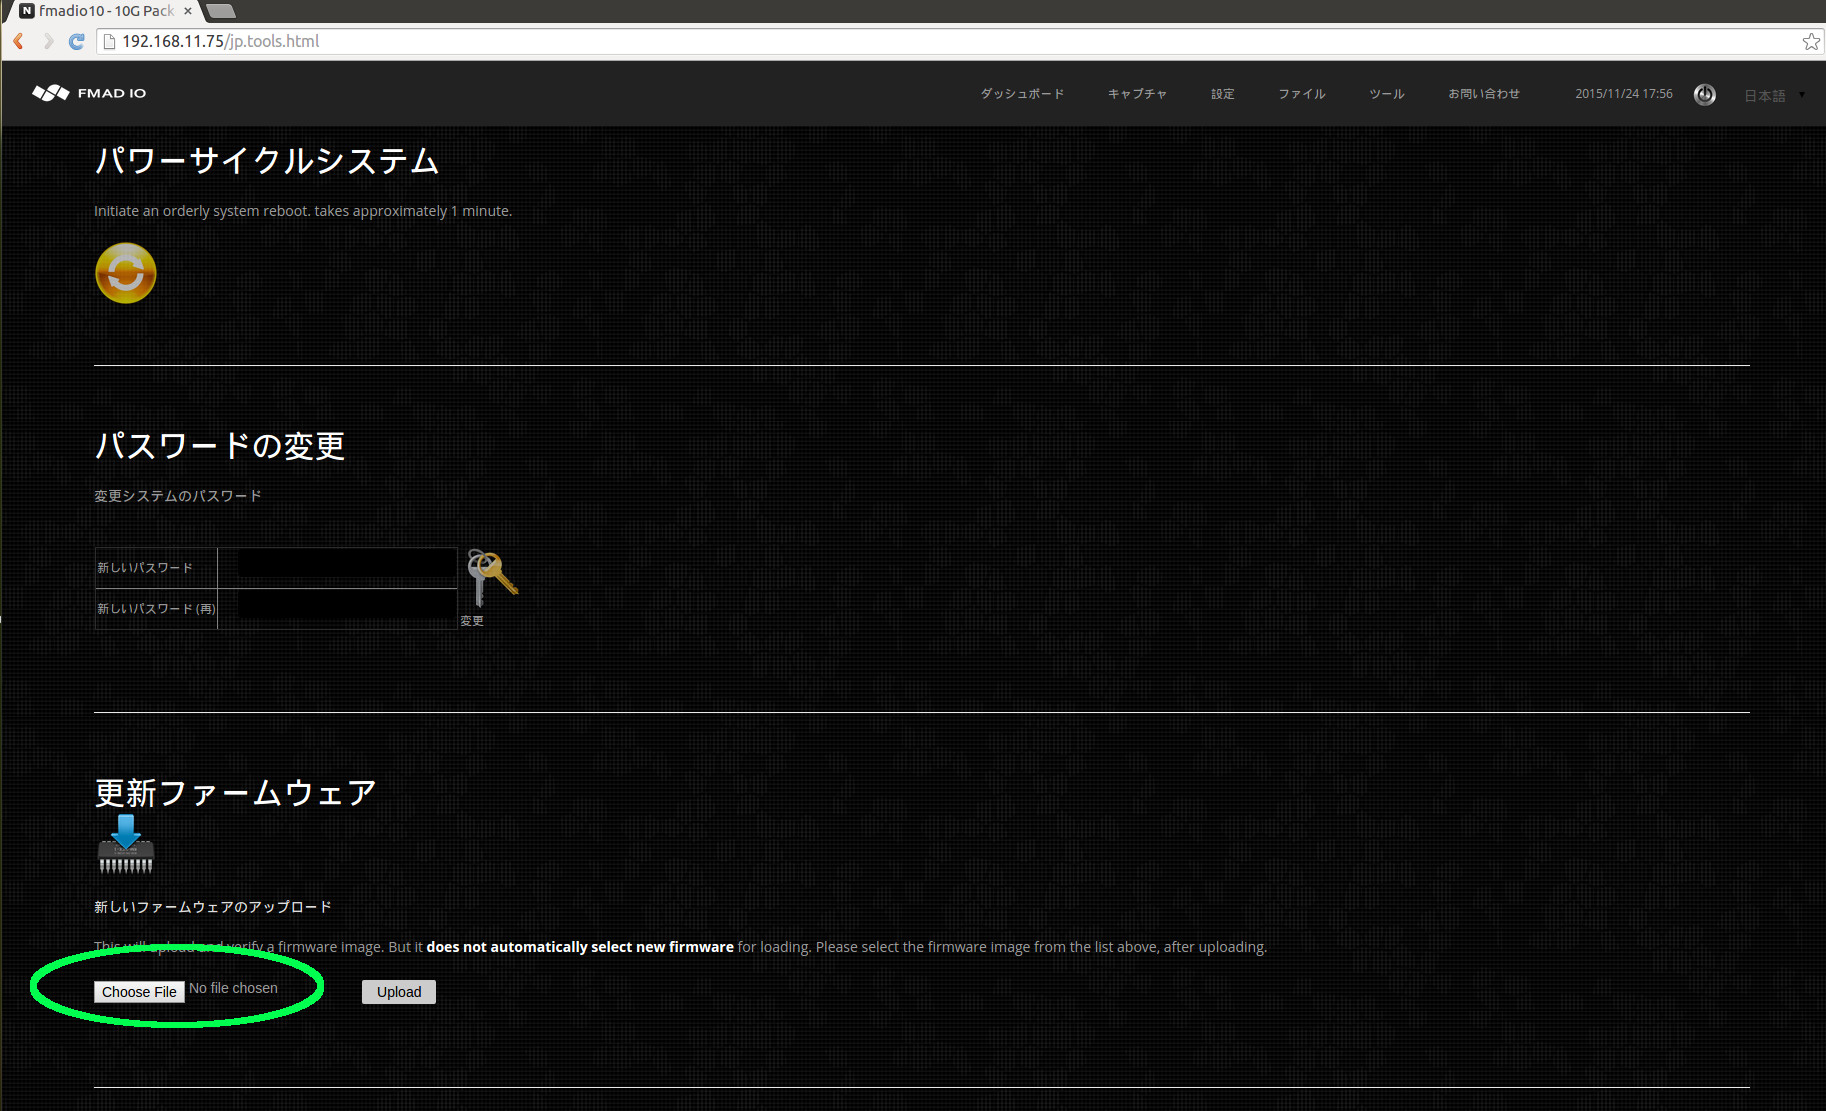
手順3) アップロードのためにファームウェアバイナリを選択してください。
見つけるためにツールページ上でスクロールを下げ、"Choose File "のファームウェアボタンを選択してください(下に緑で印をつけている)。
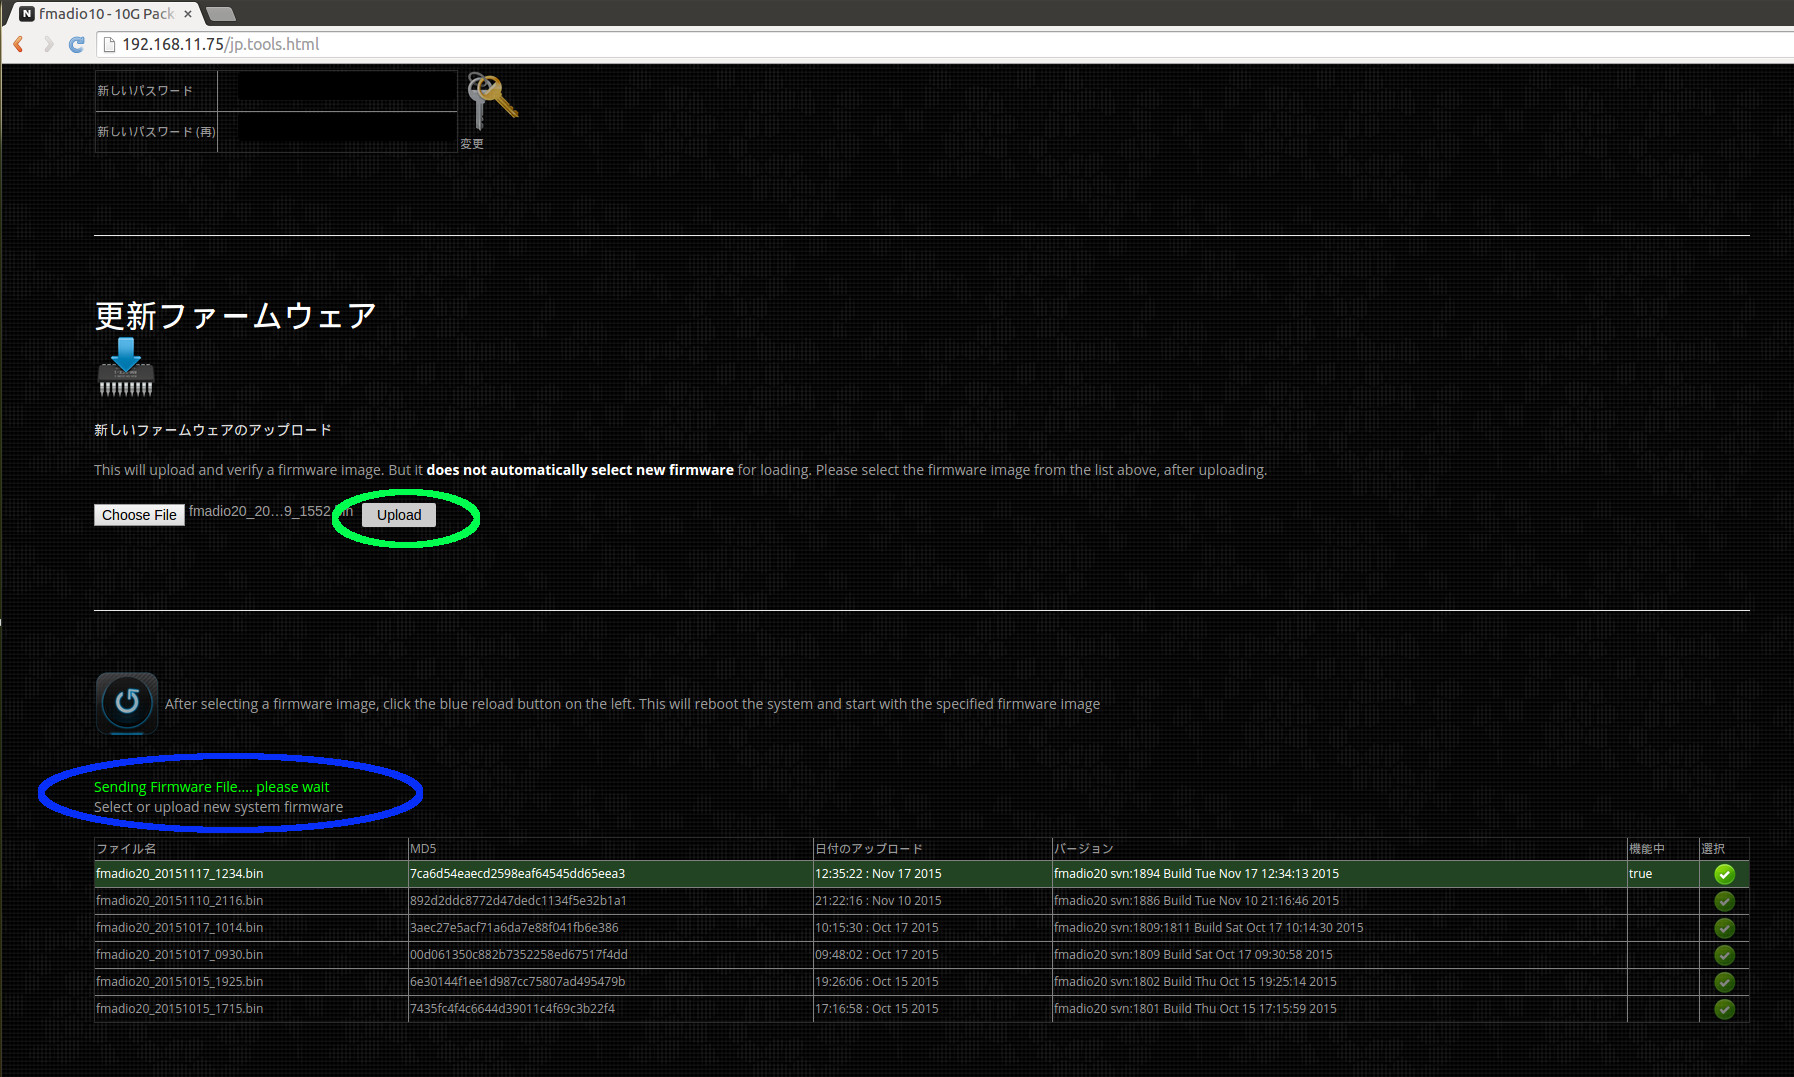
手順4)バイナリのアップロード
適切なファイル(例えば: fmadio10_20150623_1257.bin)を選択した後、キャプチャ装置に転送するためにアップロードボタンをクリックしてください。注:これは、装置上のファームウェアを変更するのではなく、アップロードするだけです。
アップロードのステータスは、以下に青で印をつけています。
手順5) ファームウェアがアップロードされたか確認して下さい。
ファームウェアのアップロードが成功したら、Webページが更新し、下に緑で示したようにファームウェアリストに新しいエントリーが現れます。

手順6) ファームウェアを選択し、再起動してください。
緑のアイコン(以下に緑で印をつけている)をクリックして、新しいファームウェアイメージを選択してください。緑の選択ボタン(印をつけられたままになっている)。
どのファームウェアを使うかを選択した後、システムにアップデートを要求して再起動してください(以下に青で印をつけている)。

手順7)新しいファームウェアを確認してください。
システムが再起動し、再びアクティブになるのに12分かかります。一度システムがオンラインになったら、ブラウザのツールページに行き、現在のアクティブファームウェアイメージが正確にアップロードされ、選択されたものかを確かめてください。
システムのアップデートは簡単でシンプルです。装置は、私たちが絶えずお客様のご要望に基づいて追加の性能を加えていけるように、定期的アップデートの為にデザインされています。これは、Linuxシステムを基にしている標準のRedhat/Ubuntuではありません。非常にカスタマイズされ、 制御された組込みLinuxシステムです。
ネットワークスイッチのシステムがパケットキャプチャをするとして、弊社の装置が機能すると思って下さい。
ホスト名の変更
適切なホスト名をもつことは、サーバー管理を非常に簡単にします。デフォルトによってすべてのシステムは、それぞれ特有に配置された"fmadio-XXX"というホスト名をもっています。ホスト名の変更は次の手順に従うと簡単です。
手順 1) システムにログインしてください
Fmadio10装置の中にあるSSH
$ ssh fmadio@192.168.11.75
fmadio@192.168.11.75's password:
  _____                    .___.__      10G
_/ ____\_____  _____     __| _/|__|  ____
\   __\/     \ \__  \   / __ | |  | /  _ \
 |  | |  Y Y  \ / __ \_/ /_/ | |  |(  <_> )
 |__| |__|_|  /(____  /\____ | |__| \____/
            \/      \/      \/
============================================
  -+ no user serviceable parts inside +-

fmadio@fmadio10-049:~$
手順 2) コンフィグレーションディレクトリに変更してください
fmadio@fmadio10-049:~$ cd /mnt/store0/etc
fmadio@fmadio10-049:/mnt/store0/etc$
手順 3) 現在のホスト名を表示してください
fmadio@fmadio10-049:/mnt/store0/etc$ cat hostname
fmadio10-049
fmadio@fmadio10-049:/mnt/store0/etc$
手順 4) 新しいホスト名を設定してください
お好みのエディターを使うか、ホスト名ファイルの変更のためのコマンドも使えます。例:
fmadio@fmadio10-049:/mnt/store0/etc$ sudo echo "my.new.hostname" > hostname
fmadio@fmadio10-049:/mnt/store0/etc$
手順 5)システムのパワーサイクルを行ってください
変更を有効にするために、システムを再起動してください。
fmadio@fmadio10-049:/mnt/store0/etc$ sudo reboot
fmadio@fmadio10-049:/mnt/store0/etc$ Connection to 192.168.11.75 closed by remote host.
手順 6) 完了
次回ログインするときは、ホスト名は新しくアップデートされた値です。この場合は"my.new.hostname"です。
fmadio@my.new.hostname:/mnt/store0/etc$
RAID5 コンフィグレーション
FMADIO10/20はRAID5コンフィグレーションに12TBとして設定できます。手順は簡単ですが、システムのすべてのデータを破壊しますので、注意が必要です。初期の手順に加えて、RAID5システムはドライブの初期化を完了するのに8時間必要です。この間、システムのパフォーマンスは、低下します。
手順 1) システムにログインしてください
FMADIO装置の中にあるSSH
$ ssh fmadio@192.168.11.75
fmadio@192.168.11.75's password:
  _____                    .___.__      10G
_/ ____\_____  _____     __| _/|__|  ____
\   __\/     \ \__  \   / __ | |  | /  _ \
 |  | |  Y Y  \ / __ \_/ /_/ | |  |(  <_> )
 |__| |__|_|  /(____  /\____ | |__| \____/
            \/      \/      \/
============================================
  -+ no user serviceable parts inside +-

fmadio@fmadio10-049:~$
手順 2) ディスクフォーマットコマンドを出してください
コマンドラインから次のオプションを入力してください。
fmadio@fmadio10-049:~$ cd /opt/fmadio/bin
fmadio@fmadio10-049:/opt/fmadio/bin$ ./format_raid.lua --raid5
fmad fmadlua Aug 11 2015
calibrating...
0 : 00000000d09daaff           3.5000 cycles/nsec
Cycles/Sec 3499993855.0000 Std:       0cycle std(  0.00000000)
loading filename [./format_raid.lua]
done: 0 0
done 3.023745Sec 0.050396Min
fmadio@fmadio10-049:/opt/fmadio/bin$ Connection to 192.168.11.75 closed by remote host.
Connection to 192.168.11.75 closed.
aaron@display0:~$
システムは現状で初期化と再起動を連続して行います。完了するのに約5分かかります。
手順 3) 約5分後、ログインしてRAID5のステータスを確認してください
約5分後、システムは変更を完了しています。そのステータスを確認するために、次の SSHコマンドを作動させてください。
aaron@display0:~$ ssh fmadio@192.168.11.75
fmadio@192.168.11.75's password:
  _____                    .___.__      10G
_/ ____\_____  _____     __| _/|__|  ____
\   __\/     \ \__  \   / __ | |  | /  _ \
 |  | |  Y Y  \ / __ \_/ /_/ | |  |(  <_> )
 |__| |__|_|  /(____  /\____ | |__| \____/
            \/      \/      \/
============================================
  -+ no user serviceable parts inside +-
fmadio@fmadio10-049:~$ sudo mdadm --detail /dev/md0
/dev/md0:
        Version : 1.2
  Creation Time : Wed Aug 12 08:52:10 2015
     Raid Level : raid5
     Array Size : 11720662464 (11177.70 GiB 12001.96 GB)
  Used Dev Size : 3906887488 (3725.90 GiB 4000.65 GB)
   Raid Devices : 4
  Total Devices : 4
    Persistence : Superblock is persistent

  Intent Bitmap : Internal

    Update Time : Wed Aug 12 08:58:46 2015
          State : active, degraded, recovering
 Active Devices : 3
Working Devices : 4
 Failed Devices : 0
  Spare Devices : 1

         Layout : left-symmetric
     Chunk Size : 64K

 Rebuild Status : 0% complete

           Name : fmadio10-049:0  (local to host fmadio10-049)
           UUID : a6d5fc4b:dbb7f274:7918601a:938c8451
         Events : 202

    Number   Major   Minor   RaidDevice State
       0       8      112        0      active sync   /dev/sdh
       1       8       64        1      active sync   /dev/sde
       2       8       96        2      active sync   /dev/sdg
       4       8       80        3      spare rebuilding   /dev/sdf
fmadio@fmadio10-049:~$
上にはアレイを構成し直しているところを示しています。この過程と完了時間についてのよりよい情報を得るために次のファイルをチェックしてください。
fmadio@fmadio10-049:~$ cat /proc/mdstat
Personalities : [raid6] [raid5] [raid4] [raid0]
md1 : active raid0 sdb2[0] sdi2[3] sdd2[2] sdc2[1]
468594688 blocks super 1.2 64k chunks
md0 : active raid5 sdh[0] sdf[4] sdg[2] sde[1]
11720662464 blocks super 1.2 level 5, 64k chunk, algorithm 2 [4/3] [UUU_]
[>....................] recovery = 0.9% (37383872/3906887488) finish=481.4min speed=133952K/sec
bitmap: 1/30 pages [4KB], 65536KB chunk
unused devices:
上の例では、初期化が完成するのに481分、つまり約8時間残っています。
手順 4) Web GUI が再構成しているか確認してください
RAID5アレイが再構成しているか確認するために、ダッシュボードページにブラウザを移動させてください。
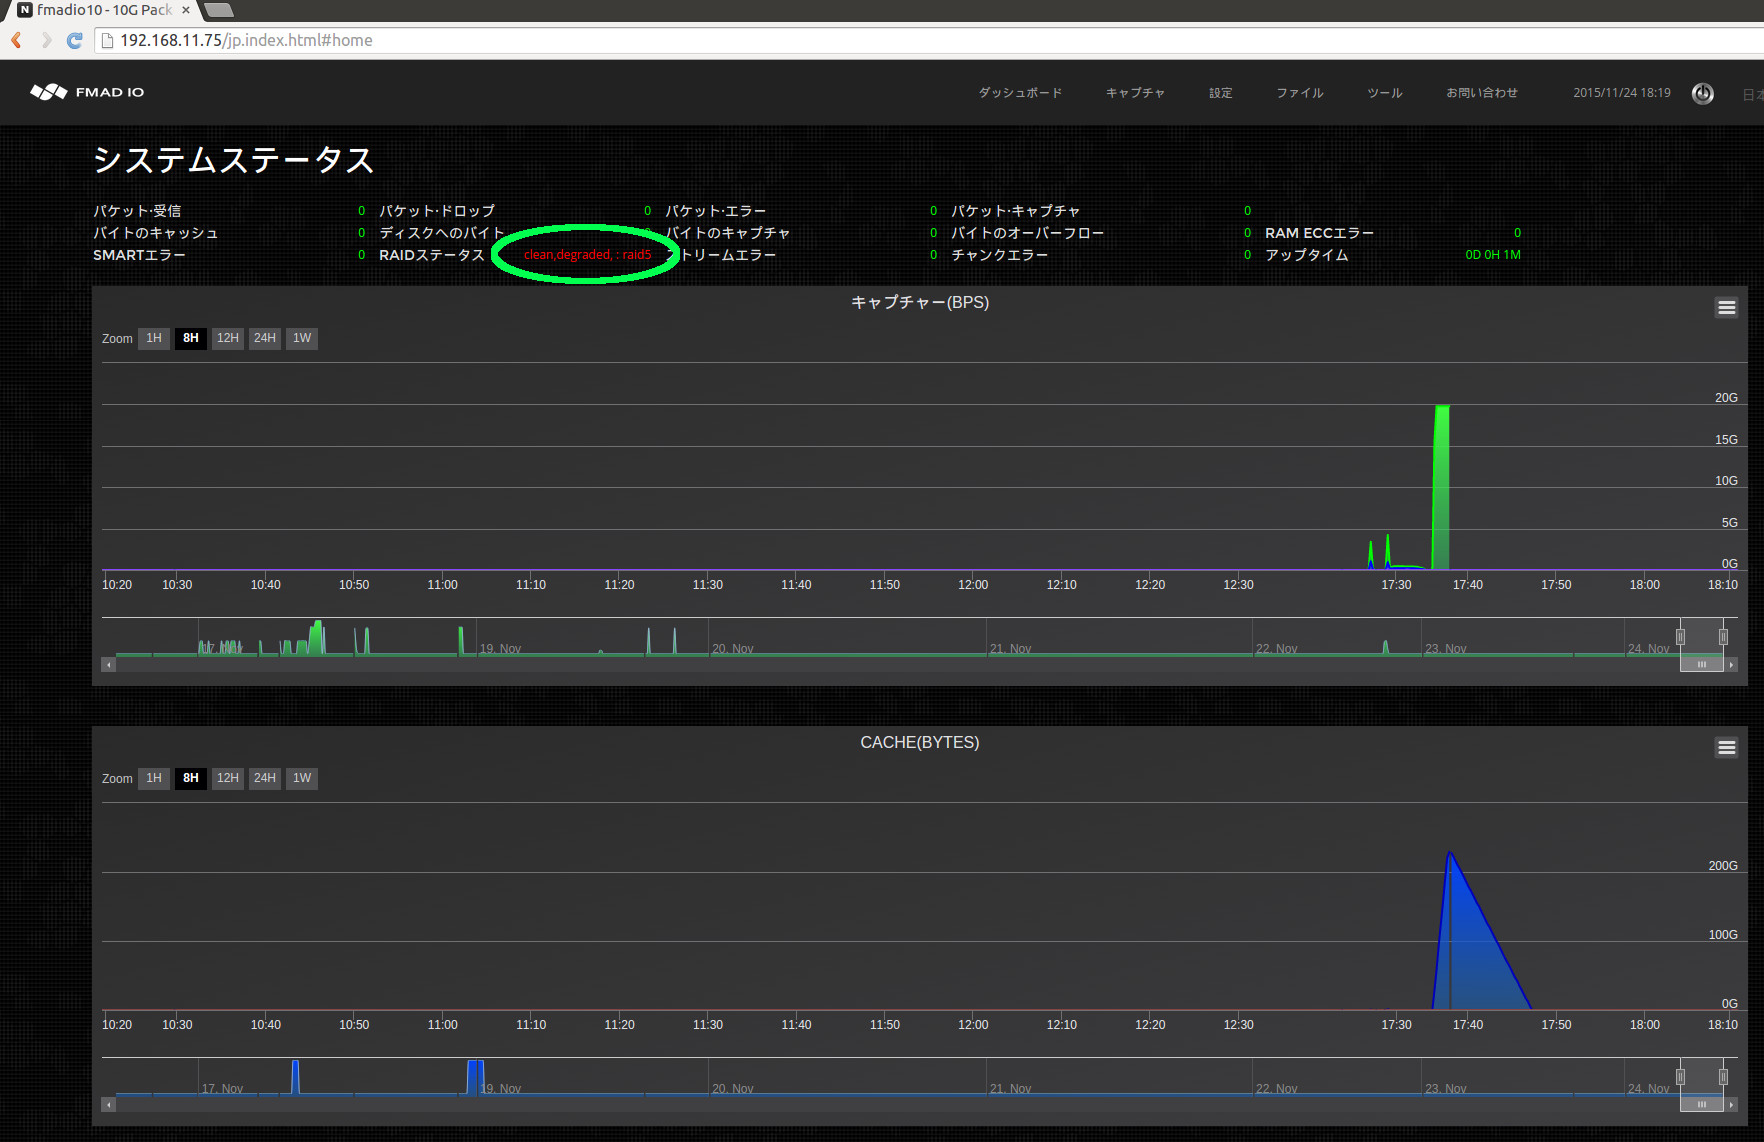
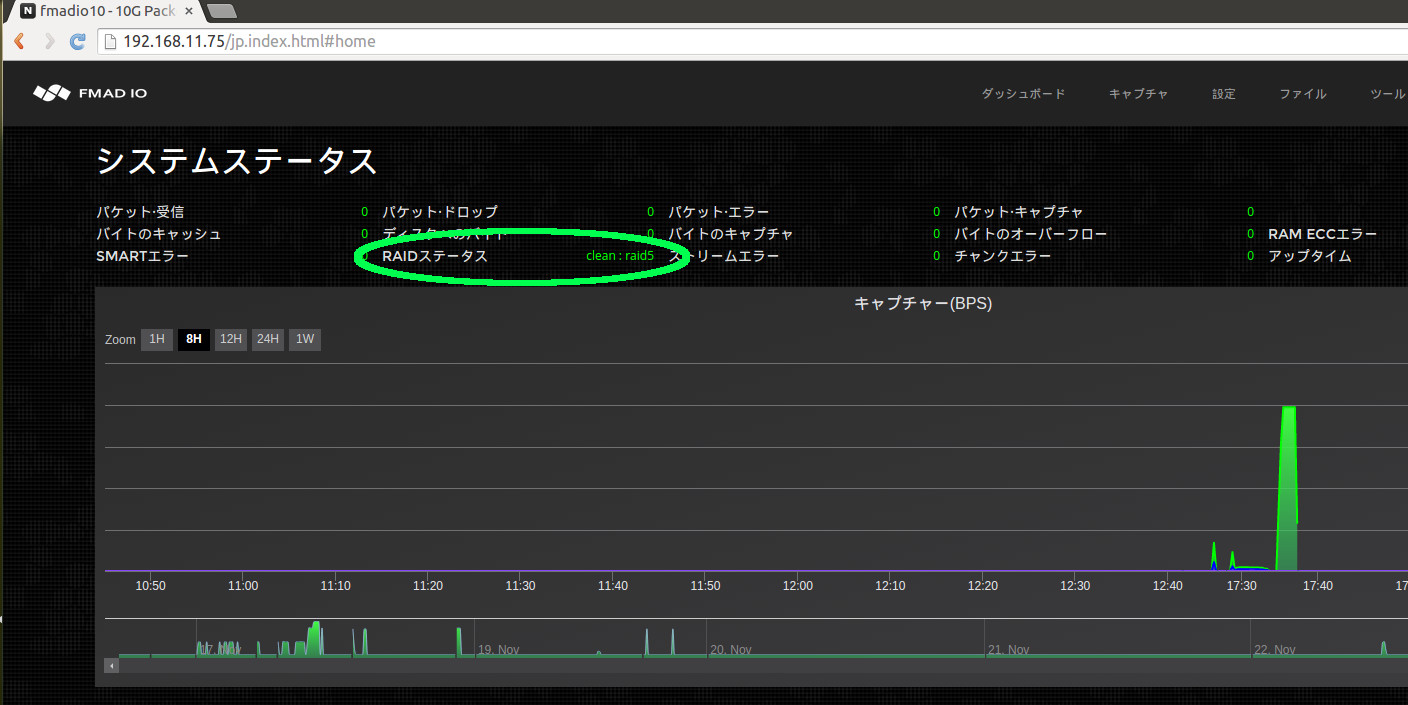
上の画像はディグレードされ、再構成されているRAIDステータスを示しています。これが完了するのに約8時間かかります。
手順 5) Web GUIファイルシステムを確認してください
すべてのキャプチャ一覧を表示するために、"Files"ブラウザタブをクリックしてください。キャプチャは一つもないはずで、ちょうどファイルシステムがフォーマットされたところです。

手順 6) RAID5の再構成が完了するまで待ってください
約8時間後、RAID5ファイルシステムは完全に再構成されています。再構成がうまく成功しているか確認するために、下の"Clean" RAIDステータス(緑で印をつけている)が RAID5ファイルシステムがうまく再構成されたことを示していて、作動準備ができています。
手順 7) 完了
システムは現状で全キャプチャのワークロードの準備ができています。
RAID0 コンフィグレーション
FMADIO10/20はRAID0コンフィグレーションに16TBとして設定できます。RAID0の第一の利点は大きなディスク領域と高いパフォーマンスにあります。しかしながら、たった一つのディスク破損でデータ損失に至ります。次の手順がRAID0のシステムの設定方法を示しています。 アレイの再構成は必要ありませんし、すぐに使用できます。
手順 1) システムにログインしてください
FMADIO装置の中にあるSSH
$ ssh fmadio@192.168.11.75
fmadio@192.168.11.75's password:
  _____                    .___.__      10G
_/ ____\_____  _____     __| _/|__|  ____
\   __\/     \ \__  \   / __ | |  | /  _ \
 |  | |  Y Y  \ / __ \_/ /_/ | |  |(  <_> )
 |__| |__|_|  /(____  /\____ | |__| \____/
            \/      \/      \/
============================================
  -+ no user serviceable parts inside +-

fmadio@fmadio10-049:~$
手順 2) RAID0ディスクフォーマットコマンドを出してください
コマンドラインから次のオプションを入力してください。
fmadio@fmadio10-049:~$ cd /opt/fmadio/bin/
fmadio@fmadio10-049:/opt/fmadio/bin$ ./format_raid.lua  --raid0
fmad fmadlua Aug 11 2015
calibrating...
0 : 00000000d09da89a           3.5000 cycles/nsec
Cycles/Sec 3499993242.0000 Std:       0cycle std(  0.00000000)
loading filename [./format_raid.lua]
done: 0 0
done 3.116626Sec 0.051944Min
fmadio@fmadio10-049:/opt/fmadio/bin$ Connection to 192.168.11.75 closed by remote host.
Connection to 192.168.11.75 closed.
aaron@display0:~$
システムは現状でシステムの初期化と再起動を連続して行います。これが完了するのに約5分かかります。
手順 3) 約5分後、ログインして、RAID0の初期化が完了しているか確認してください
約5分後、システムは変更を完了しています。そのステータスを確認するために、次のSSHコマンドを作動させてください。
aaron@display0:~$ ssh fmadio@192.168.11.75
fmadio@192.168.11.75's password:
X11 forwarding request failed on channel 0
  _____                    .___.__      10G
_/ ____\_____  _____     __| _/|__|  ____
\   __\/     \ \__  \   / __ | |  | /  _ \
 |  | |  Y Y  \ / __ \_/ /_/ | |  |(  <_> )
 |__| |__|_|  /(____  /\____ | |__| \____/
            \/      \/      \/
============================================
  -+ no user serviceable parts inside +-
fmadio@fmadio10-049:~$ sudo mdadm --detail /dev/md0
/dev/md0:
        Version : 1.2
  Creation Time : Wed Aug 12 09:39:50 2015
     Raid Level : raid0
     Array Size : 15627549952 (14903.59 GiB 16002.61 GB)
   Raid Devices : 4
  Total Devices : 4
    Persistence : Superblock is persistent

    Update Time : Wed Aug 12 09:39:50 2015
          State : clean
 Active Devices : 4
Working Devices : 4
 Failed Devices : 0
  Spare Devices : 0

     Chunk Size : 64K

           Name : fmadio10-049:0  (local to host fmadio10-049)
           UUID : 42d3cf0d:92b4e95c:1cee3e93:fdd2558b
         Events : 0

    Number   Major   Minor   RaidDevice State
       0       8      112        0      active sync   /dev/sdh
       1       8       64        1      active sync   /dev/sde
       2       8       96        2      active sync   /dev/sdg
       3       8       80        3      active sync   /dev/sdf
fmadio@fmadio10-049:~$
手順 4) Web GUI RAIDステータスがCLEANであるか確かめてください
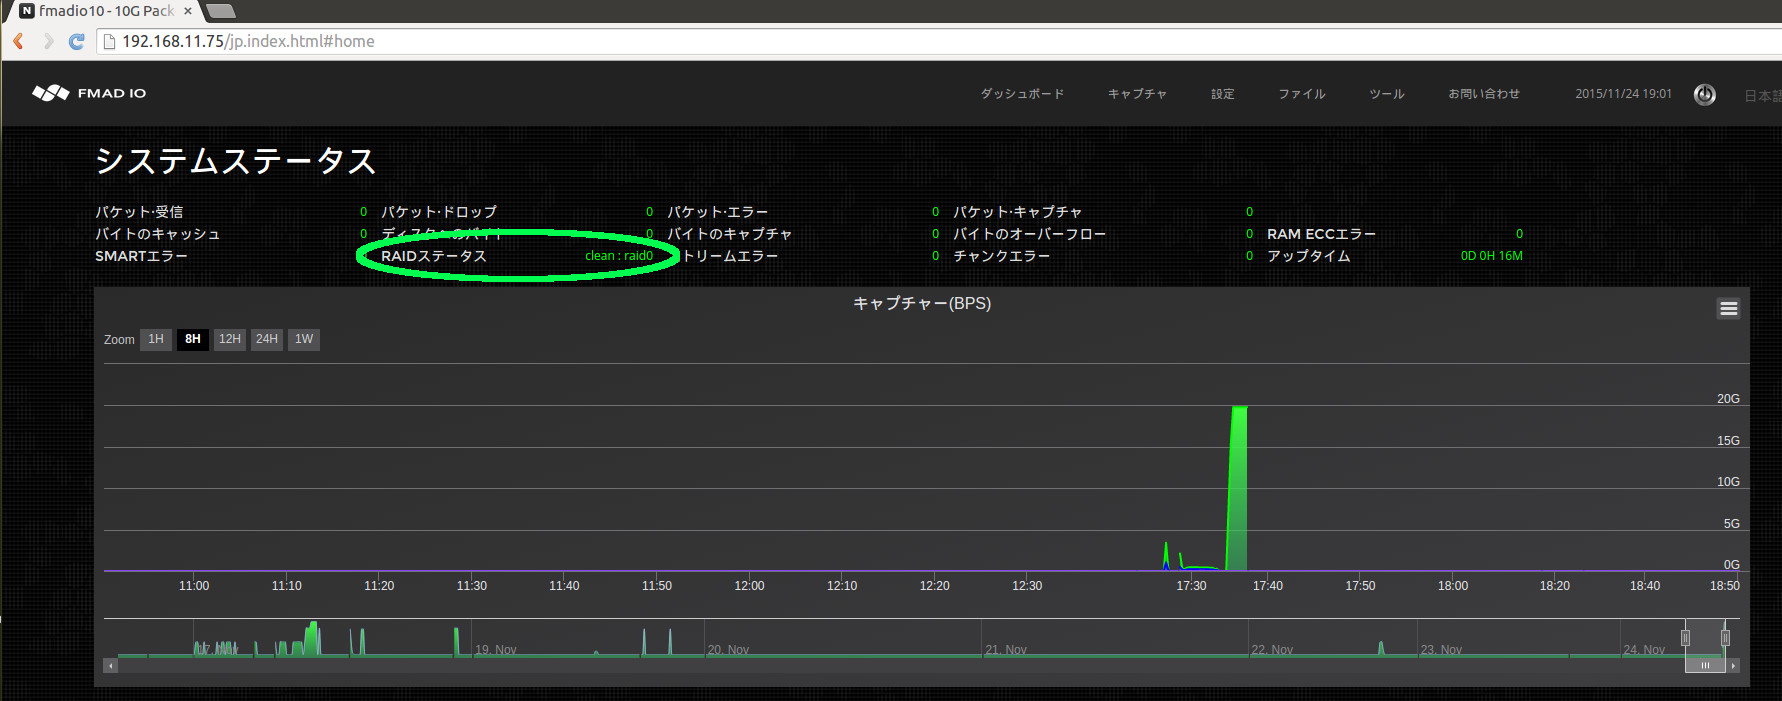
RAID0アレイがクリーンであるか (緑で印をつけている)確認するために、ブラウザをダッシュボードページに移動させてください。
手順 5) Web GUIファイルシステムを確認してください
すべてのキャプチャを列挙するために、"Files"ブラウザタブをクリックしてください。クリックすると、キャプチャは一つもないはずで、ファイルシステムがフォーマットされたところです。

手順 6) 完了
システムは現状で全キャプチャのワークロードの準備ができています。
iSCSI Storage
Standard FMAD10/20 systems can use up to 300TB of remote iSCSI target storage for long term packet capture. By default All systems are configured to utilize the local 16TB of 3.5" HDD storage in RAID0 or RAID5. This section describes how to configure a remote iSCSI backend storage device.
Step 1) Navigate to the Config page
Click on the "CONFIG" menu bar at the top of the screen as shown in green below.
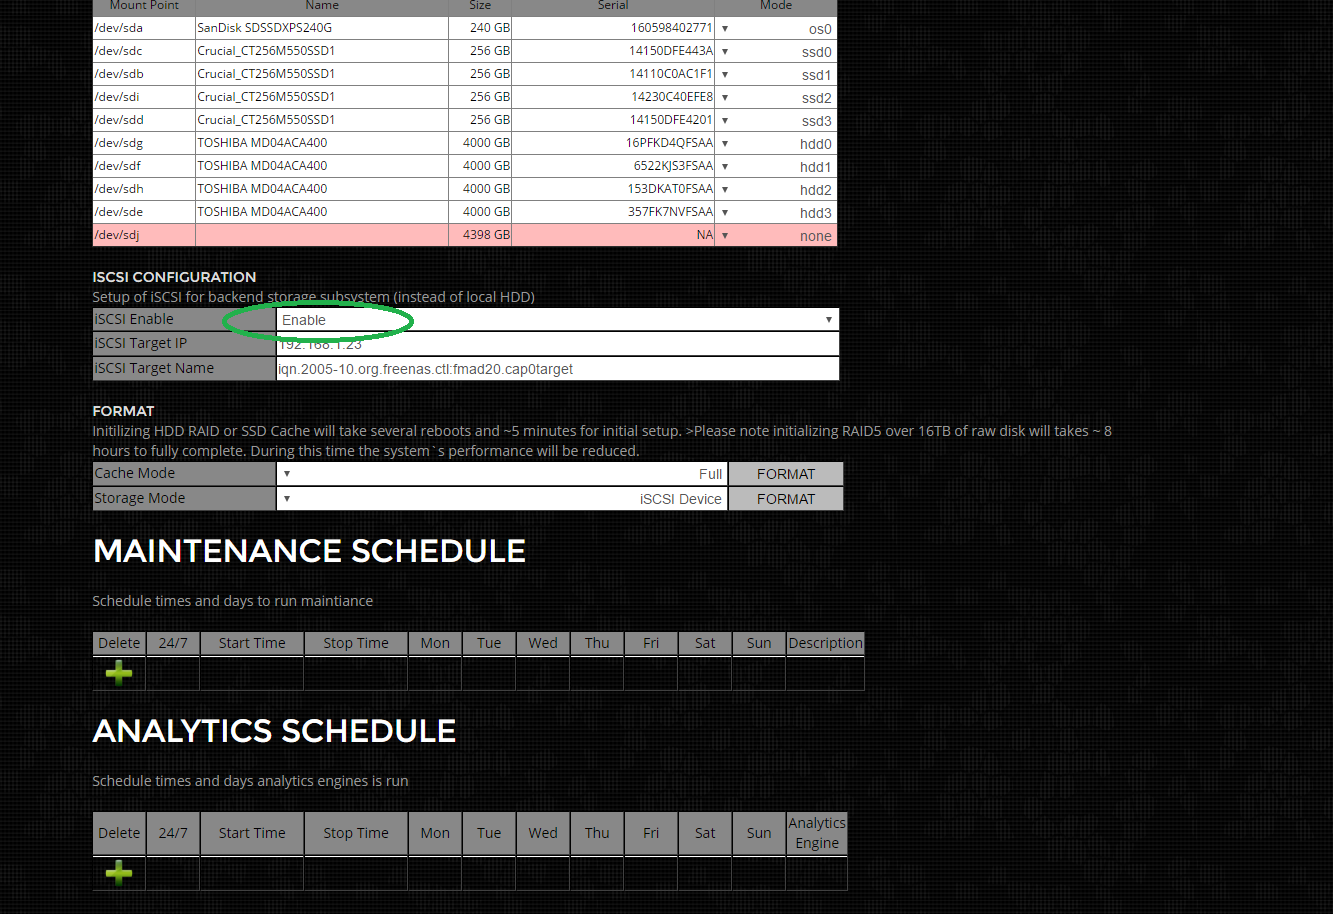
Step 2) Enable iSCSI Backend
Select "Enable" from the drop down menu as highlighted in green
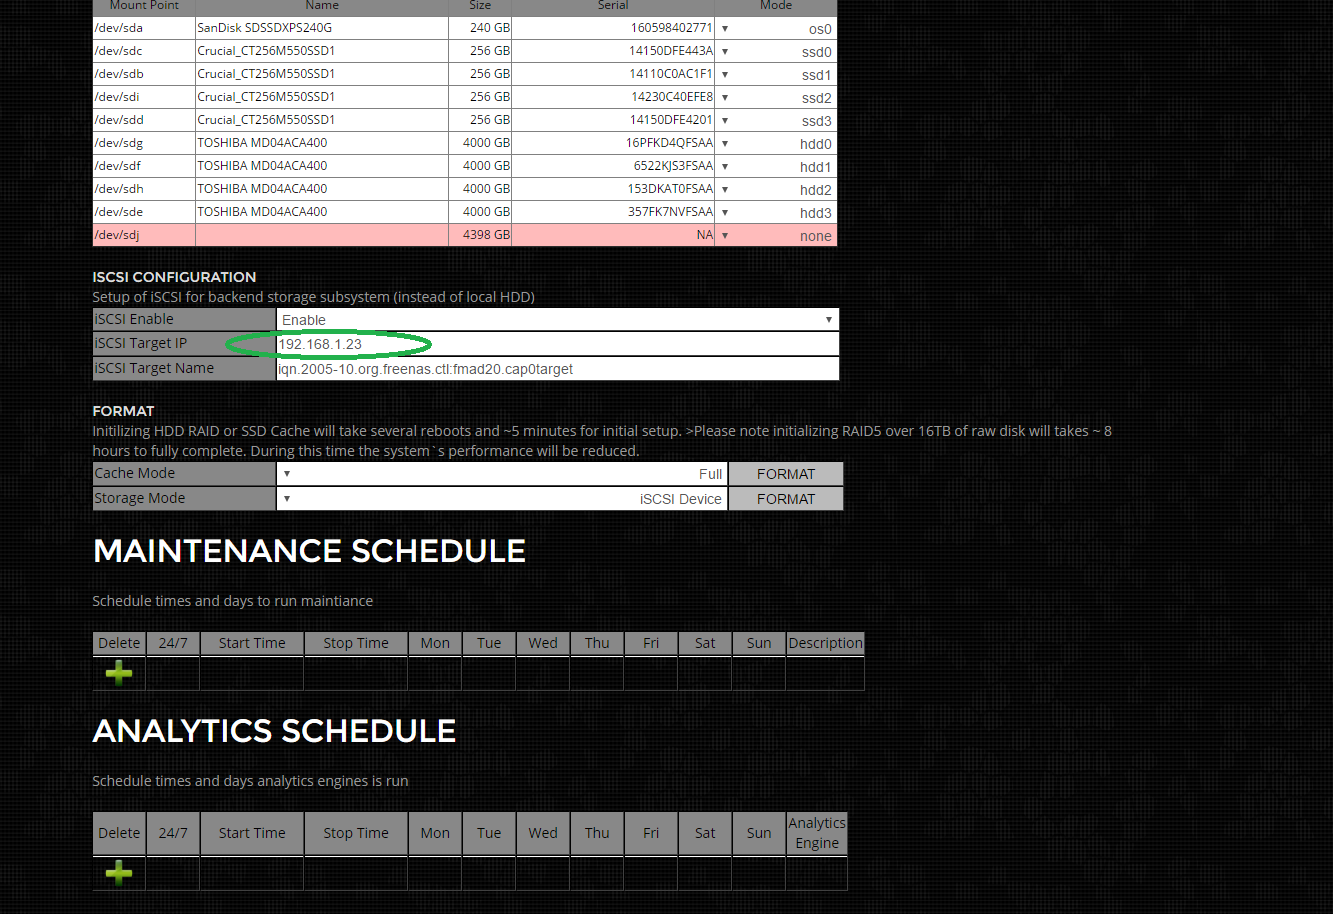
Step 3) Set iSCSI Target`s IP Address
Enter the full IP address of the iSCSI target device
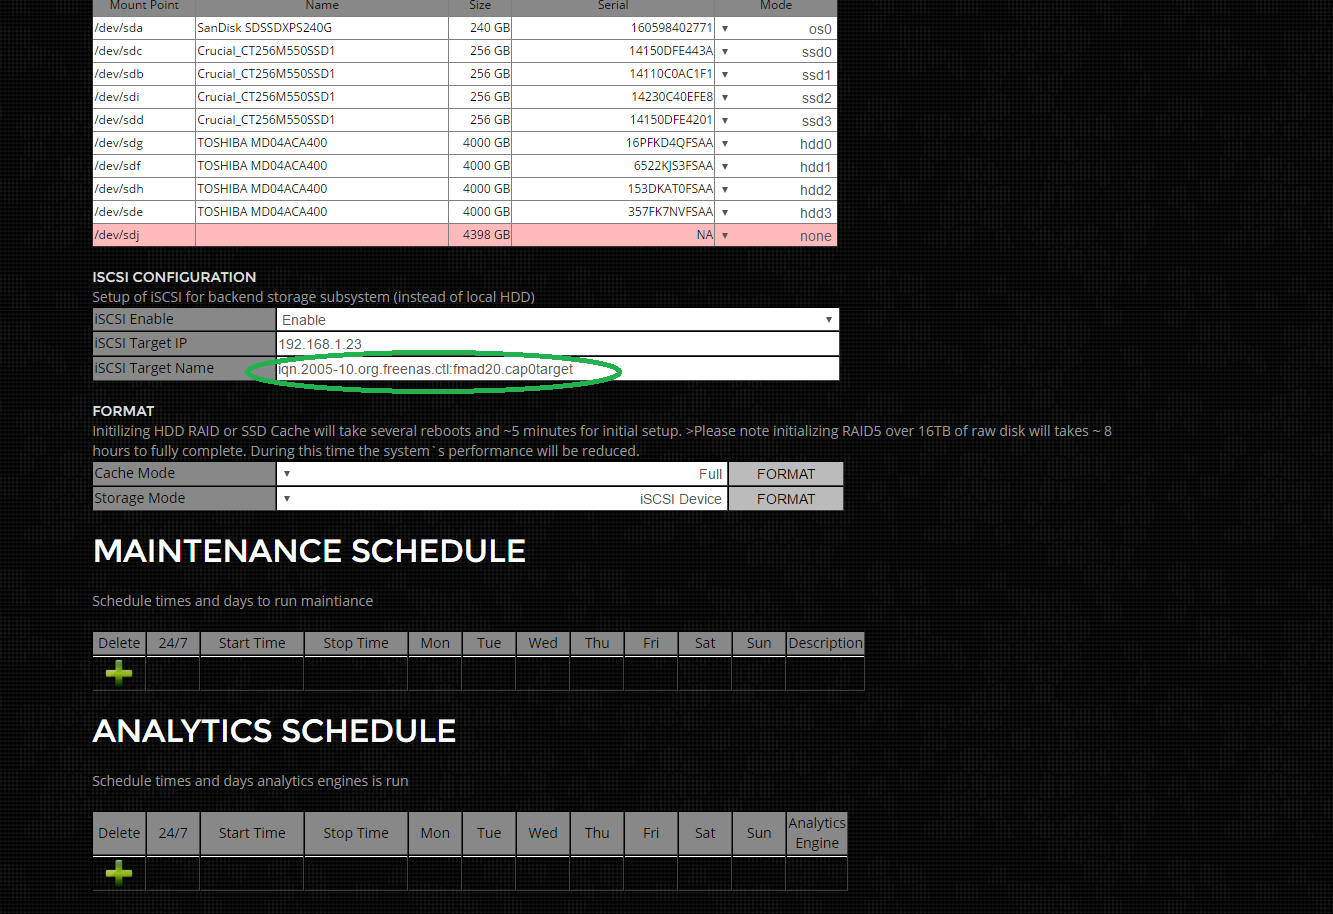
Step 4) Set iSCSI Target Name
Enter the full iSCSI Target name, as highlighted in green below
Step 5) Format iSCSI Target Storage
Now need to re-format the storage system to utilize the iSCSI target. This is an un-recoverable operation that destroys all previous capture data on the system. THIS IS AN UNRECOVERABLE OPERATION. Start by selecting "iSCSI" from the Storage Mode menu as highlighted in green below.
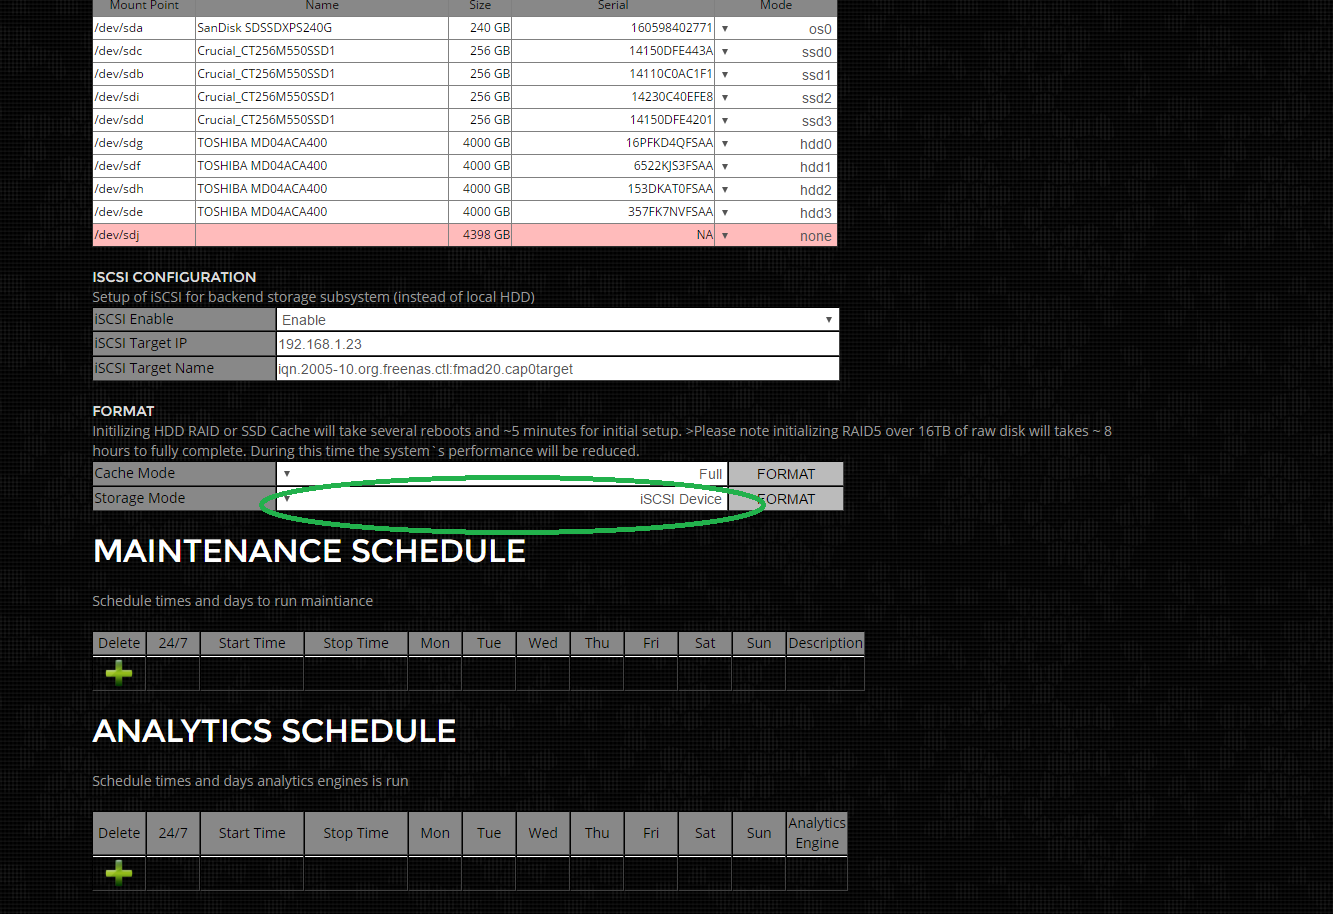
Then click on the FORMAT button next to it. This will prompt with a confirmation dialog box and then a system message. This operation reboots the systems multiple times during storage initialization. It can take 5-30min depending on the size of the iSCSI Target device.
SNMP Setup with NAGIOS
Nagios XI is an excellent and popular system monitoring software used extensively thought the IT industry. Its extremely flexible and all FMAD devices now have full support. To setup and install FMAD device into NAGIOS follow the following steps.
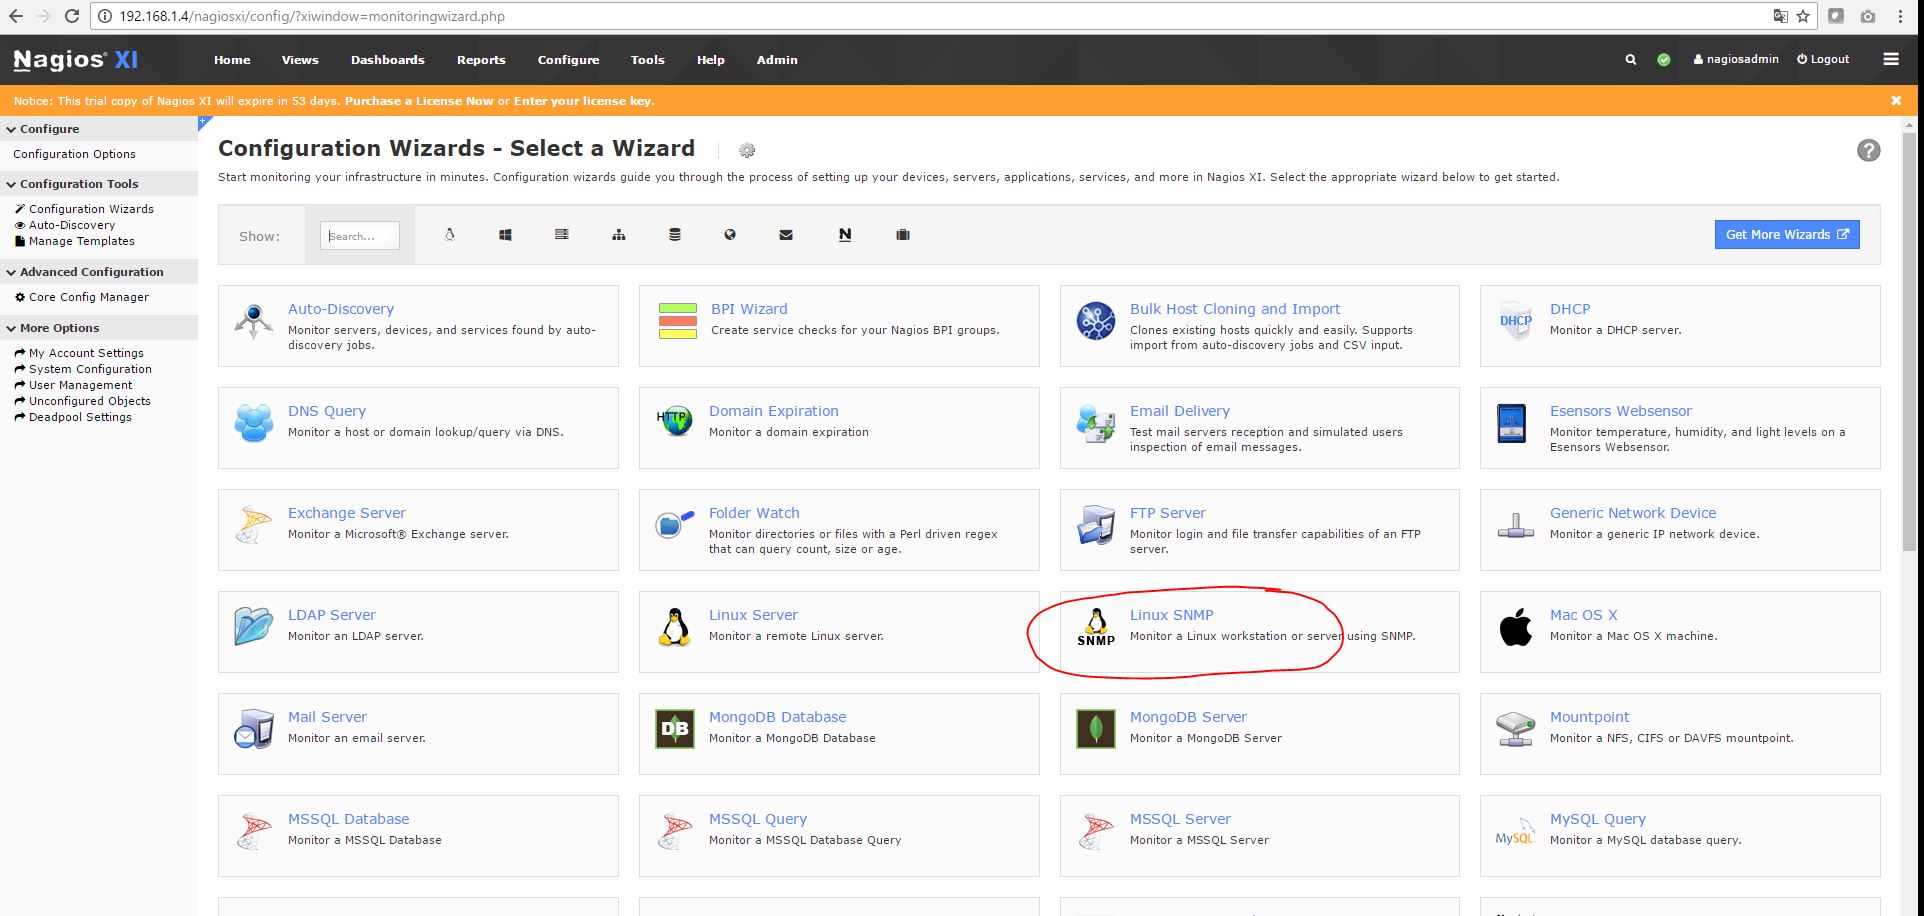
1) Install the basic Linux SNMP target as shown in red below. Use all the default settings.
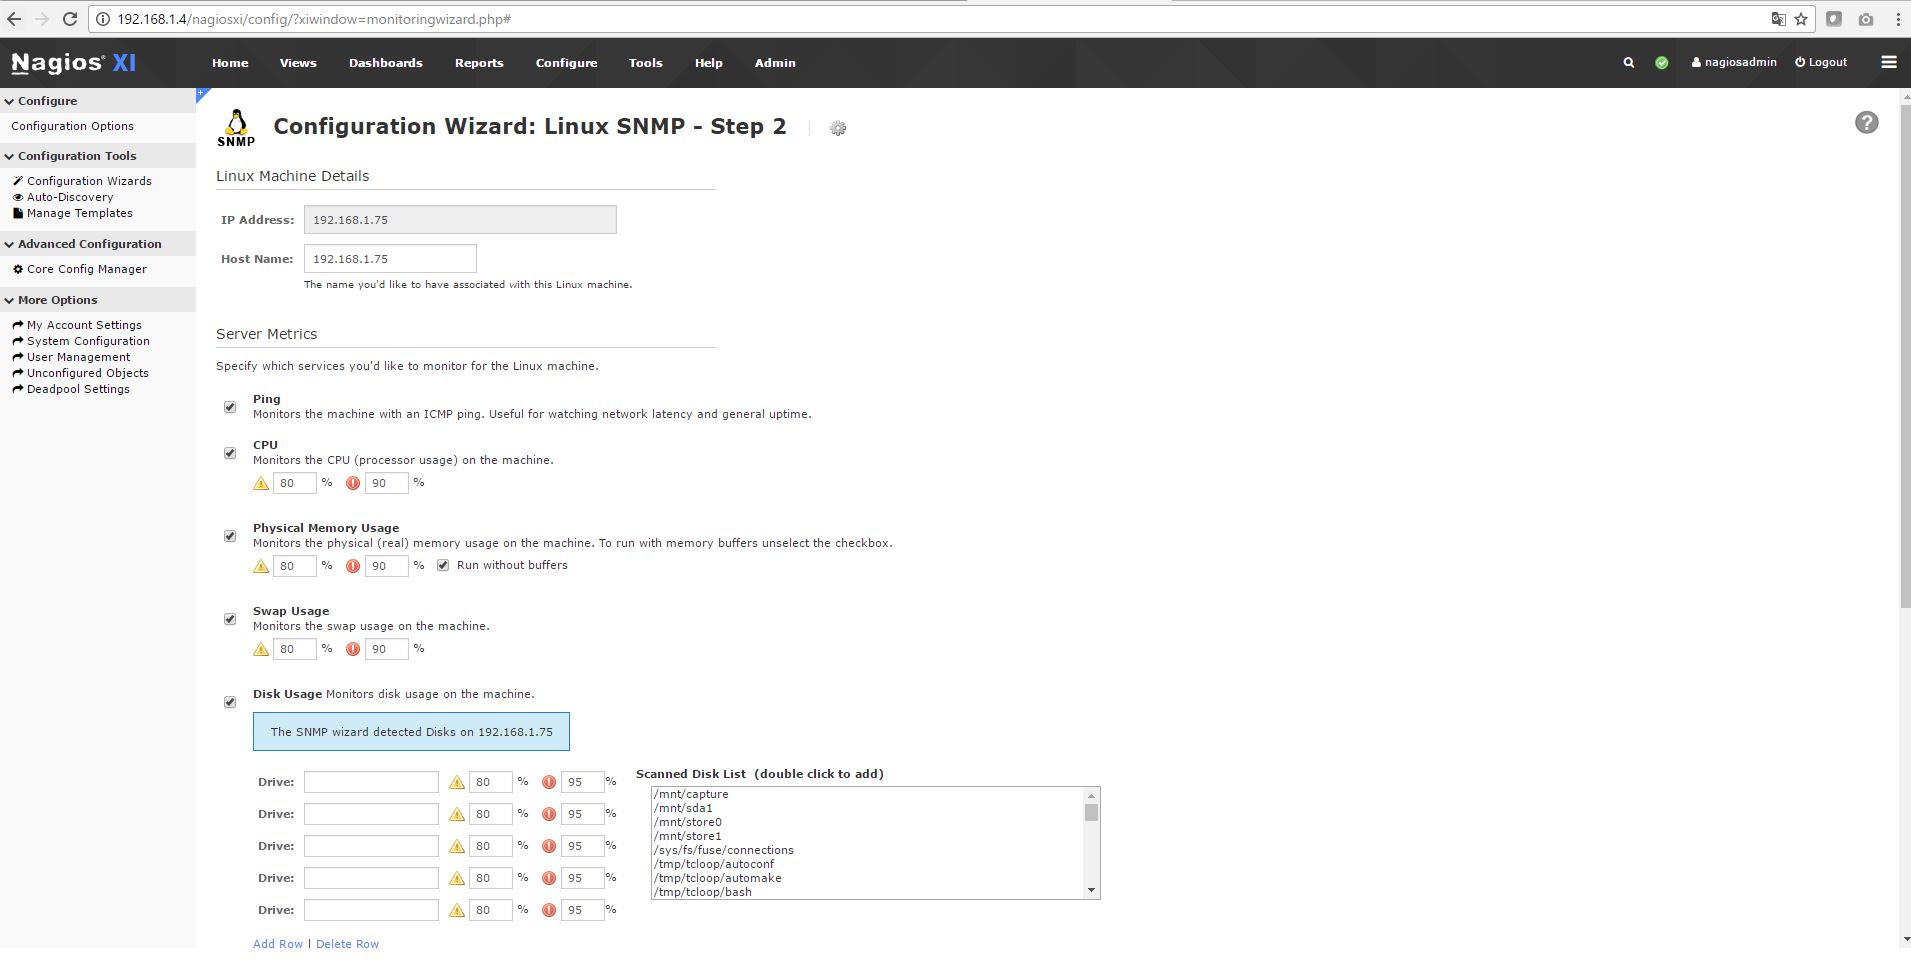
2) Enter FMAD management port IP address (as shown in Red)
This sets up basic Linux SNMP monitoring.

3) Continue and finish using the default settings

4) Generate custom Nagios FMAD configuration file
Generate a Nustom nagios services configuration file, or replace the IP/name of the checked in file.
Generator script is located here:
https://github.com/fmadio/fmadio_scripts/blob/master/snmp/nagios_xi_service_gen.lua
Example usage is as follows:
$ ./nagios_xi_service_gen.lua  --host 192.168.1.75 --fmad20-1u-16t
--host
--fmad20-1u-16t
Generating for [fmadio20] at host [192.168.1.75]
$
There will now be a nagios services configuration file in the local directory. In this case "192.168.1.75.cfg"
OR
Modify the checked in file, and rename all the IP address. Example services config file:
https://github.com/fmadio/fmadio_scripts/blob/master/snmp/192.168.1.75.cfg
$ ls -al
total 116
drwxrwxr-x 2 aaron aaron  4096 11月 24 02:42 .
drwxrwxr-x 4 aaron aaron  4096 11月 22 09:42 ..
-rw-rw-r-- 1 aaron aaron 70709 11月 24 02:42 192.168.1.75.cfg
-rwxrwxr-x 1 aaron aaron 23765 11月 22 09:42 FMADIO-MIB.txt
-rwxrwxr-x 1 aaron aaron  9704 11月 24 02:42 nagios_xi_service_gen.lua
5) Copy services file to nagios server
On the nagios server there is a list of service configuration files.
[root@localhost services]# pwd
/usr/local/nagios/etc/services
[root@localhost services]# ls -al
total 140
drwsrwsr-x 2 apache nagios  4096 Nov 20 14:27 .
drwsrwsr-x 7 apache nagios  4096 Nov 17 22:48 ..
-rw-rw-r-- 1 apache nagios 70709 Nov 19 00:33 192.168.1.75.cfg
-rw-rw-r-- 1 apache nagios  3118 Nov  2 04:07 localhost.cfg
[root@localhost services]#
scp and overwrite the current IP.cfg file with the one generated above
$ scp 192.168.1.75.cfg  root@192.168.1.4:/usr/local/nagios/etc/services/
root@192.168.1.4's password:
192.168.1.75.cfg
$
6) Reload the Nagios configuration
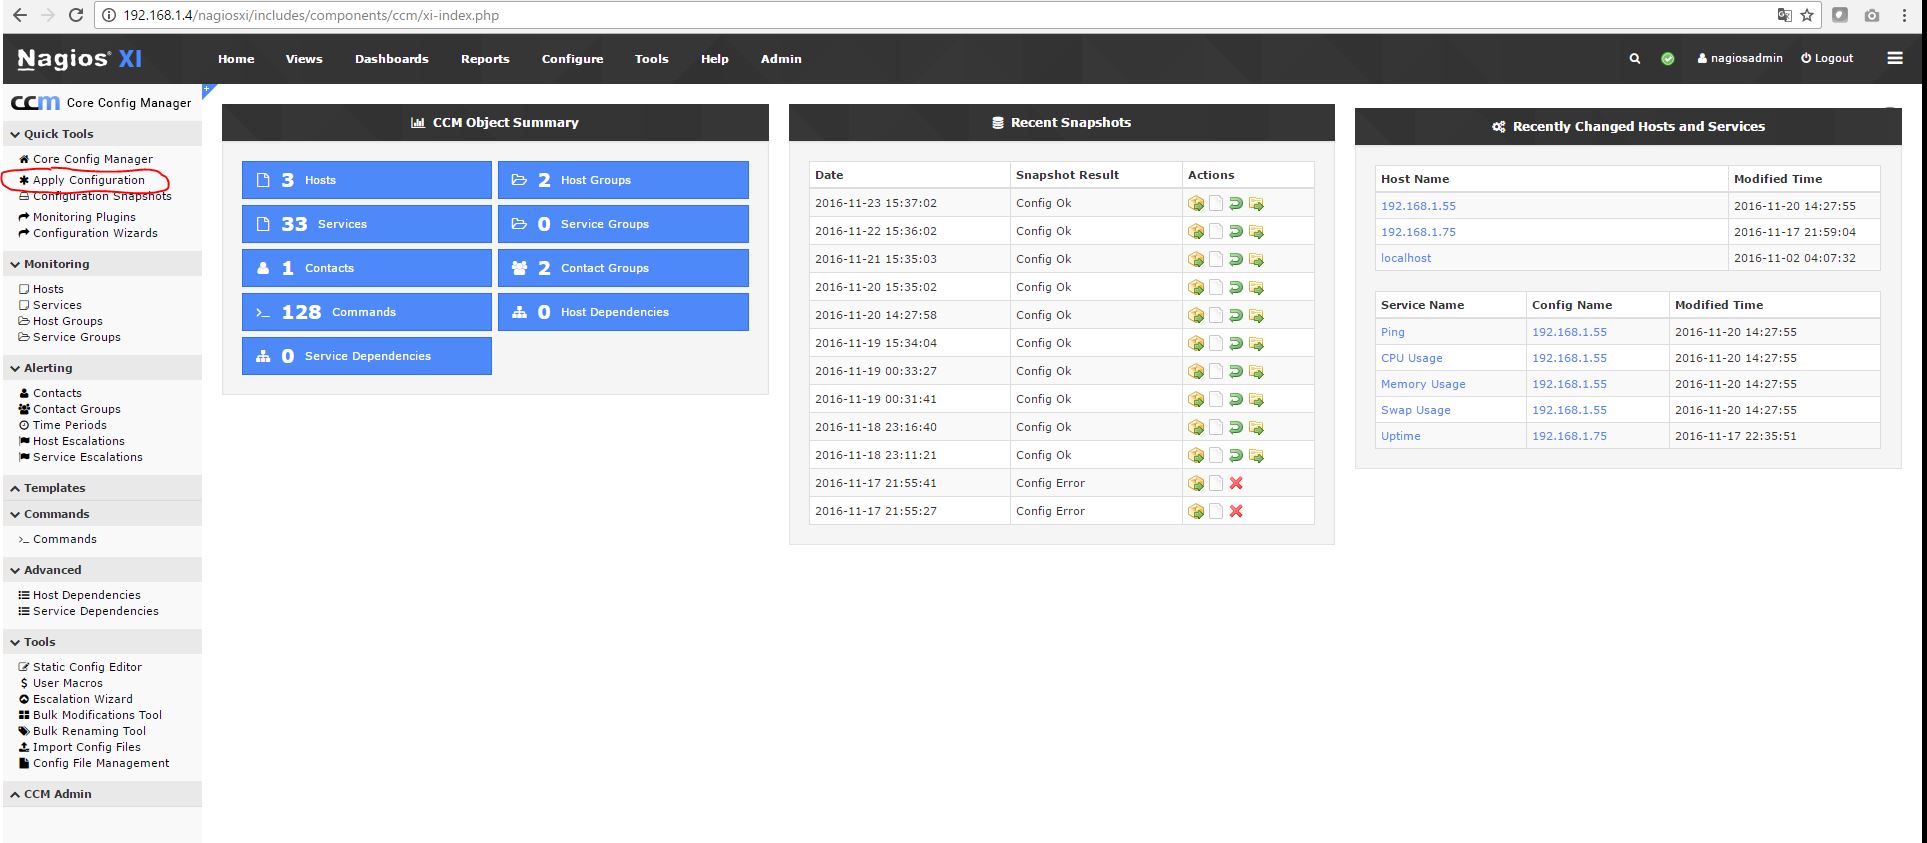
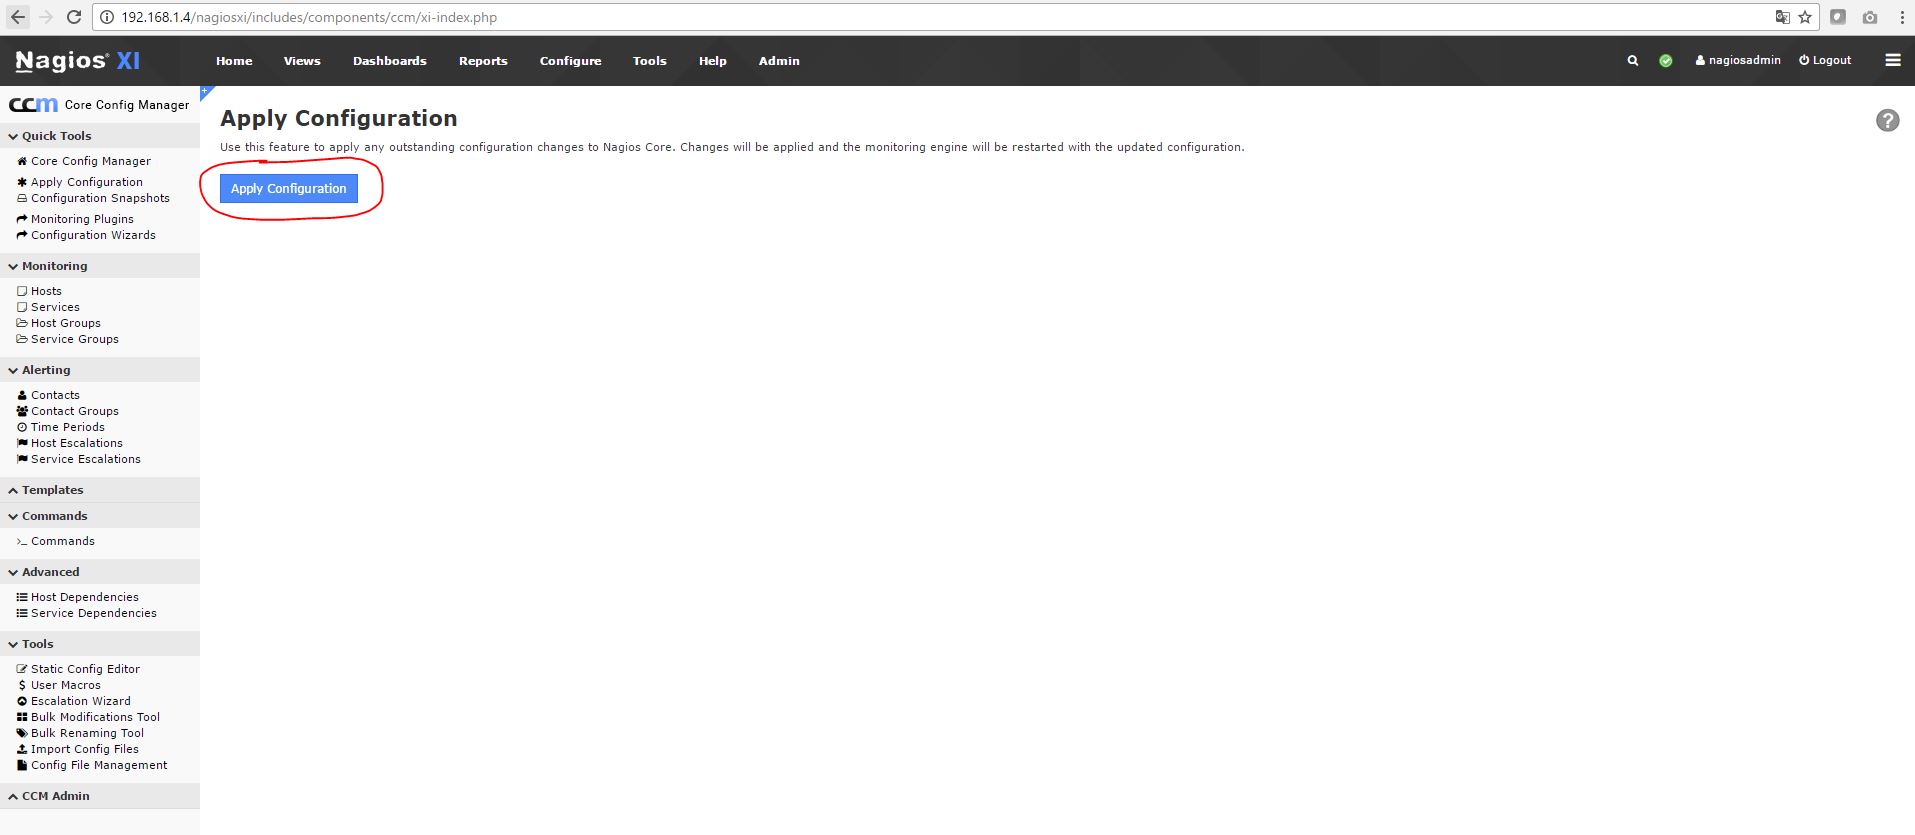
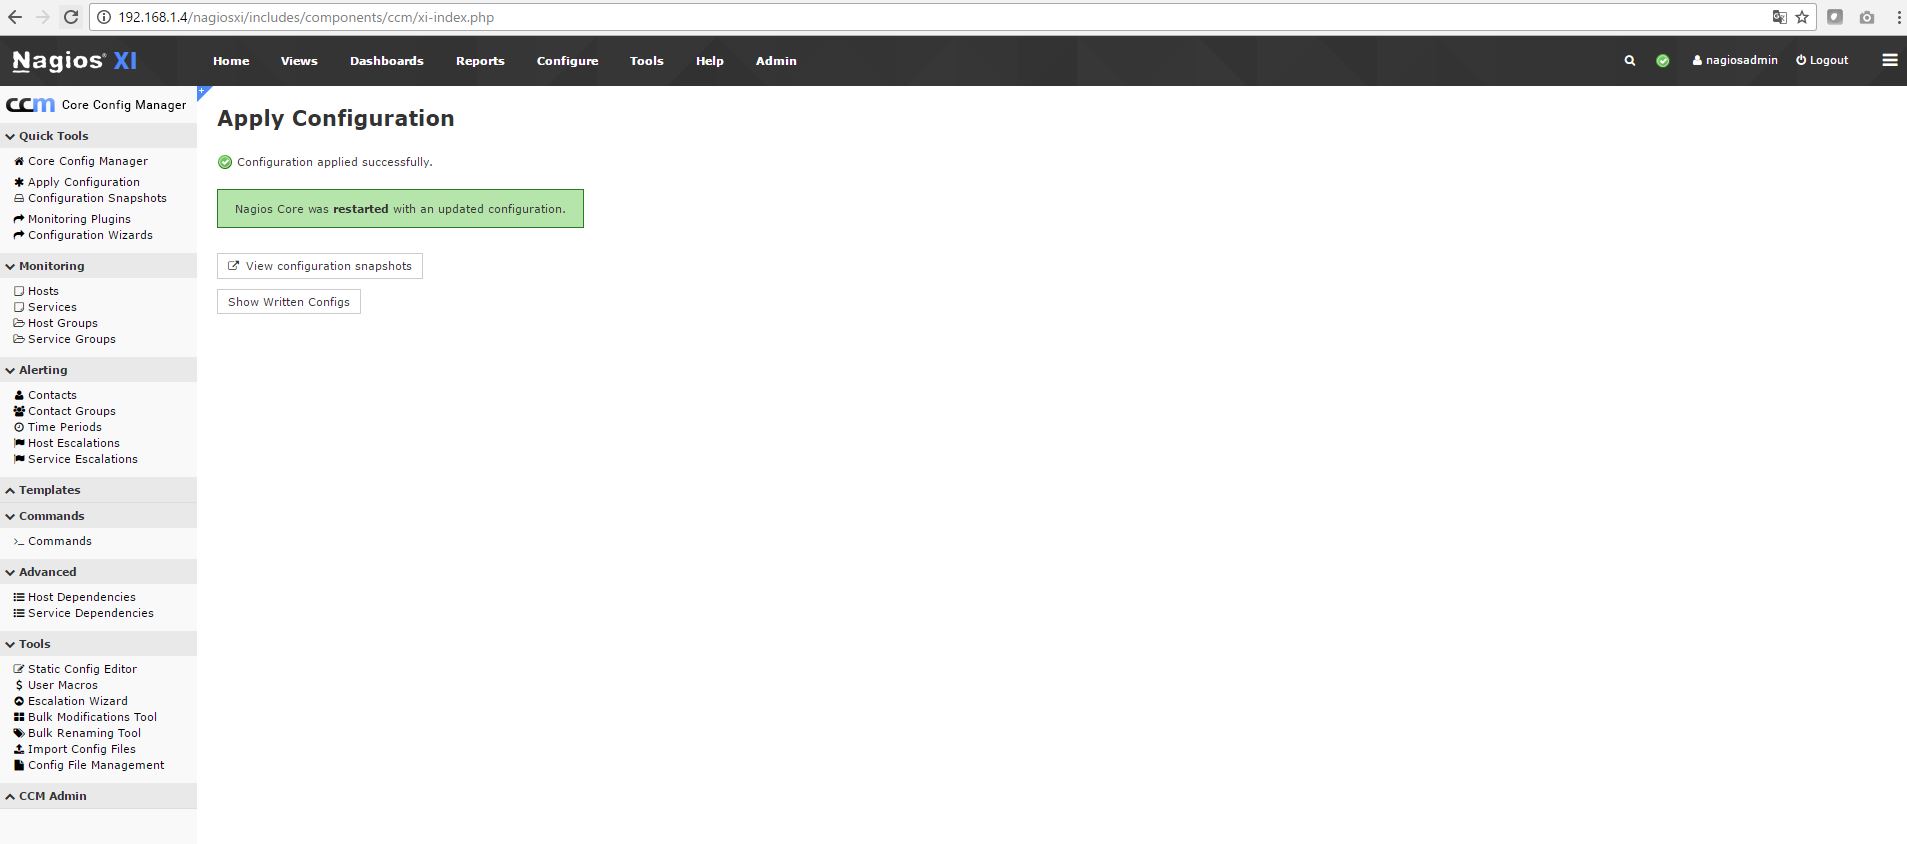
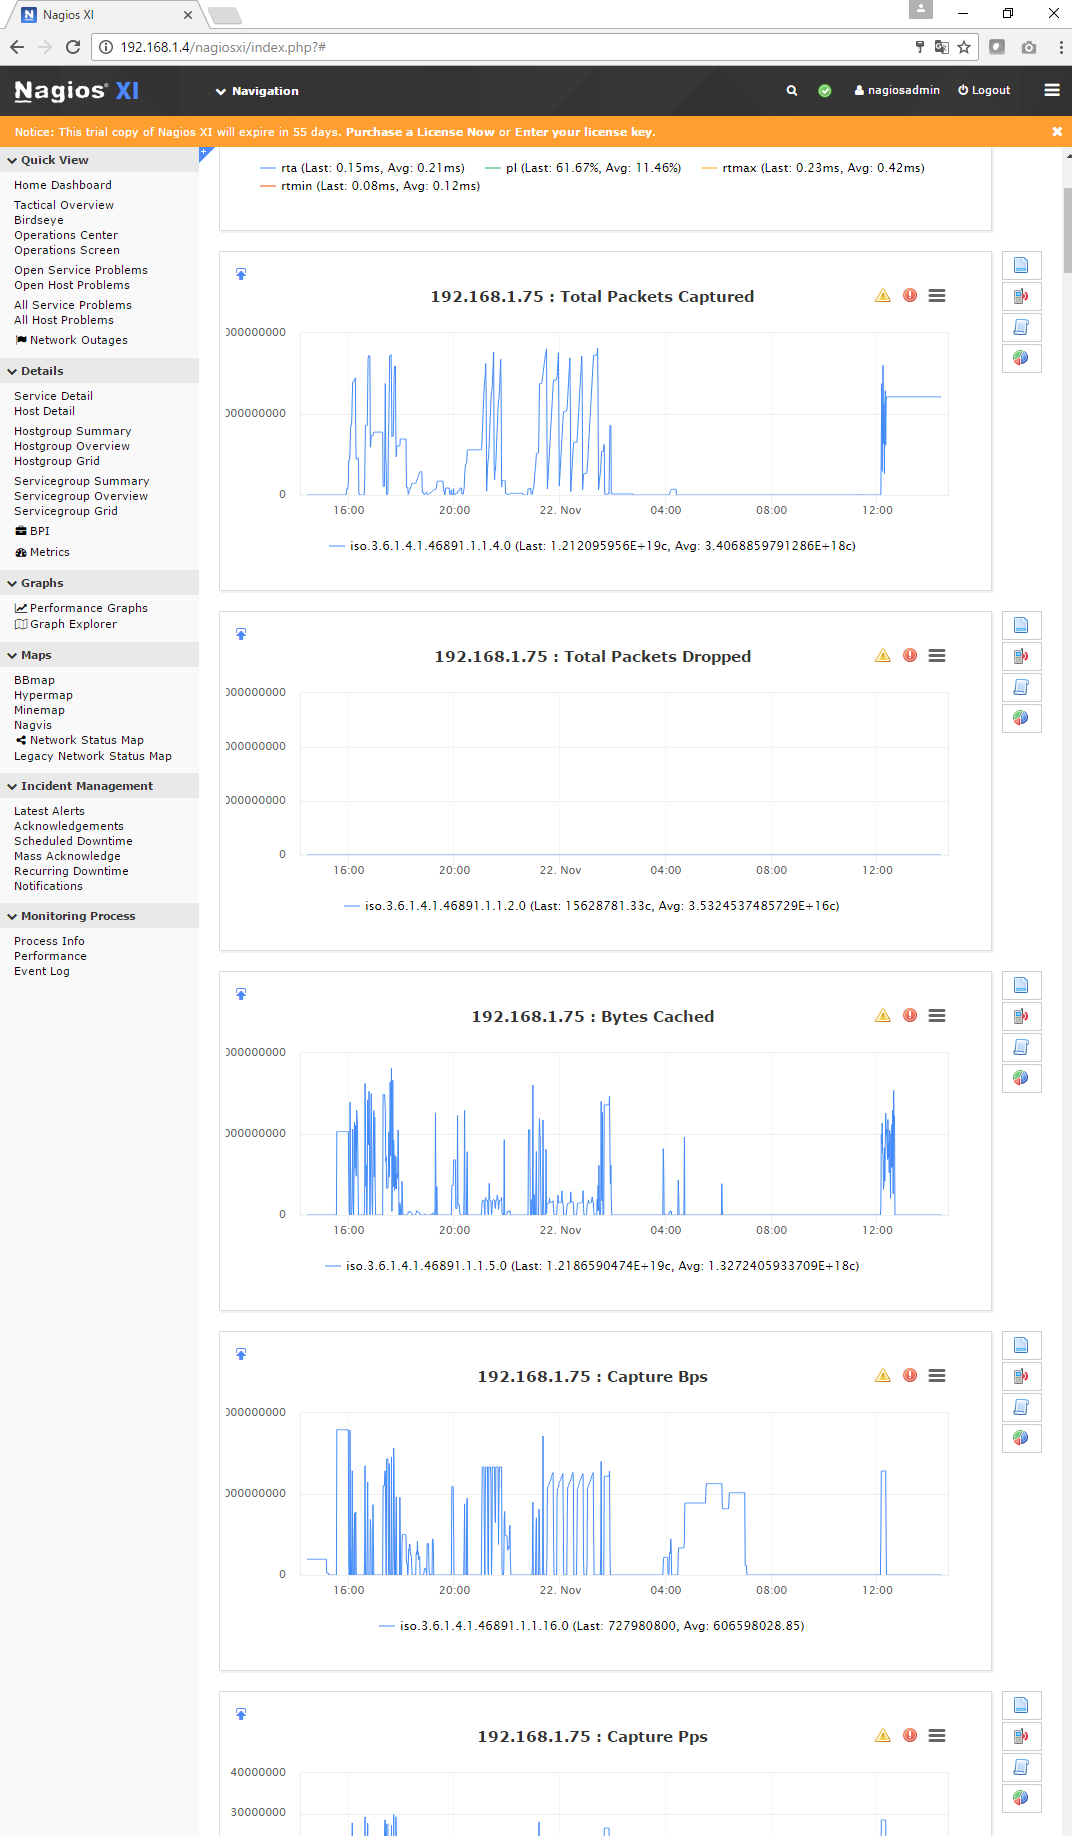
7) Nagios configuration is now complete.
Some examples shown below
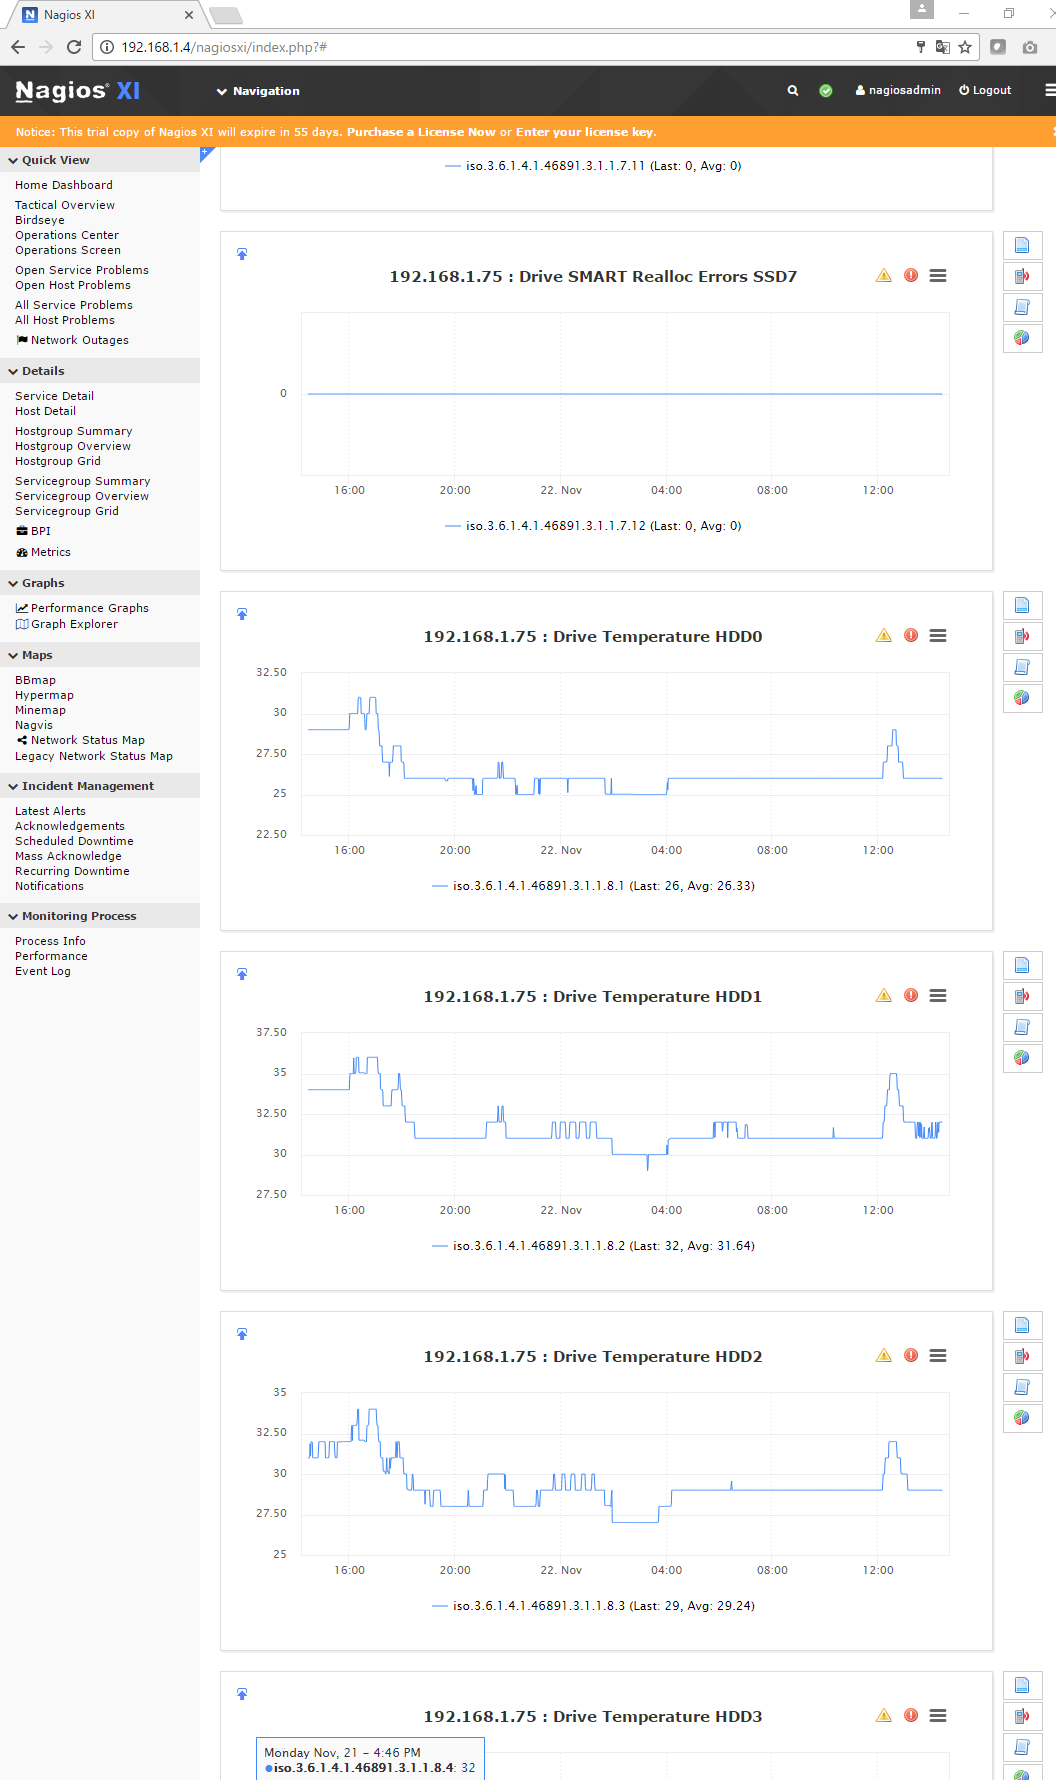
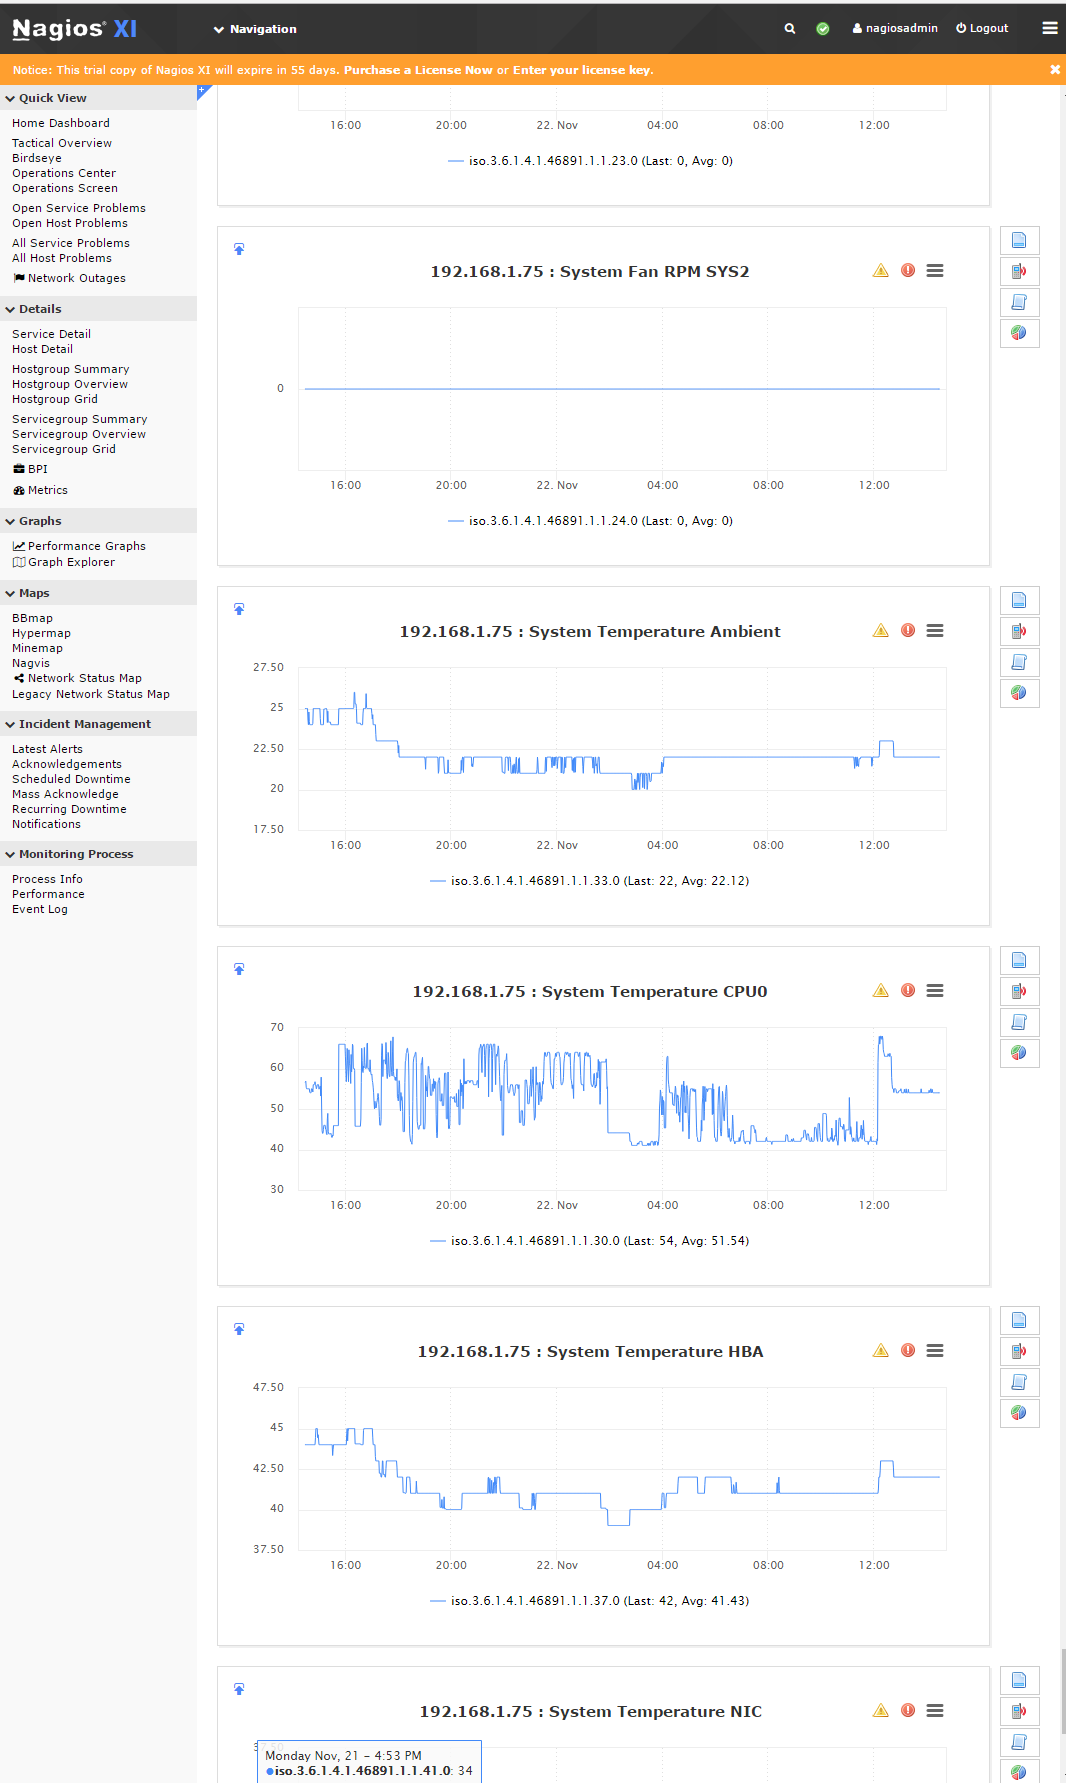
クロックシンクロナイザー
FMADIOキャプチャ装置は多様な時間/クロックシンクロナイザーの方法をもっています。この設定は、ローカルクロックを世界時間(またはローカルグランドマスター)に同期するためのものです。パケットごとのハードウェアタイムスタンプは必ず1ナノ秒の分解能です。
| プロトコル | 精密度 | 説明 |
| PTPv2 | < 100ナノ秒 | 高精度時間プロトコルバージョン2 |
| PTPv2 + PPS | < 10 ナノ秒 | 外部PPS付き高精度時間プロトコルバージョン2 |
| GPS | < 10 10ナノ秒 | 全地球測位システム時間シンクロナイザー(組込み) |
| NTP | ~ 1,000,000 ナノ秒 | 手動のネットワーク時間プロトコルアップデート |
| NTP マニュアル | ~ 1,000,000 ナノ秒 | 手動のネットワーク時間プロトコルアップデート |
作業状況や必要条件によって、あなたの装置にとって最もよい時間のシンクロナイザーオプションを選んでください。
PTPv2 時間シンクロナイザー
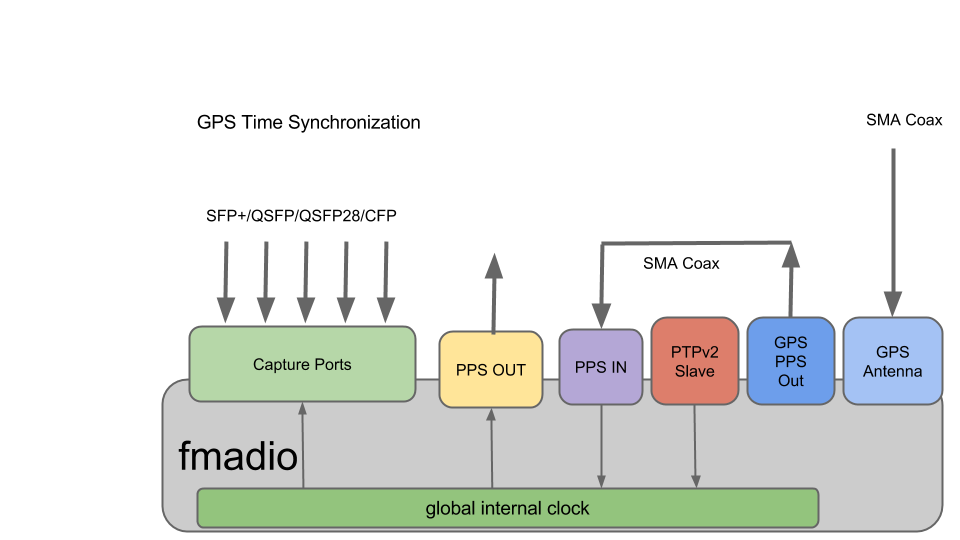
PTPバージョン2コンフィグレーションは、最も少ないセットアップ/インフラで最高の精密度を提供します。これはイーサネットを使って同期されるローカルPTPグランドマスターを必要とします。一般的に弊社はこの方法を使えば50100ナノ秒の精密度だと考えています。
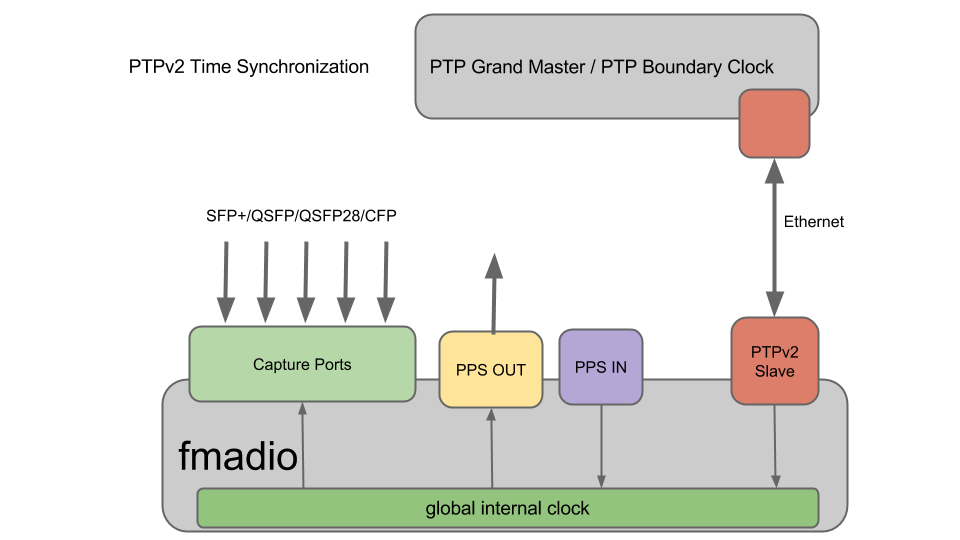
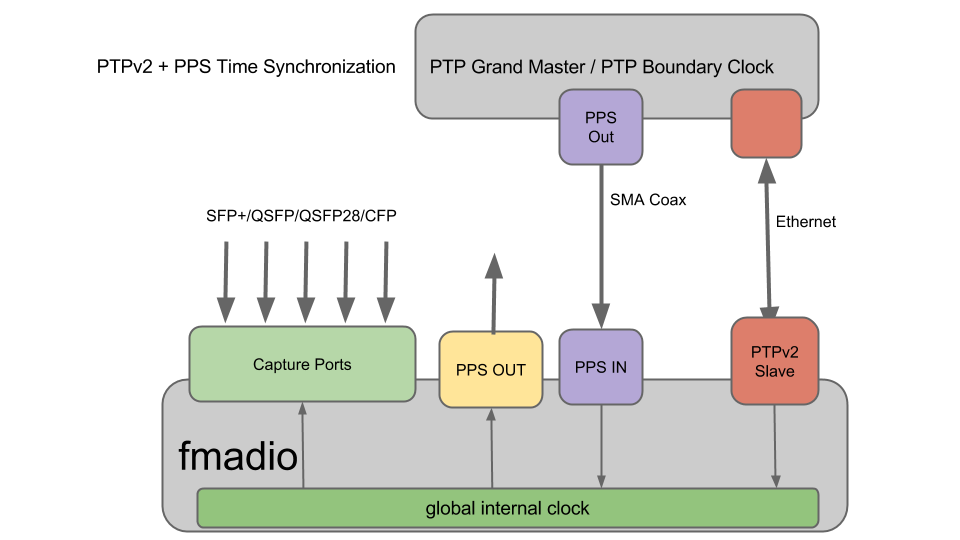
PTPv2 時間シンクロナイザー + PPS入力
非常に正確な時間調整を必要とするアプリケーションのために、このセットアップは、PTPグランドマスター/PTP境界スイッチからの1PPS信号を使って、PTPv2シンクロナイザーを増やします。SMA同軸ケーブルを通した追加のPPS入力は、PTPプロトコルが正確な日付や時間を提供する一方で、1パルス毎秒から約10ナノ秒の精密な時間調整を提供します。
GPS
付属のSMAケーブルと組み込まれているGPS受信機を使うことで、優れた10ナノ秒以下の精密な世界時間を提供します。これは、コンセントにつないだアクティブGPSアンテナを必要とし、GPS PPS出力をPPS入力に付属のケーブルで接続してください。
NTP
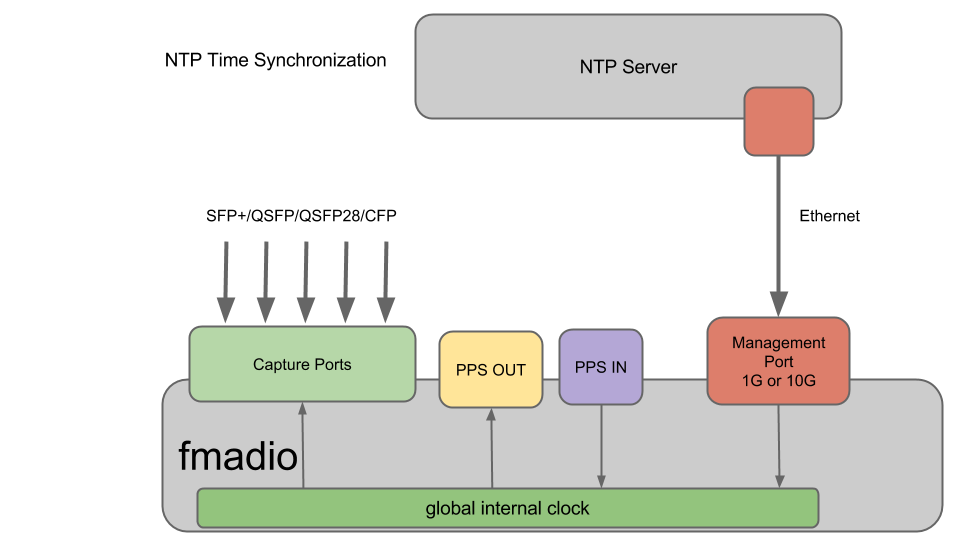
ネットワーク時間プロトコル(NTP)は、最も一般的で広く使われている時間シンクロナイゼイションプロトコルです。これは、NTP時間サーバーへのイーサネット接続を必要としますが、 シンクロナイザーの精密度は、1100ミリ秒程度であまりよくありません。
SSH Shell Settings
FMADIO devices run exclusively from pseudo-ROM where any changes on the file system between reboots is lost. This ROM approach provides consistency and system predictability making maintenance simpler.
Shell Environment
One problem with this approach is shell customization becomes quite difficult. To allow small modifications in the shell environment when a user logs into the system it can run the shell script for each SSH session. Configuration file is:/mnt/store0/etc/fmadio.rc
Please do not use this excessively, typically its used for setting ENV variables.
Example:
$ cat /mnt/store0/etc/fmadio.rc
# local shell prompt configuration (ash) ran on at boot time

export TEST="random test variable"
authorized_keys
This file is usually located in ~/.ssh/ directory. As that is part of the volatile file system, the persistent version of this is placed into
/opt/fmadio/etc/authorized_keys
This allows SSH keys to be used in a persistent way across reboots and power cycles. Note the file in /opt/fmadio/etc/authorized_keys is only copied during bootup. Updates made after reboot are not copied to the user .ssh directory.
sshd_config
A customized sshd configuration file can be used by placing the customized configuration into
/opt/fmadio/etc/sshd_config
This is helpful for example to force exclusive RSA based login / disable password login. Which is a good practice if the device is on a public network.
System Configuration
Configuration Save
To save the global system configuration uses the command line utility system_config.lua The utility offers the following options
system_config.lua : save and restore system config
---------------------+----------------------------------------------
--save
To Save a configuration run as follows
fmadio@fmadio20-049$ system_config.lua  --save test1234
Save System Configuration
Cmd [sudo mkdir -p /opt/fmadio/etc/backup/]
Cmd [sudo find /opt/fmadio/etc/ -type f | grep -v backup > /tmp/config_backup.list]
sh: can't create /tmp/config_backup.list: Permission denied
Cmd [sudo tar hcfz /opt/fmadio/etc/backup/config_20170718_225310_test1234.tar.gz -T /tmp/config_backup.list]
Cmd [tar: removing leading '/' from member names]
Config Saved as [/opt/fmadio/etc/backup/config_20170718_225310_test1234.tar.gz]
fmadio@fmadio20-049$
This creates the backup file which may be copied off the box for remote storage
/opt/fmadio/etc/backup/config_20170718_225310_test1234.tar.gz
Configuration Restore
To restore a configuration file, start by listing the current backup configurations
fmadio@fmadio20-049$ system_config.lua  --list
List System Configuration
List [config_20170718_223801_factory]
List [config_20170718_225310_test1234]
fmadio@fmadio20-049$
In this case there are 2 backup configurations. This example will restore the "factory" config. To apply as follows
fmadio@fmadio20-049:$ system_config.lua  --restore config_20170718_223801_factory
fmad fmadlua Jul 18 2017
calibrating...
0 : 3499993134           3.5000 cycles/nsec offset:0.007 Mhz
Cycles/Sec 3499993134.0000 Std:       0 cycle std(  0.00000000) Target:3.50 Ghz
argv /opt/fmadio/bin/fmadiolua
argv config_20170718_223801_factory
loading filename [system_config.lua]
Restore System Configuration
Cmd [cd /; sudo tar xfzv /opt/fmadio/etc/backup/config_20170718_223801_factory.tar.gz]
Cmd [opt/fmadio/etc/60-persistent-ethernet.rules]
Cmd [opt/fmadio/etc/shadow-]
Cmd [opt/fmadio/etc/container.lua]
.
.
.
.
fmadio@fmadio20-049:$
And the system has restored the configuration.
Read Only Configuration
In some install locations disabling any configuration changes are required. For example if support staff are utilizing the device an accidental change to the configuration (e.g. stopping a capture or power off the device) could be problematic.
FMADIO devices can be put into a "READ ONLY" mode, where all configuration changes are denied. It requires changing a configuration file an a few linux CLI commands as shown below.
Step 1) Change configuration file
The configuration shown below is set to "full" access. See the "ConfigAccess" setting.
$ cat /mnt/store0/etc/time.lua
madio@fmadio20-049:~$ cat /opt/fmadio/etc/time.lua
-- autogenerated Tue Oct 17 02:37:55 2017 from fcgi handler
local Time=
{
["TZ"] =
{
    ["Offset"] = "+09:00",
    ["OffsetHour"] = 9,
    ["OffsetMin"] = 0,
    ["OffsetTS"] = 32400000000000,
    ["Name"] = "Asia/Tokyo",
    ["Abbr"] = "JST",
},
["Source"] = "none",
["NTP"] =
{
    ["Server0"] = "",
    ["Server1"] = "",
    ["Server2"] = "",
    ["Server3"] = "",
},
["PTP"] =
{
    ["Master0"] = "0.pool.ntp.org,
    ["Master1"] = "",
    ["Master2"] = "",
    ["Master3"] = "",
    ["UpdateRate"] = "15min",
    ["VLANID"] = "0",
},
["PPS"] =
{
    ["CableLength"] = "10",
},
["Security"] =
{
    ["HTTPAccess"] = "enable",
    ["LDAPAuth"] = "disable",
    ["ConfigAccess"] = "full",
    ["GUIMode"] = "full",
    ["EnableWebDAV"] = false,
},
["SNMP"] =
{
    ["ComName"] = "public",
},
["PCAP"] =
{
        ["TimeResolution"] = "nsec",
        ["TimeSortDepth"] = 256,
}
}
return Time
Change this to "readonly" as follows. NOTE: all punctuation must not be changed otherwise the configuration file can not be processed
["Security"] =
{
    ["HTTPAccess"] = "enable",
    ["LDAPAuth"] = "disable",
    ["ConfigAccess"] = "readonly",
    ["GUIMode"] = "full",
    ["EnableWebDAV"] = false,
},
Step 2) System Reboot
After the config has been updated a system reboot is required for the configuration to take effect.
Alternatively if a system reboot is not possible, you can manually restart the following processes for the new permissions to become activated
fmadio@fmadio20-049:~$ sudo killall www_fcgibackend
fmadio@fmadio20-049:~$ sudo killall stream_http
The system will take ~ 1 minute for the processes to respawn with the new configuration setting.
Step 3) Confirm READONLY mode
Check the GUI Config page, scrolling down to see the following setting. Note from the GUI the configuration can NOT be changed.
If a user attempts to change configuration, for example set the management IP to 192.168.1.1 the GUI will show a "permission denied" error message as shown below
Push Configuration
FMADIO Packet Capture systems provide a built in Push mode to transfer capture PCAP data on a regular schedule to a remote system. An example is pushing 1minute PCAPs to a remote NFS share
Configuration is via configuration scripts located:
/opt/fmadio/etc/push_realtime.lua
An example is shown as follows:
fmadio@fmadio20v3-287:/opt/fmadio/etc$ cat push_realtime.lua
local Config = {}

Config.Target = {}

table.insert(Config.Target, { Desc = "pcap-all", Mode = "File", Path = "/mnt/remote0/push/",   Split="--split-time 60e9", FileName="--filename-epoch-sec-startend", FilterBPF=nil })

return Config

fmadio@fmadio20v3-287:/mnt/store0/etc$
Multiple push targets can be specified. In the above example all PCAP data is sent to the remote NFS share mounted on /mnt/remote0. See NFS mount configuration for details on setting up /mnt/remote0 mounting points.
Configuration options as follows
Desc
Text field providing user information about the push target. Recommend no spaces or special characters.
Mode
- File : write a file (currently this is the only mode)
Path
Full remote path of the target PCAPs. This include any subdirectories within the NFS mount the PCAPs are to be written to
Split
What kind of split mode to apply:
--split-time (time in nanonseconds)       : the example is 1 minute (60e9 nanonseconds)

--split-byte (bytes)                      : the number of bytes to split by. scientific notation can be used (e.g 1e9 for  1GB)
FileName
Specifies how the split filename is encoded
--filename-epoch-sec-startend             : writes the sec epoch start/end time as the file name. (e.g. 1616334655-1616334755.pcap)

--filename-epoch-sec                      : writes the sec epoch start time as the file name. (e.g. 1616334655.pcap)

--filename-timestr-HHMM                   : writes the YYYYMMDD_HHMM style file name. (e.g. 2021 Dec 1st 23:50 20211201_2350.pcap)

--filename-timestr-HHMMSS                 : writes the YYYYMMDD_HHMMSS style file name. (e.g. 2021 Dec 1st 23:50:59 20211201_235059.pcap)

--filename-timestr-HHMMSS_NS              : writes the YYYYMMDD_HHMMSS.MSEC.USEC.NSEC style file name. (e.g. 2021 Dec 1st 23:50:59 123456789nsec 20211201_235059.123.456.789.pcap)
FilterBPF
Full libpcap BPF filter can be applied to reduce the total PCAP size. Example might be
"tcp"
to write TCP only traffic. A more likely example is to exclude backup traffic from specific ip
"not host 192.168.1.100"
Analytics Configuration
In addition to /opt/fmadio/etc/push_realtime.lua Analytics scheduler must be set to start the push operation. Configuration must be set as follows

Currently it only pushes the currently active capture.
Inline Packet Capture
FMADIO Gen2 packet capture systems support Inline 10G full duplex (20 Gbps) Packet capture. This enables quick and easy capture of data on the wire without complicated Optical TAPs or Switch SPAN/Mirror ports. The downside is this adds additional infrastructure risk due to the active components on the link. Because of this additional risk we have provide more detail on how the inline capture operates.
FMADIO Gen2 inline mode operates entirely at the Layer 1 XGMII level, there is no MAC involved and all forwarding is performed entirely on-chip in the FPGA. Additional latency added to the link is under 1 microsecond. The figure below shows the logical topology of the inline capture.
As shown above forwarding is performed at the eletrical Layer 1 level entirely on the FPGA itself (no SW or offchip memory involved). As this is Layer 1 forwarding, in network terminiology it is cut-thru forwarding 100% of the time.
Please note forwarding is stopped durning reboot and power cycle of the capture system. We are working to target downtime to under 100 milliseconds (currently it is 1 - 90 secconds). Because of potential downtime, its expected Inline mode is only used for temporary troubleshooting.
Once Inline Mode is activated, forwarding is always performed regardless of the capture enable/disable status. e.g packets remain forwarding until the system is shutdown or rebooted.
Finally Full 2 x 10G packet capture is performed as normal, inline mode is completely independent and has no impact on the capture performance. At the higher level shown below you can see how capturing a full duplex 10G link is achveived, its simple, quick to setup and gaurenteed to no drop any packets.
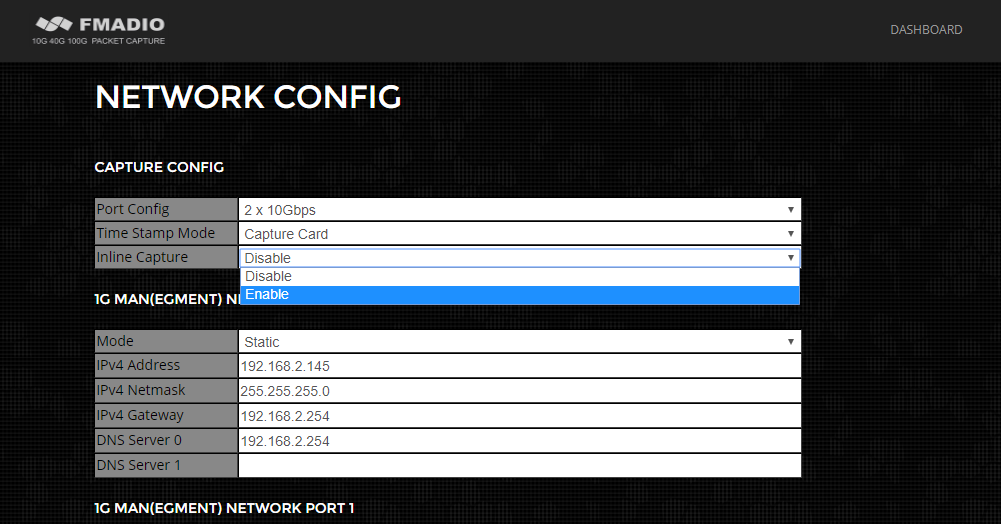
To enable Inline capture mode
1) Stop any currently active captures
2) Selected from the config menu as shown below.
3) Start a new catpure and inline mode will activate
Flush to Disk
Gen2+ Only
FMADIO Packet Capture systems like all capture systems have multiple internal buffers. These internal buffers can sometimes cause problems for low bandwidth connections which requires Packets to be available on disk immediately for downstream processing.
One such example is Financial Order and Entry data, which can sometimes be extremely low bandwidth however downstream systems require packets to be available ASAP for further processing.
FMADIO Gen2 systems buffer between 2MB-4MB of data internally. To support multiple use cases the flushing mechanics can be tuned based on the customers requirements. By default the flushing occurs when there is no new packets in the last 1 second.
Configuration
Please edit the configuration file in
/opt/fmadio/etc/time.lua
The relevant sections are
["Capture"] =
{
        ["Inline"]      = false,
        ["PortMode"]    = "2x10G",
        ["FlushPktCnt"] = 2000,
        ["FlushPeriod"] = 0,
        ["FlushIdle"]   = 1e9,
}
If these options are not visible in the config file, please go to the GUI Config page, change the PCAP Time Resolution to Micro Second, then back to Nano Second. This will write the default values into the config file. Alternatively you can paste the missing lines from the above example.
NOTE: After changing the settings capture must be stopped, and restarted for the new settings to take effect
FlushPktCnt
Flushing works by injecting specially marked NOP packets into the system right at the capture port. Its as if the packets arrived on the ingress port, but are never visible or downloadable. This parameter sets the number of packets for each flush per port to be injected. The packets are 256B in length.
Default value is: 2000 pkts * 256B = 512,000 bytes per port.
For usage models where quick Flush to disk is critical, its recommended to use 5,000 or 10,000 packets for a complete flush. Note this will directly effect how much storage is consumed by the flushing behavior
FlushPeriod
Flushing based on a pre-defined time interval. For example flush the entire pipeline every 1 minute regardless of how much data has been seen. For a 1 minute flush, the value here should be 60e9, scientific notation is accepted and the unit of time is nano seconds.
Default value is: 0 - this disables the periodic flushing
Lowest recommended setting is 1 minute, otherwise excessive flushing will consume disk space.
FlushIdle
Flushing based on an in-activity idle timeout. This will flush the pipeline if no new packets are received within X amount of time. For example the default setting is 1 second, if no new packets are received after 1 second a SINGLE pipeline flush is issued. The next pipeline flush will only occur if new packets are received.
Default value is: 1e9 - flush after 1 second of inactivity, value in nano seconds
To disable set to 0
This mode is the default configuration
Recommended Settings
For Financial customers the following setting is recommended
        ["FlushPktCnt"] = 5000,
        ["FlushPeriod"] = 60e9,
        ["FlushIdle"]   = 0,
This will flush both ports every 1 minute continuously.
1 Hour / 1 Min = 60 flushes
1 Flush 2 x 5000 packets * 256 Bytes = 2,560,000 Bytes per flush
Total of extra 153MB per hour for the continuous flushing. or 1.2GB for 8 Hours is fairly reasonable.
キャプチャ 開始と停止 (Web)
手動でのキャプチャの開始は、Webインターフェイスを使うか、コマンドラインインターフェイス(CLI)を通してリモートマシンから行うことができます。ほとんどの場合、キャプチャはスケジュールキャプチャ機能を使って開始されますが、即座にキャプチャを開始することを要求される場合が多くあります。
Webインターフェイス: キャプチャを開始
ダッシュボードから、下に緑で印をつけているようにキャプチャメニューオプションを選択して開始してください。
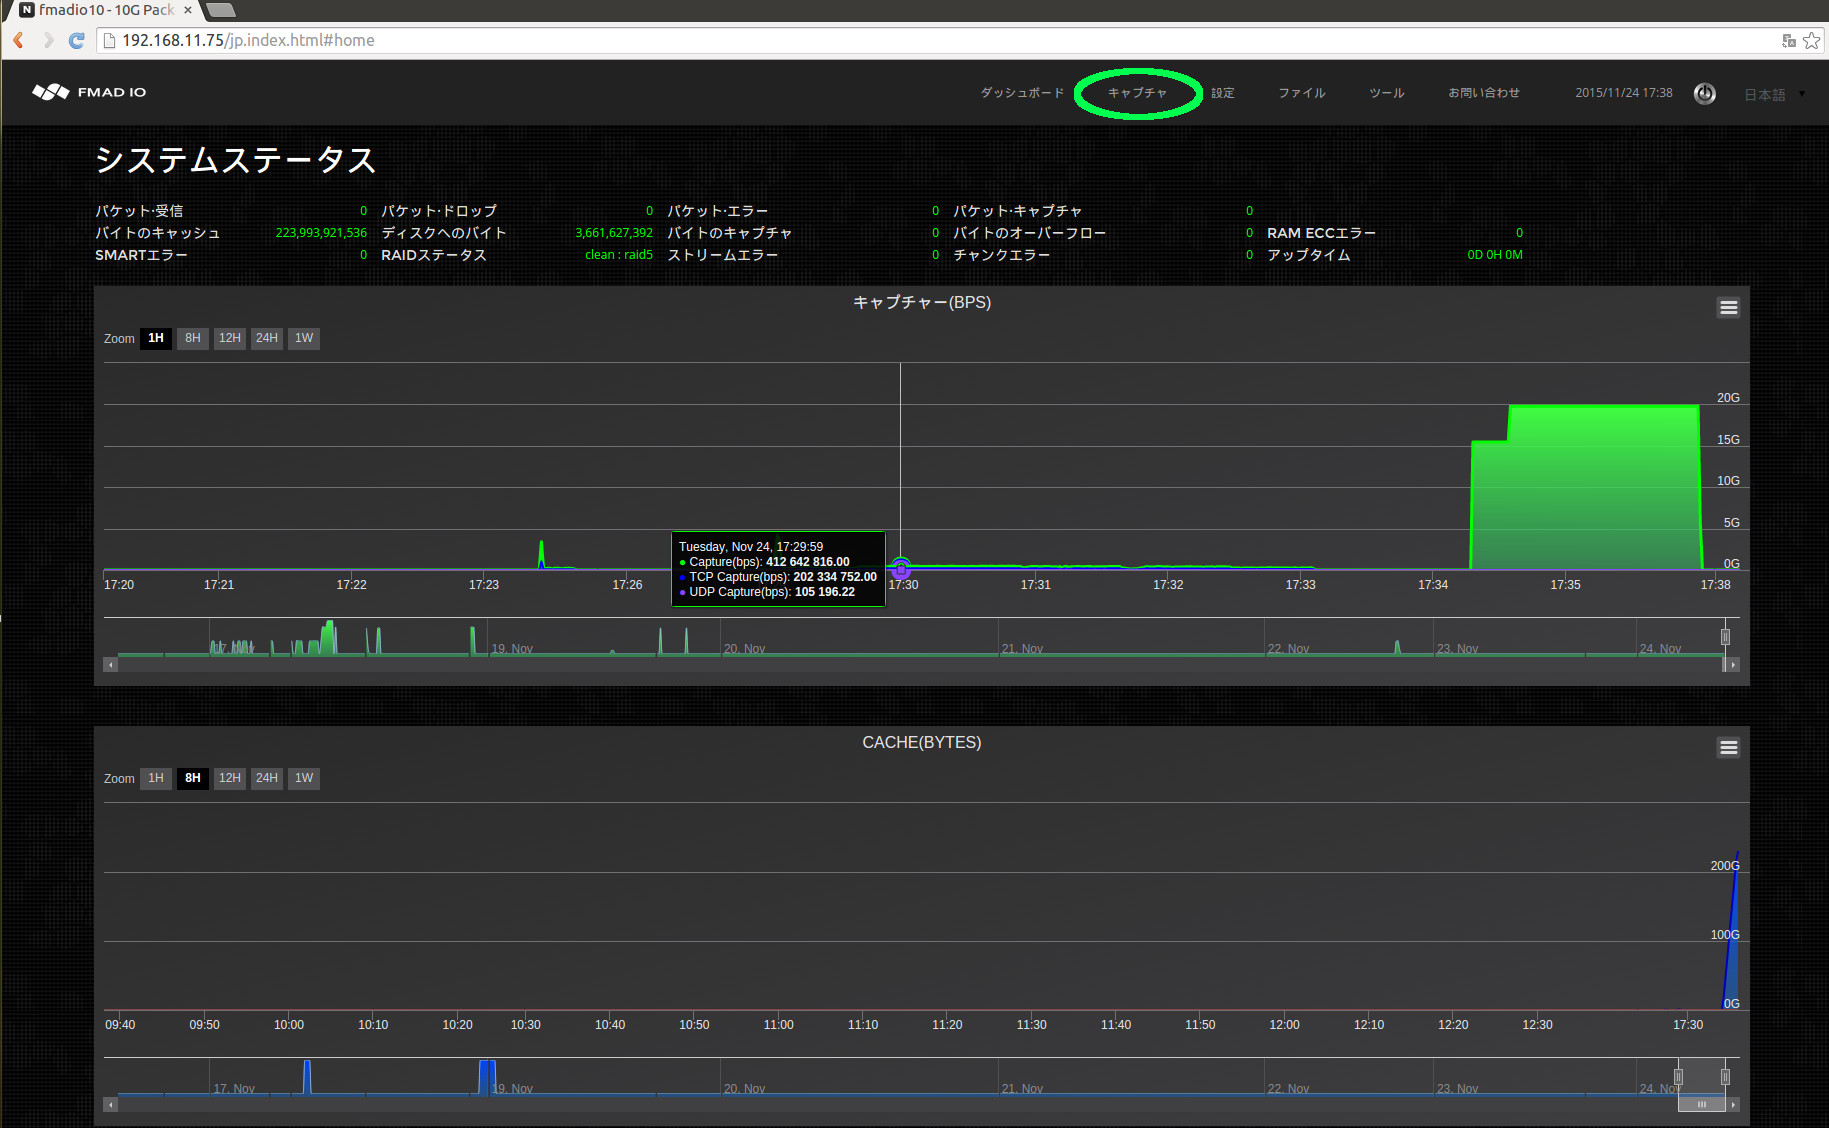
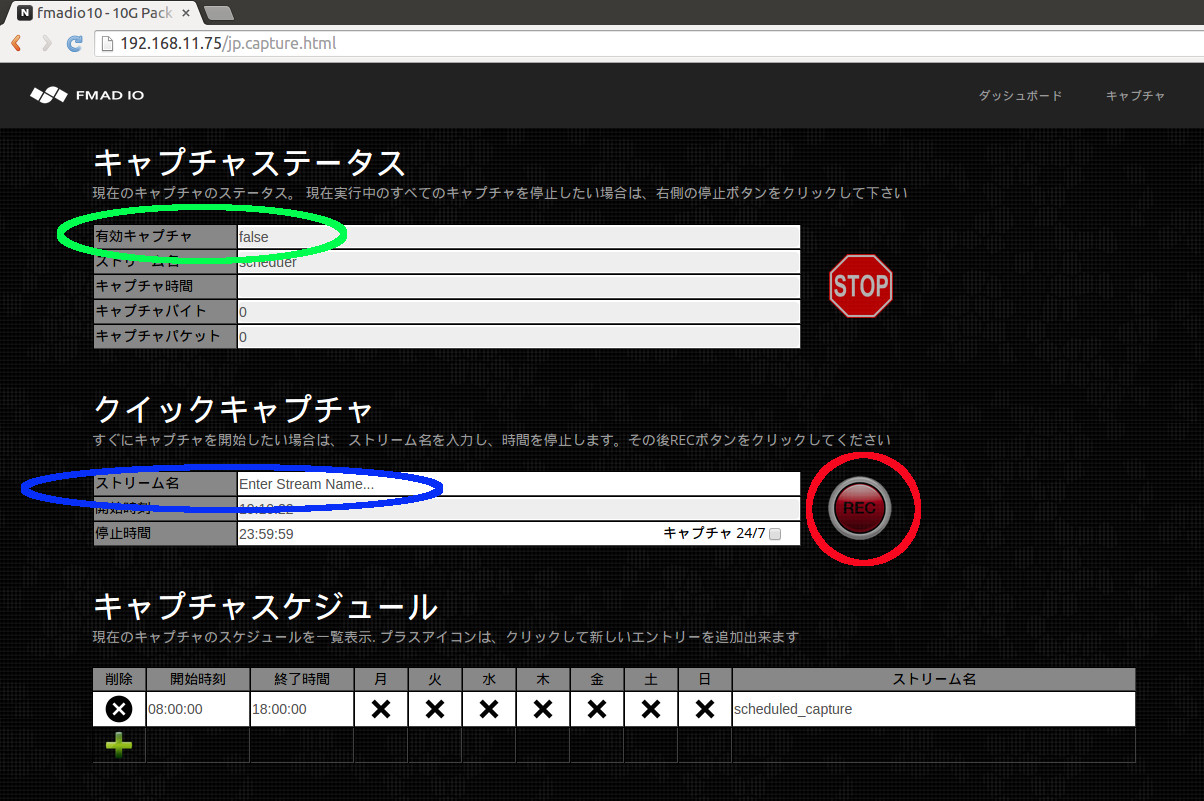
下のキャプチャページから、キャプチャが一つも作動していないことを見ることができます。
(以下に緑で印をつけている).
すぐにキャプチャを始める手順:
- 1) 新しいキャプチャ名を入力してください。この例では"manual_capture" と入力しています。(以下に青で印をつけている)
- 2)レコード ボタンをクリックして、キャプチャを開始してください。(以下に赤で印をつけている)
レコードボタンをクリックしたら、下の画像で示しているようにWebページがアップデートします。
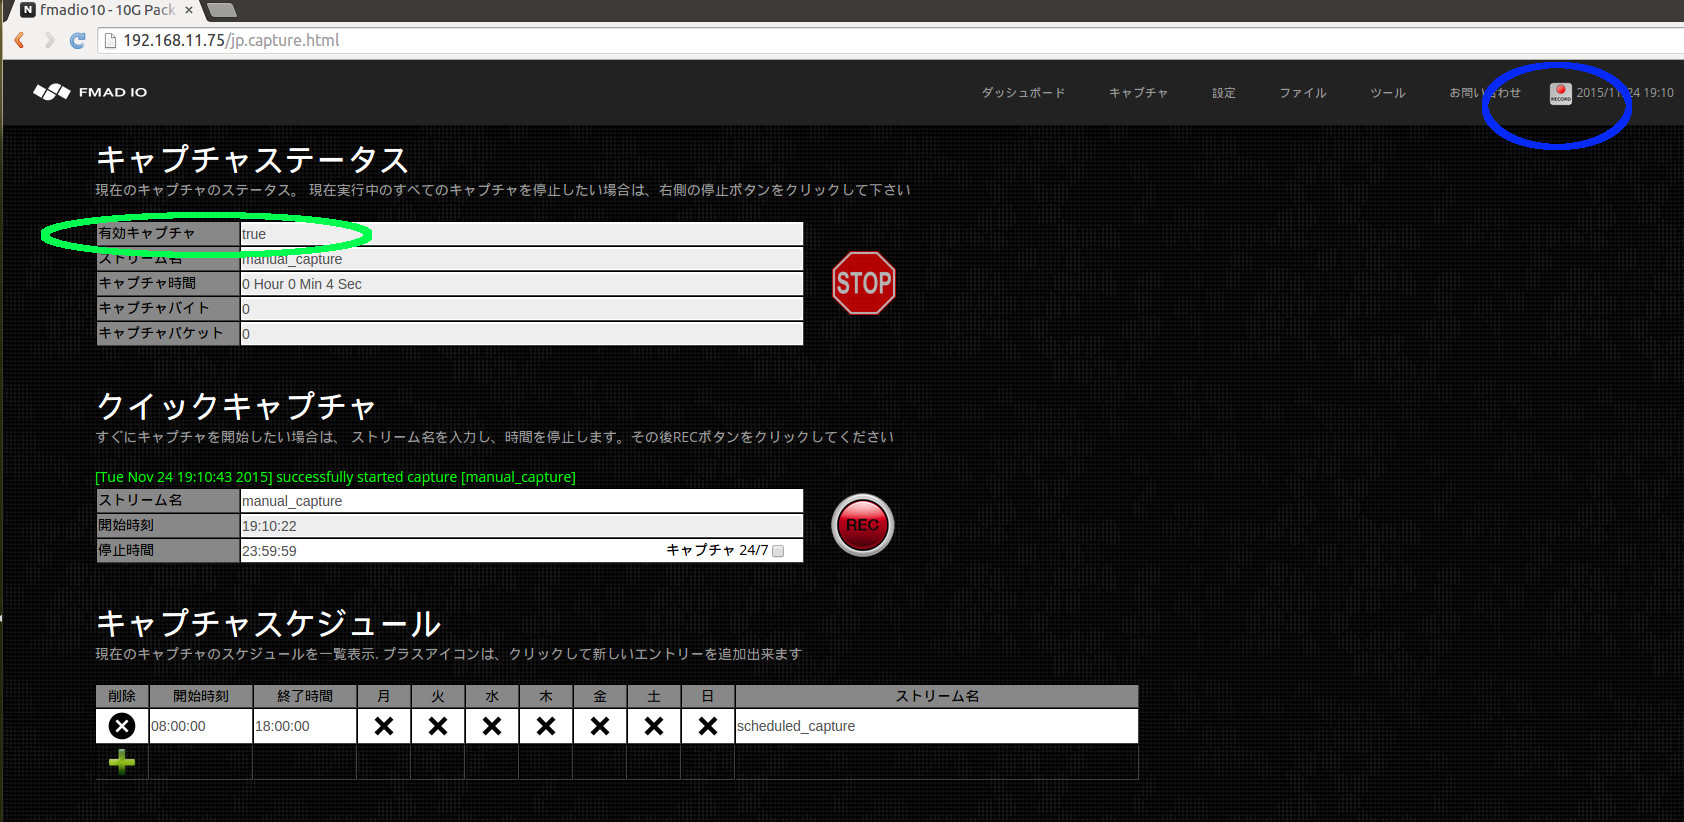
キャプチャステータスを見ることができます(上に緑で印をつけている)。これは、キャプチャが作動していること、キャプチャ名、作動時間、キャプチャされたバイト/パケットの数を示しています。また、すべてのWebページ上に、システムが現在アクティブキャプチャ状態であることを示す小さなレコードアイコンが表示されます (上に青で印をつけている)。
Webインターフェイス: キャプチャを停止
どのキャプチャ(手動とスケジュールの両方)を停止する場合でも、下に緑で印をつけているように、単に停止ボタンをクリックしてください。
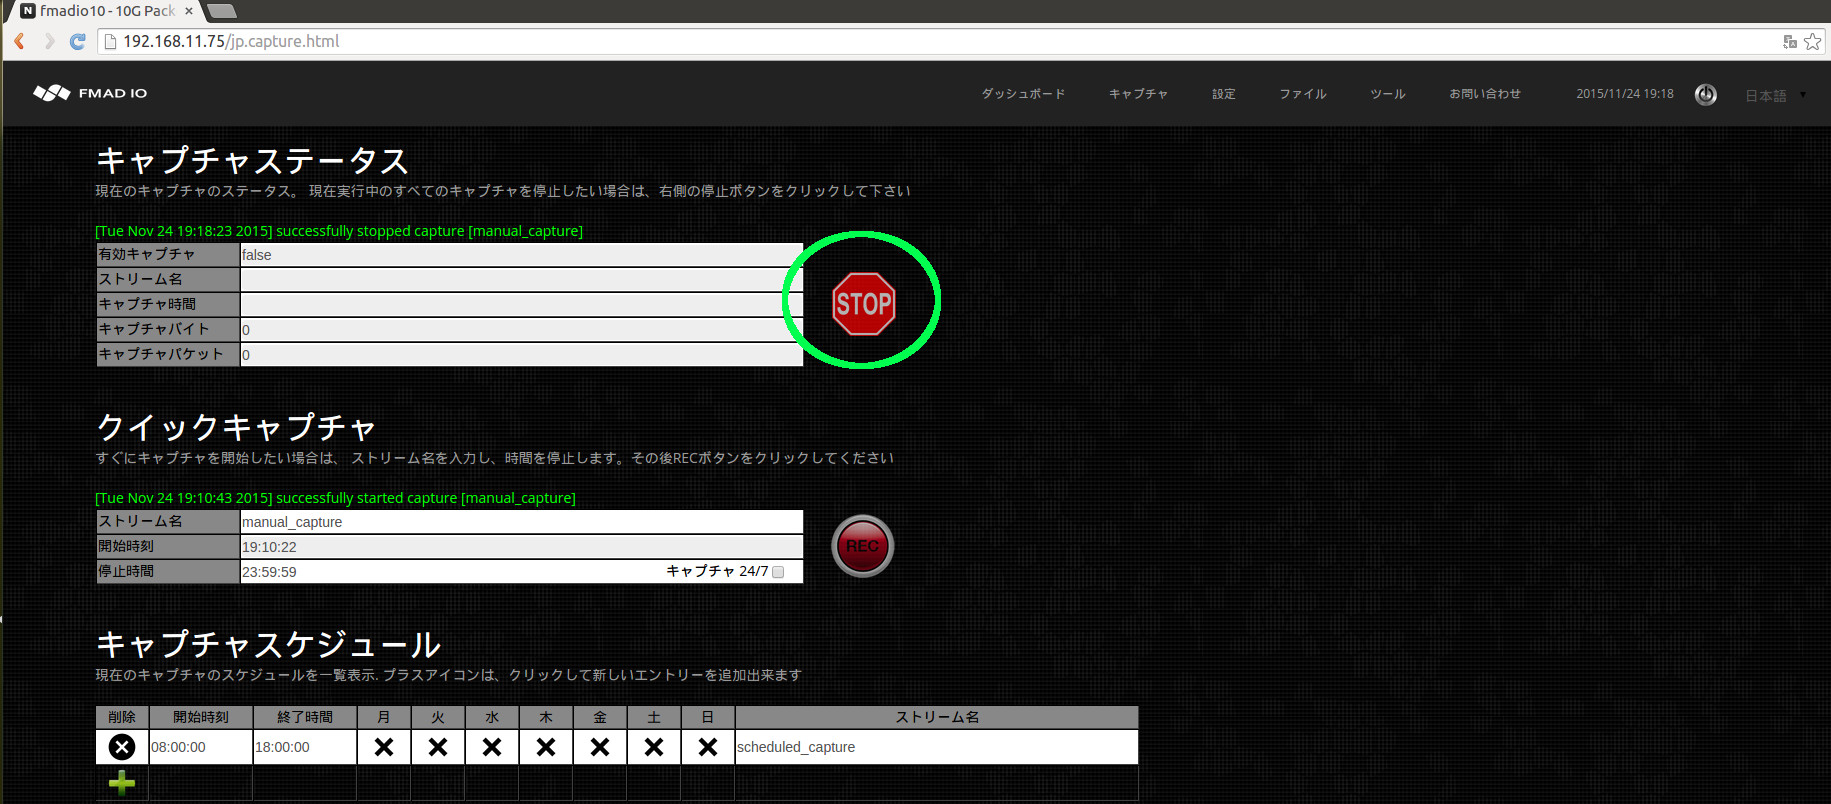
停止した後、Web UIは下の画像のようになります。
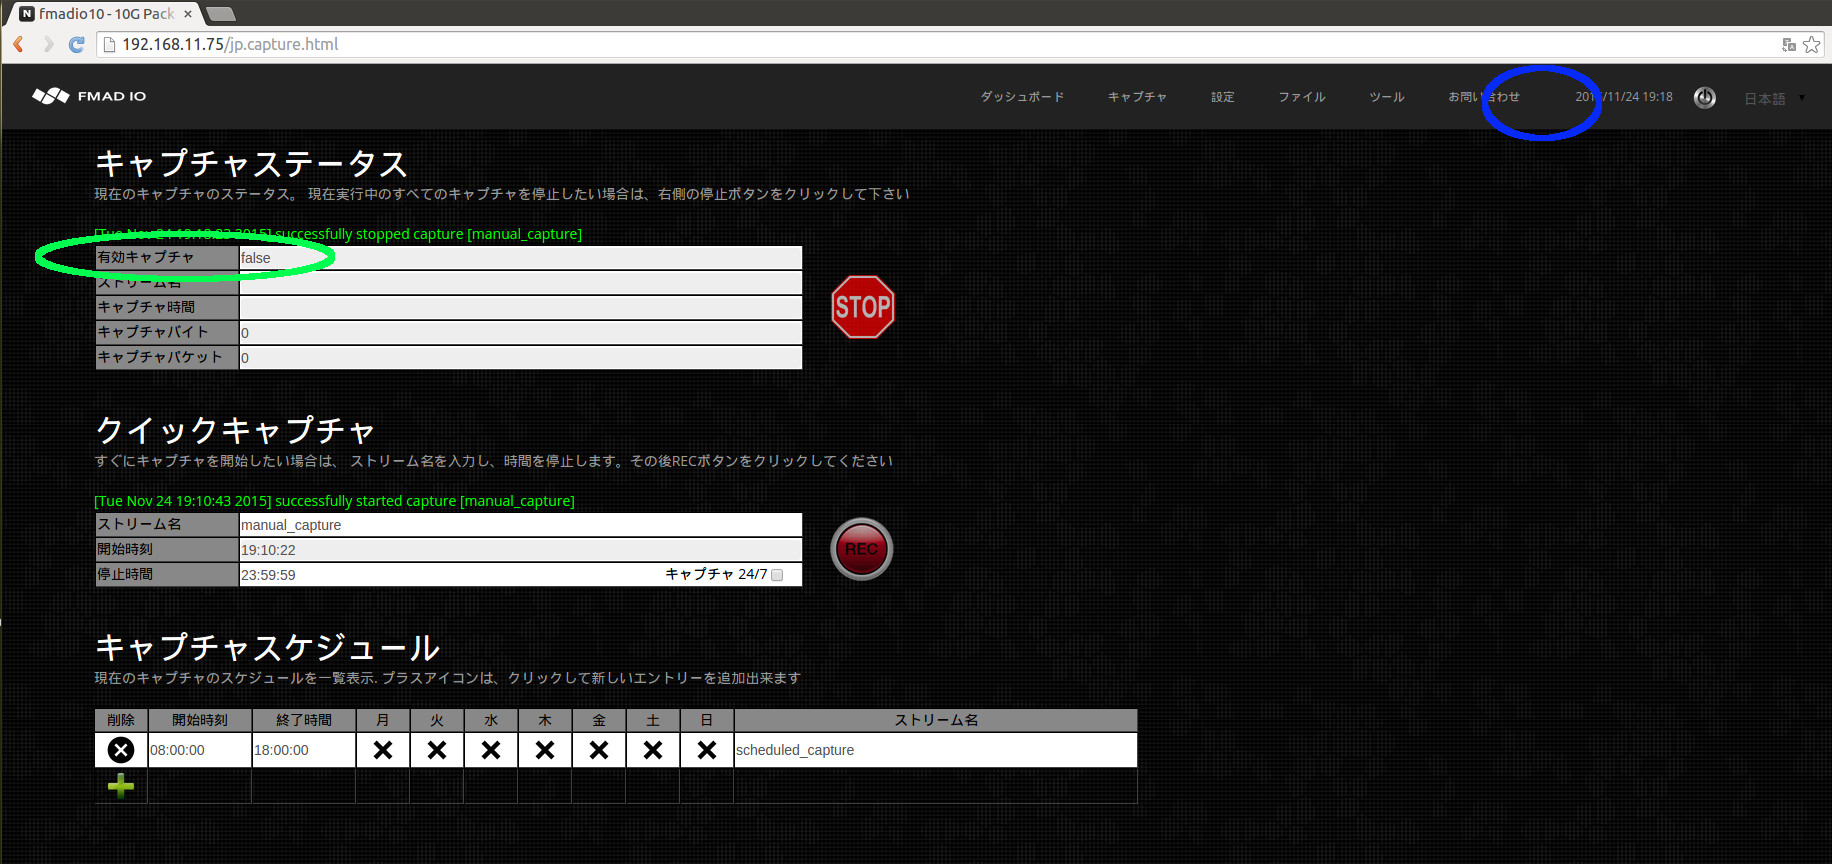
ステータスがキャプチャの動作を一つも示さない場合、"Capture Running: false" (上に緑で印をつけている)。 さらに、キャプチャが一つもアクティブではないので、すべてのWebページ上に現れていたレコードツールバーのアイコンは、このときなくなっています (上に青で印をつけている)。
これは簡潔でシンプルなインターフェイスです。もし不明な点がある場合には、support @ fmad .io に連絡していただければ、喜んでサポートいたします。
キャプチャ スケジュール (WEB)
キャプチャは週の日時を予約して自動で開始/停止することができます。このスケジュール機能は金融市場の開いている時間やテレビ番組の放送時間帯等の特定の時間帯を監視する場合に最適です。キャプチャ スケジュールの手順は以下の通り簡単です。
この例では月曜日から金曜日の午前7時から午後5時までを予約します。
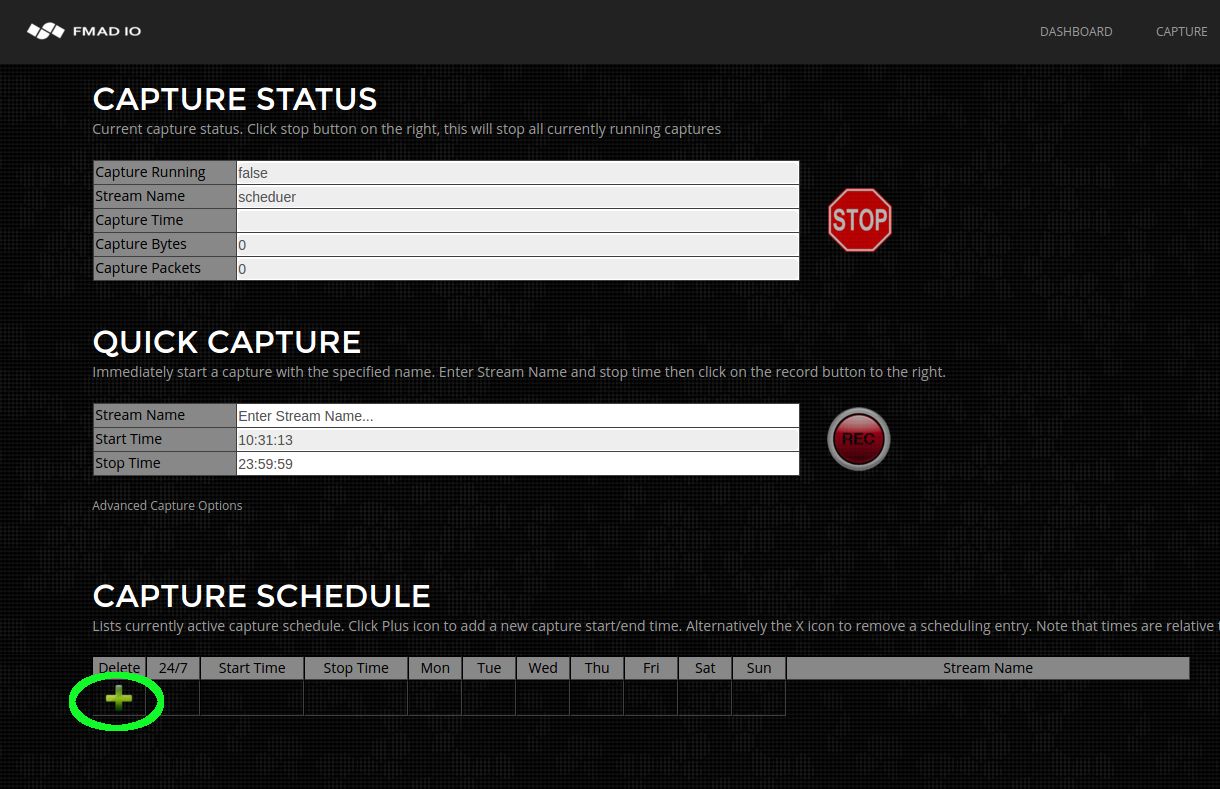
手順1) スケジュールの予定表に新たに行を追加します。下で示す緑色のプラスボタンをクリックしてください。
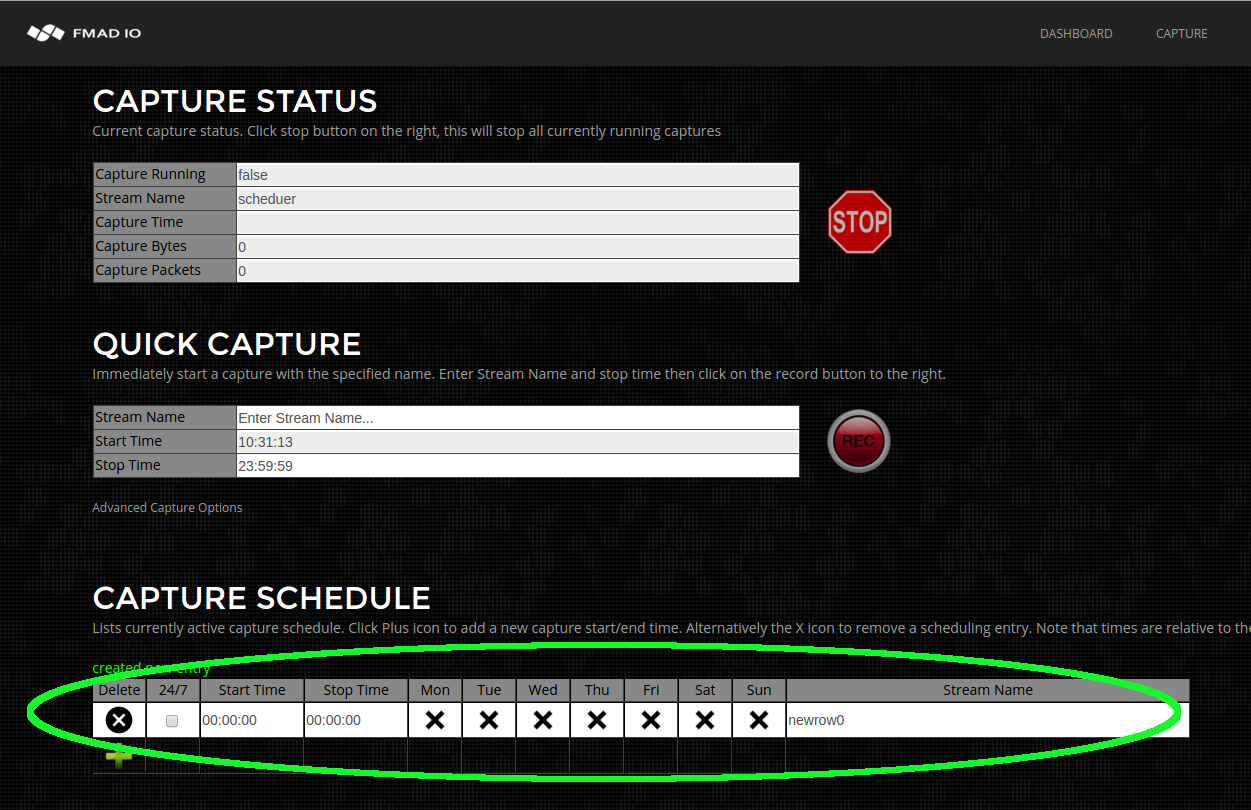
手順2) 下に示すように時間の欄がブランクの行が表示されます。
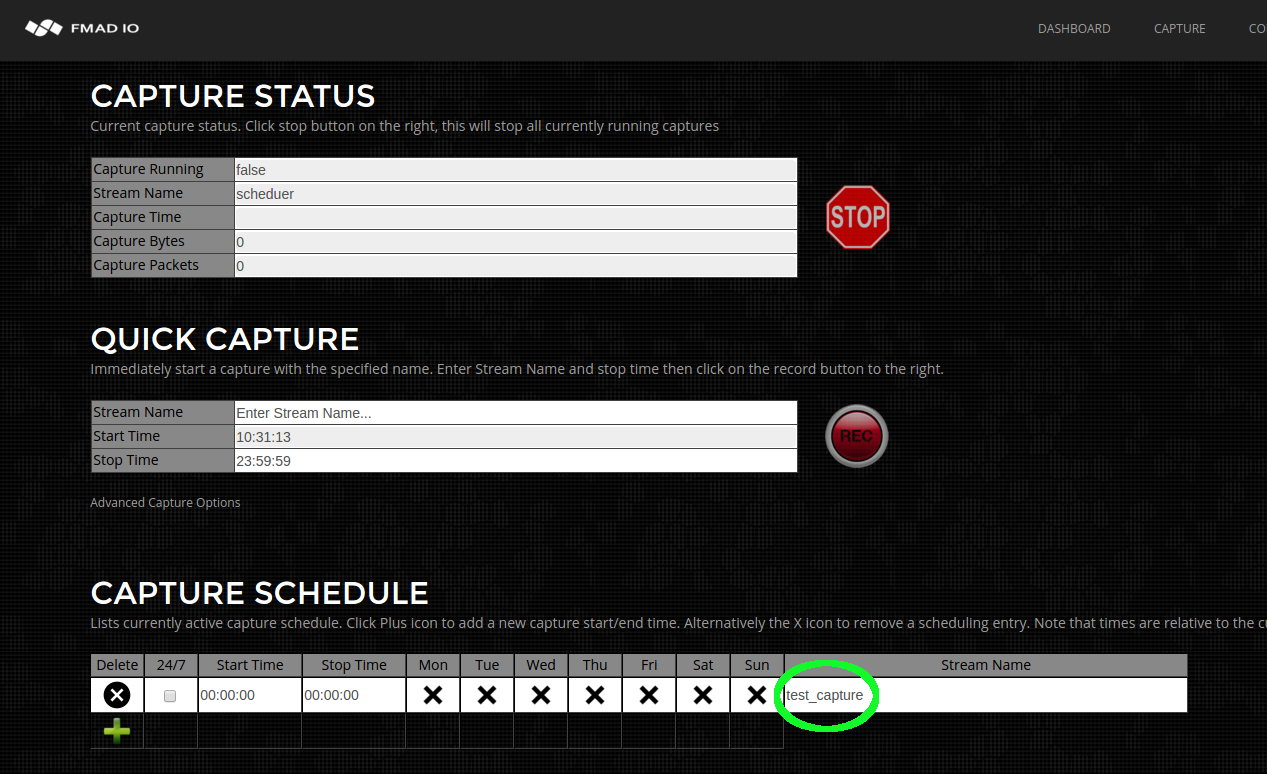
手順3) 予め用意したキャプチャ名を入力します。キャプチャが開始されるとシステムが自動で そのキャプチャ名に_YYYYMMDD_HHMMSSフォーマットで日時を付け足します。
例えば、以下の例の「test_capture」の場合、「test_capture_20160101_070000」、 「test_capture_20160102_070000」等と表示されます。
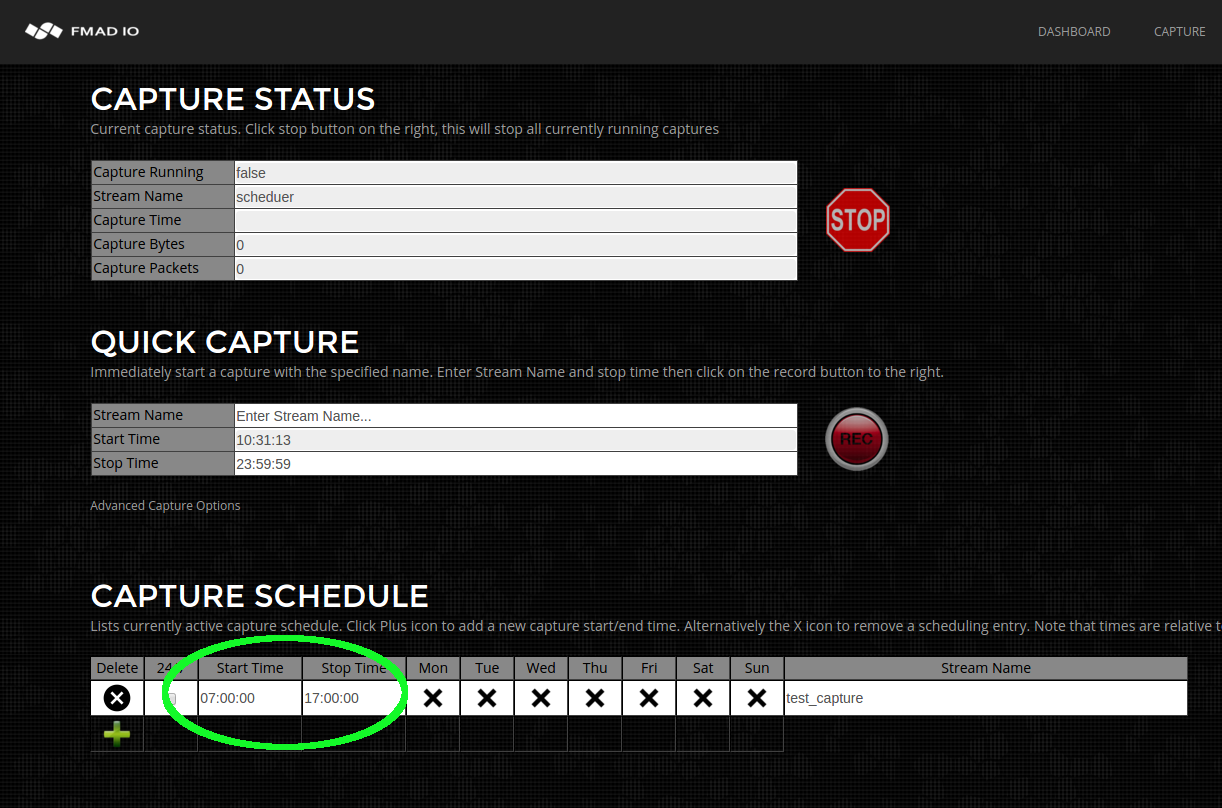
手順4) 開始時刻と終了時刻を設定します。時刻はHH:MM:SS24時間フォーマットで現地時間です。この例では07:00 -> 17:00、午前7時から午後5時に設定しています。
手順5) キャプチャを行う曜日を選択します。この場合は月曜日から金曜日を選択します。
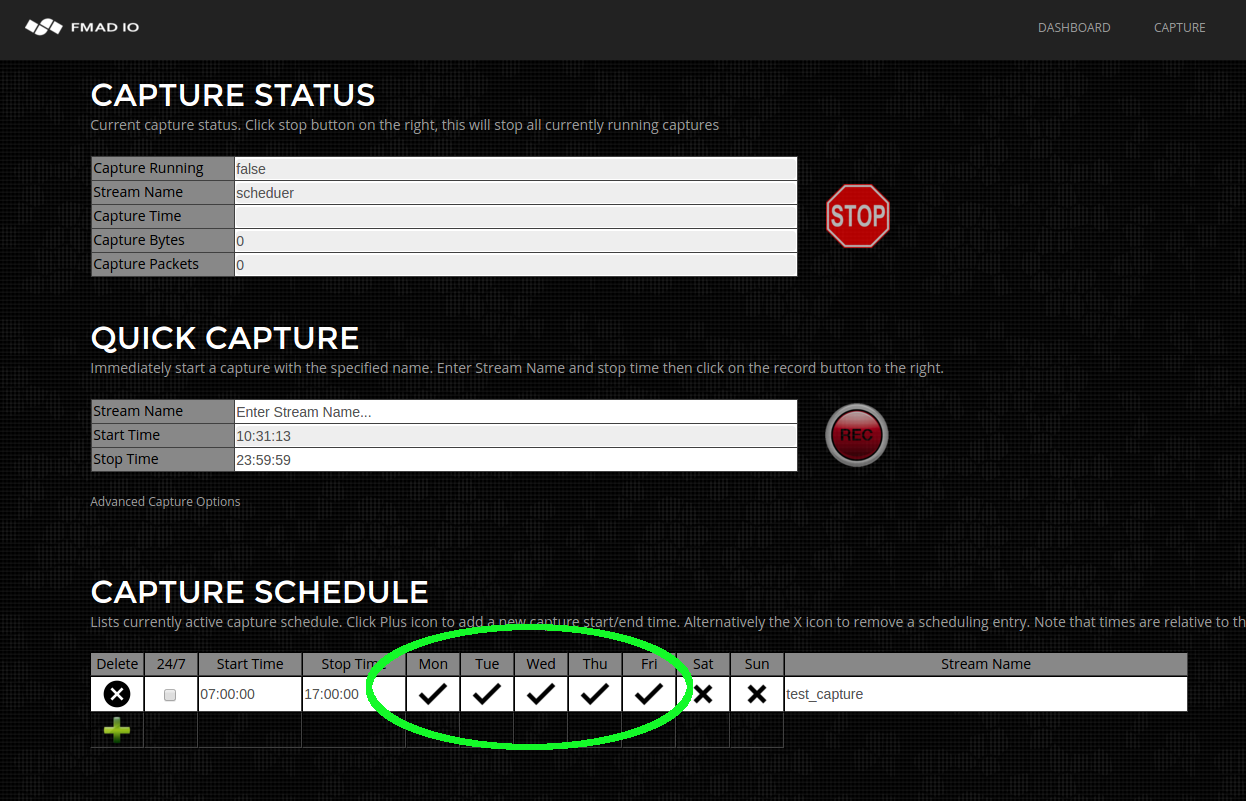
キャプチャ スケジュールは簡単で、複数のスケジュールも可能です。例えば、月曜日から金曜日の予約に1つのキャプチャ名、土曜日と日曜日の予約に1つのキャプチャ名が可能です。キャプチャ スケジュールを削除するには、その行の「X」ボタンをクリックしてください。
キャプチャ 24/7 常時オン
キャプチャ 24/7 常時オンは、多くのアプリケーションの要件になっています。以下の手順で24/7パケット キャプチャの設定方法を示します。このモードは夜間も切れ目なくキャプチャ ファイルをロールし、パケット ドロップがありません。このモードではデバイスの電源が入っていれば、リブート後でもキャプチャします。
手順1) スケジュールの予定表に新たに行を追加します。下で示す緑色のプラスボタンをクリックしてください。

手順2) 下に示すように時間の欄がブランクの行が表示されます。

手順3) 予め用意したキャプチャ名を入力します。キャプチャが開始されるとシステムが自動で そのキャプチャ名に_YYYYMMDD_HHMMSSの形で日時の接尾辞を付け足します。
例えば、下のストリーム名の「always_capture」の場合、「always_capture_20160101_000000」、「always_capture_20160102_000000」等になります。
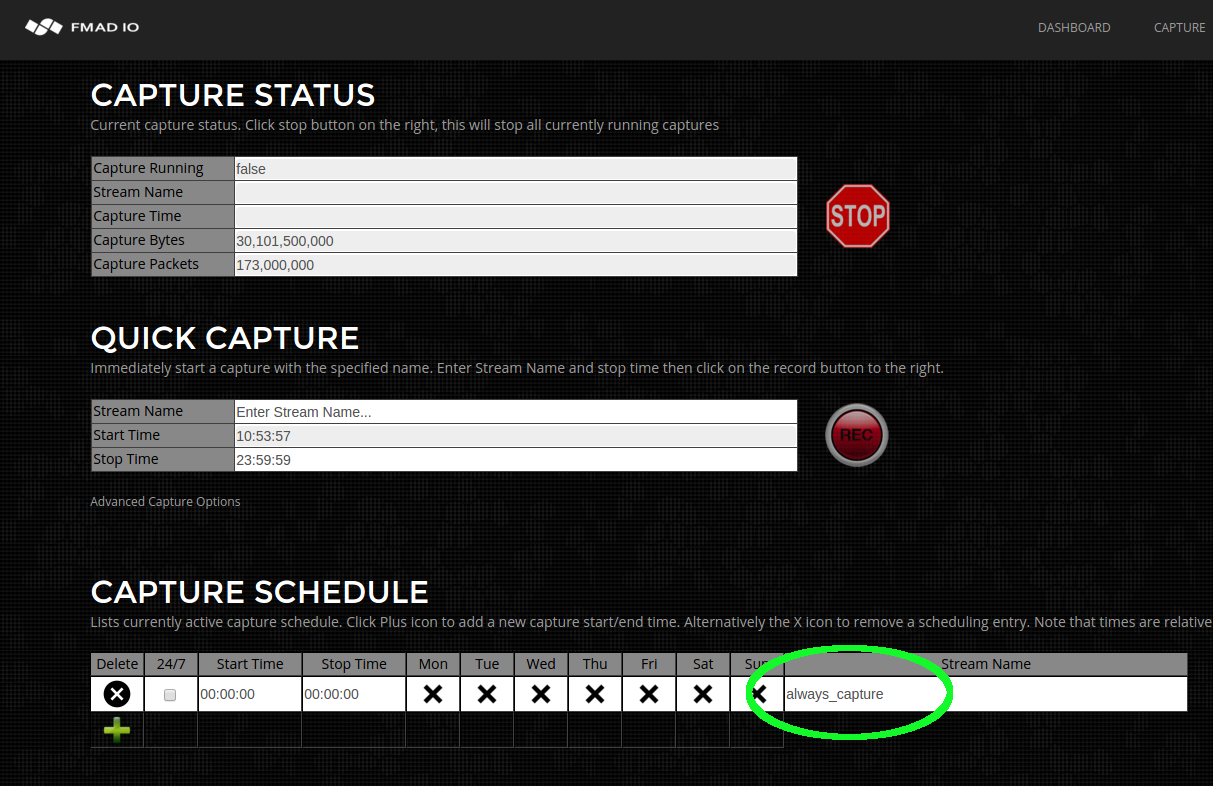
手順4) 24/7キャプチャのチェックボックスをオンにします。日時欄がグレーの表示になっていることを確認してください。
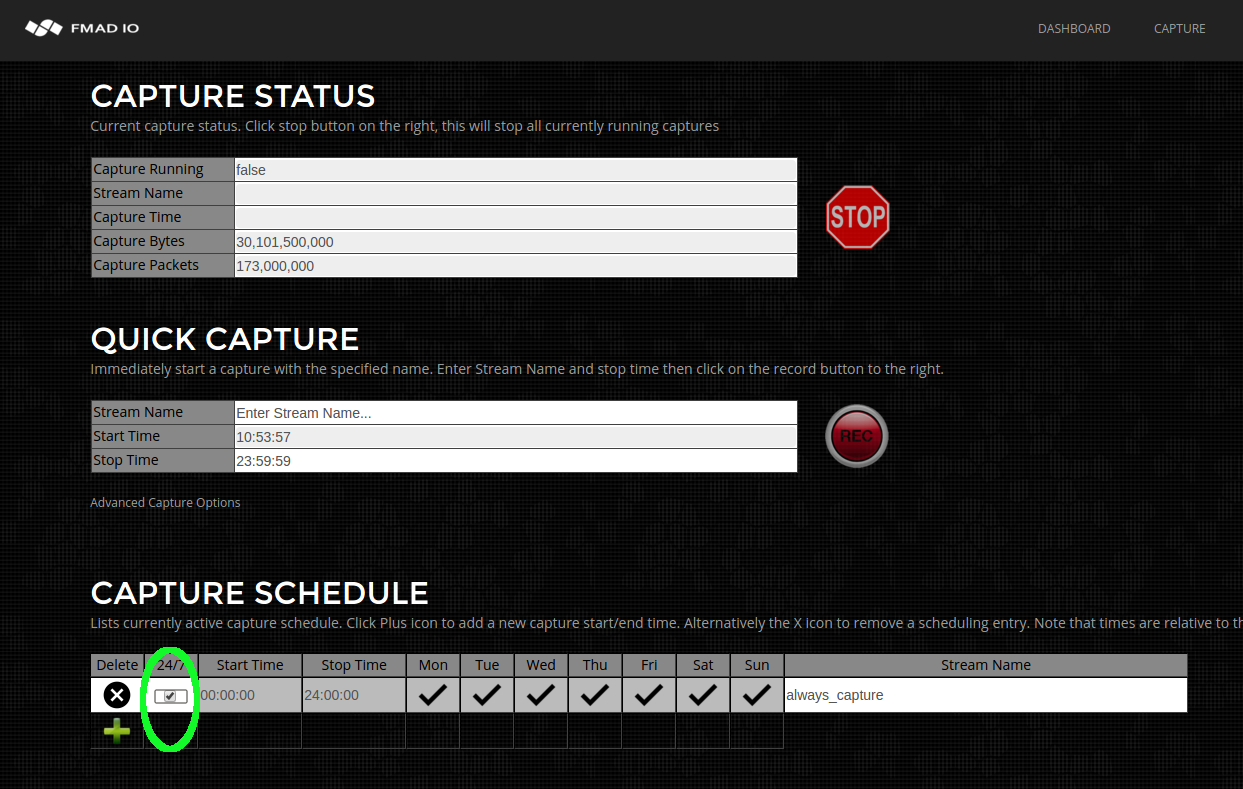
これでシステムが常時キャプチャのモードになりました。システムの電源がオンであれば、リブート後であってもキャプチャを実行します。24/7キャプチャを停止するには「X」ボタンをクリックしてその行を消去してください。
キャプチャ プレフィルタ
ストレージに書き込む前のパケット ストリームのフィルタリングには多くのアプリケーションがあります。例えば、企業コンプライアンスの理由からバックアップ トランスファーのドロップ、重複するパケット ストリームの削除、または、暗号化されたトラフィックのスライスがあります。当社のFMADIO20デバイスでは8つのプレキャプチャ フィルタ ルールにより、ストレージに書き込む前にパケットをドロップまたはスライスします。
以下の例ではすべてのHTTPSデータをストレージに書き込む前にドロップします。
注意: キャプチャプレフィルタはFMADIO20デバイスでのみ使用できます。
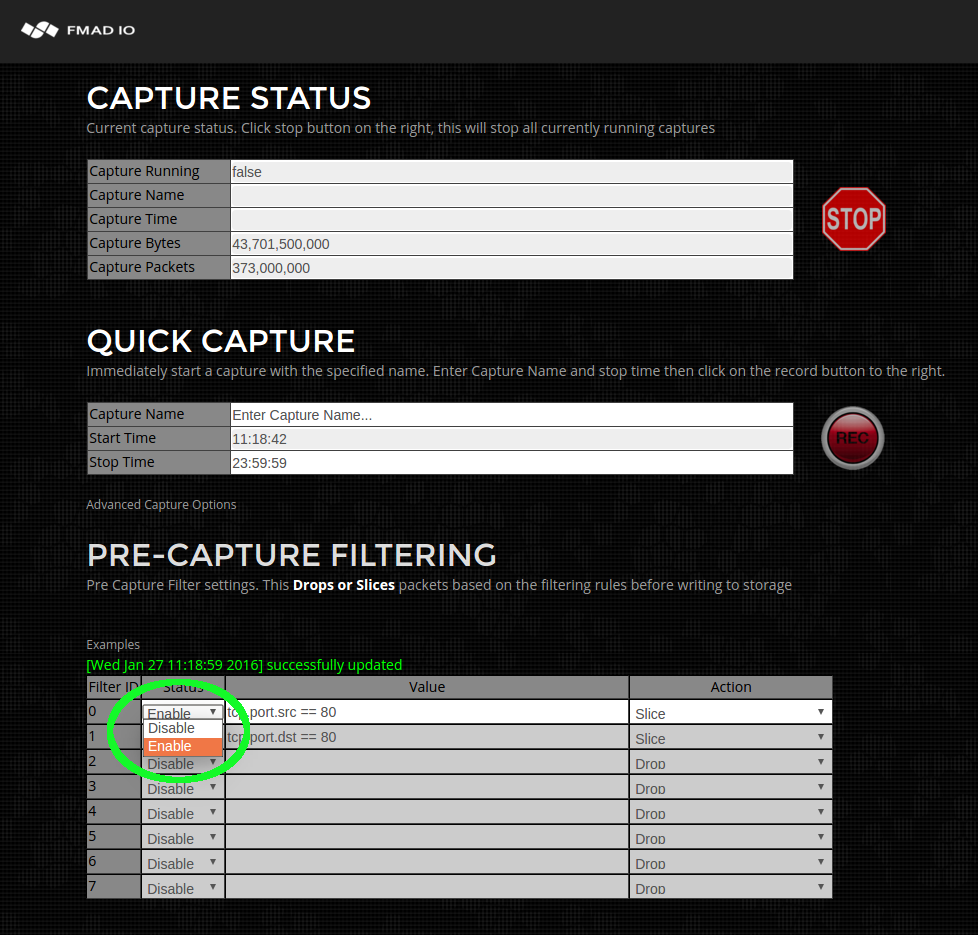
手順1) キャプチャ設定ページでAdvancedメニューを開きます。
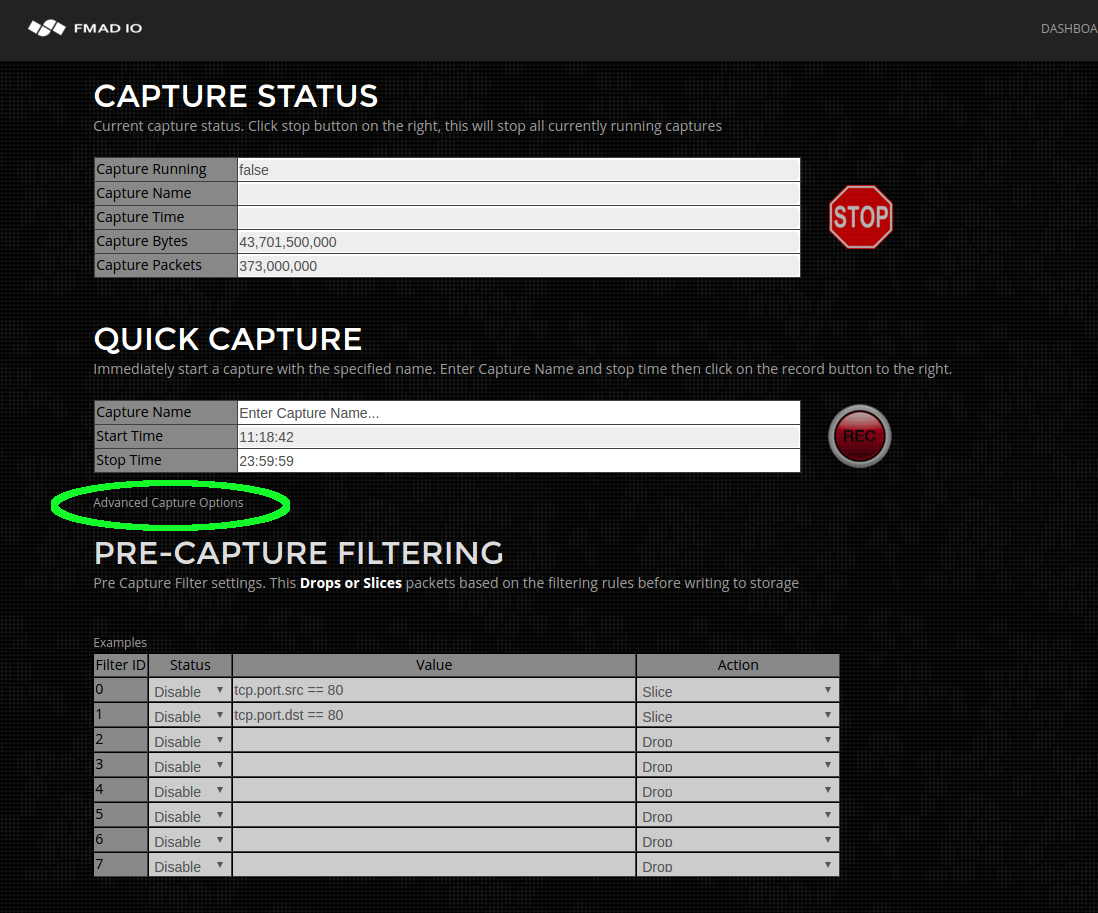
手順2) 以下に示す通りにプレフィルタ規則を有効にします。
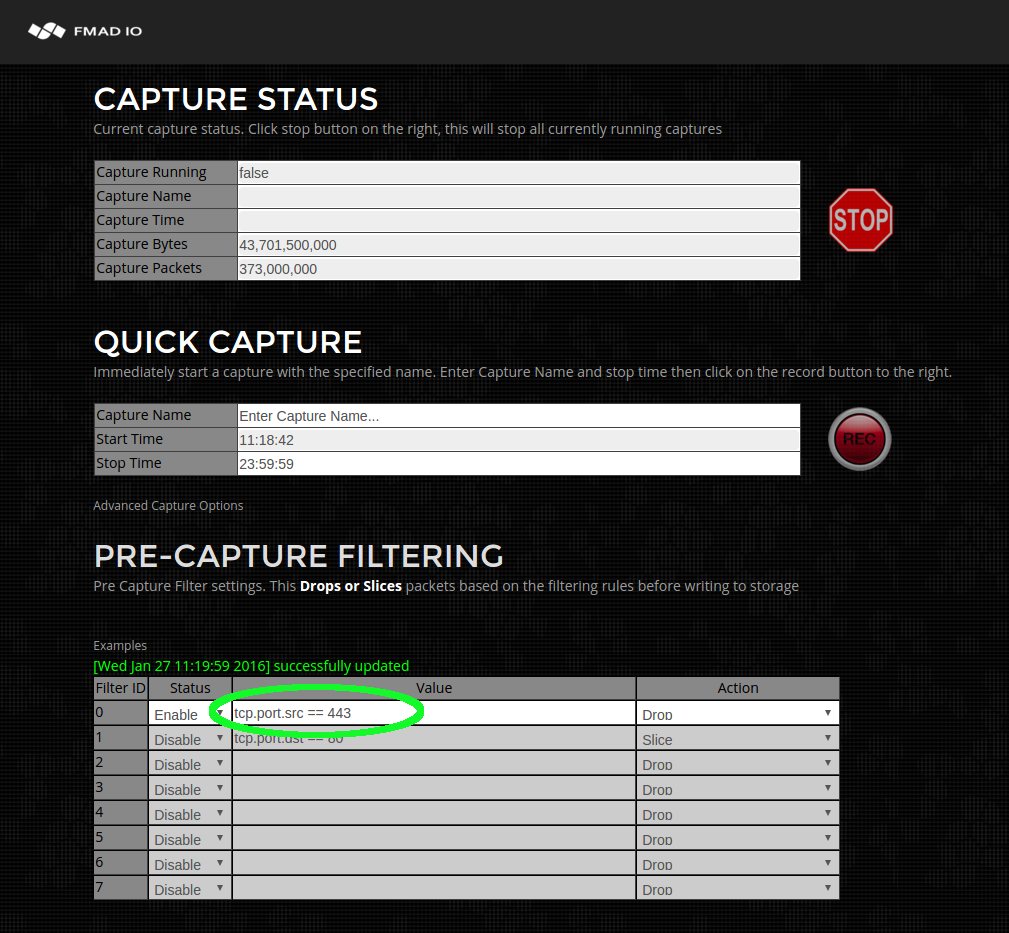
手順3) プレフィルタ条件を入力します。この場合はすべてのHTTPSソースのトラフィックです。
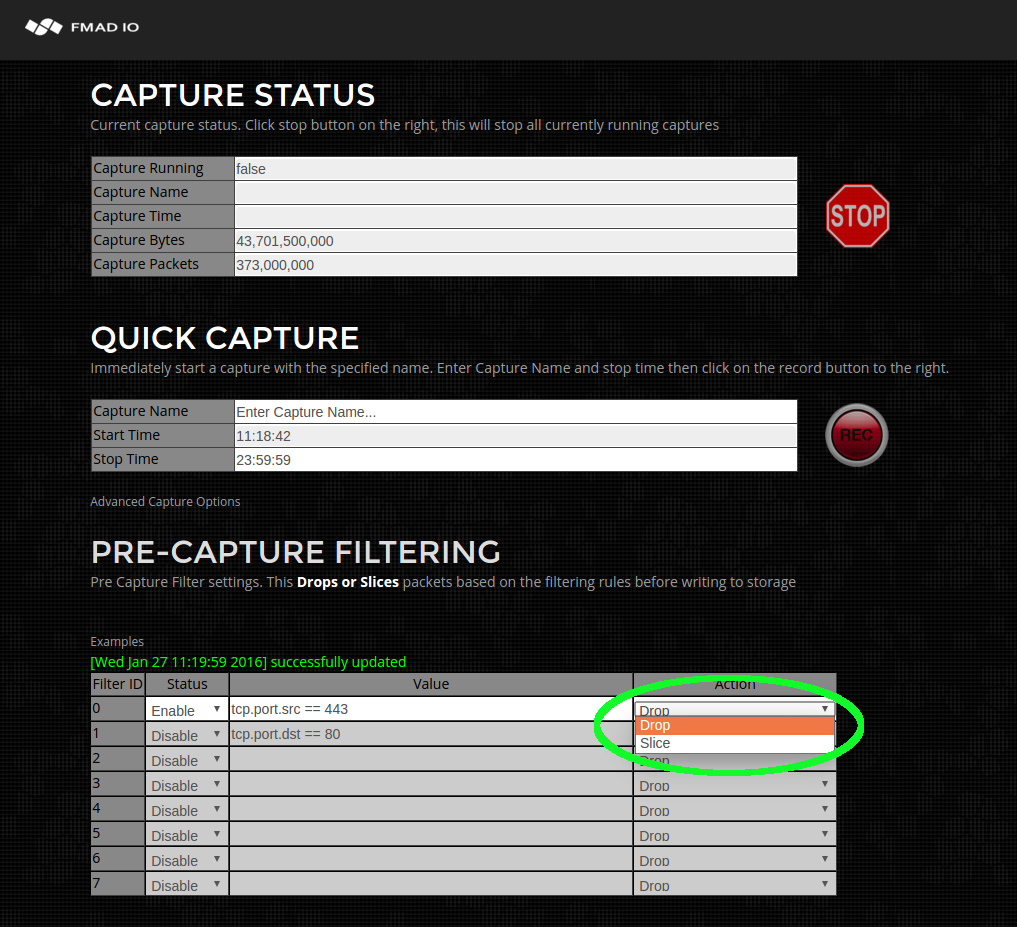
手順4) 実行するアクションを入力します。この場合、パケットを完全にドロップします。
手順5) 双方向のHTTPSフィルタリングの対象の送信先ポート用に手順を繰り返します。
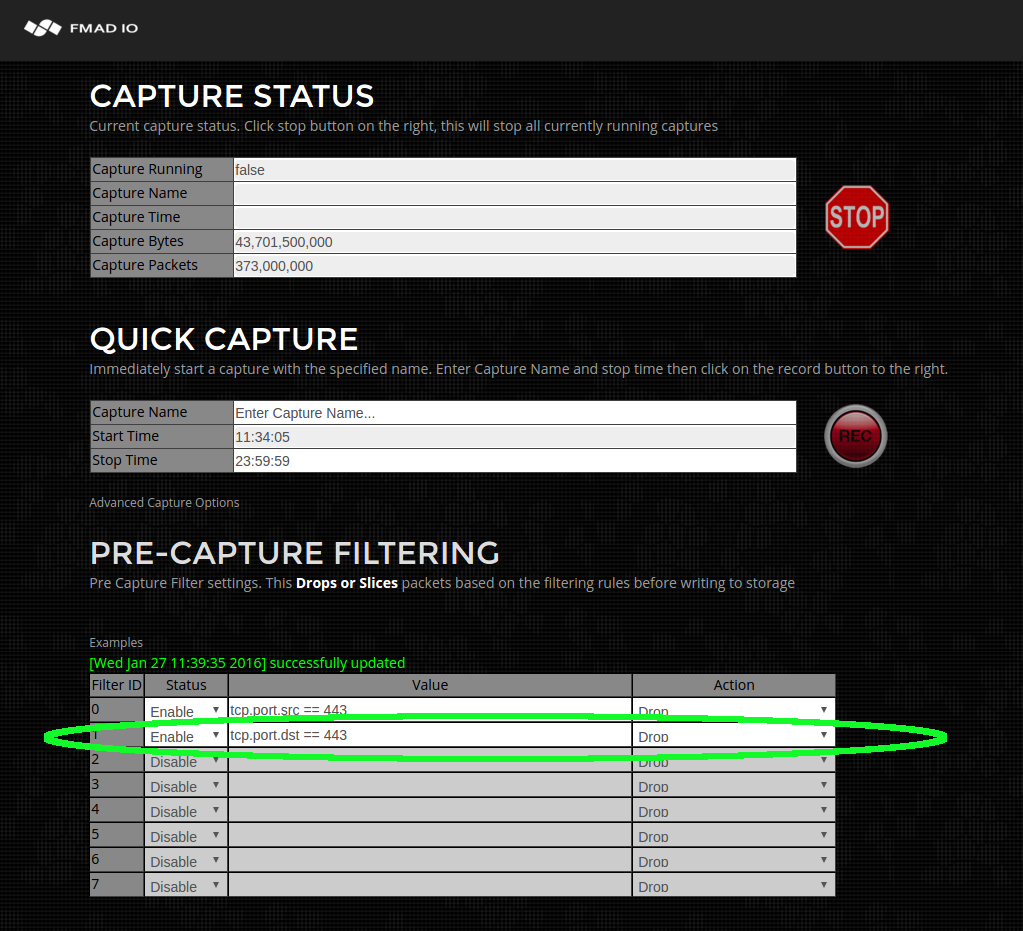
フィルタリングは完全に作動しなければならず、1秒にパケット30Mにつき20Gbsを占めるため、8つの単純な規則までしか利用できません。内部ではパケットの最初の128Bに8つの個別のマスク及びバリュー比較があります。カスタムフィルタが必要な場合はご連絡ください。
Example Filters:
| ipv4.src == 192.168.1.1 | IPv4 source filter single IP |
| ipv4.dst == 192.168.1.0/24 | IPv4 dest filter /24 subnet |
| ipv4.proto == tcp | IPv4 filter TCP traffic |
| ipv4.proto == udp | IPv4 filter UDP traffic |
| ipv4.proto == 42 | IPv4 filter protocol 42 |
| ipv6.src == 3ffe:507:0:1:200:86ff:fe05:80da | IPv6 source filter single IP |
| ipv6.dst == 3ffe:507:0:1:200:86ff:fe05:80da | IPv6 source filter single IP |
| mac.src == 00:01:02:03:04:05 | MAC Filter source address |
| mac.dst == 00:01:02:03:04:05 | MAC Filter dest address |
| mac.proto == 0x0806 | MAC Filter hex protcol number 0x0806 (ARP) |
| tcp.port.src == 80 | TCP source port filter 80 (HTTP) |
| tcp.port.dst == 80 | TCP dest port filter 80 (HTTP) |
| udp.port.src == 53 | UDP source port filter 53 (DNS) |
| udp.port.dst == 53 | UDP dest port filter 53 (DNS) |
キャプチャ 開始と停止(CLI)
非常に簡単に、コマンドラインインターフェイス(CLI)を使って手動でキャプチャを開始したり、停止したりすることができます。これは、正確にフォーマットされたURLリクエストを必要とします。下の例では、CURLを使っていますが、HTTP機能を使ったどんなプログラムも動きます。下の例ではユーザー名は"user"、パスワードは"password"としていますが、正しい情報に置き換えてください。
CLI インターフェイス: キャプチャステータス
キャプチャを開始したり、停止したりする前に、現在のシステムのキャプチャステータスを確認するのに便利です。次のURLは現在のシステムステータスをリターンします。
curl "http://fmadio.probe.ip/sysmaster/status"
例えば、パケットスニファがアクティブでデータをキャプチャしているとき、出力は下のテキストのようになります。
$ curl -u user:pass "http://192.168.11.75/sysmaster/status"
uptime,                                             0D 3H 36M
packets_received,                                   453468480
packets_dropped,                                            0
packets_errors,                                             0
packets_captured,                                   453468480
bytes_captured,                                   30835857408
bytes_pending,                                     4812701696
bytes_cache,                                                0
bytes_disk,                                       33742389248
capture_link,                                              up
capture_link_uptime,                                0D 3H 36M
capture_link_speed,                                     10000
capture_bytes,                                    31705286552
capture_packets,                                    466254210
capture_bps,                                       7726900224
capture_pps,                                         14203859
capture_name,                              manual_capture_cli
capture_active,                                          true
システムがキャプチャしていない場合は、次のようになります。
$ curl -u user:pass "http://192.168.11.75/sysmaster/status"
uptime,                                             0D 3H 28M
packets_received,                                   400000000
packets_dropped,                                            0
packets_errors,                                             0
packets_captured,                                   400000000
bytes_captured,                                   27200000000
bytes_pending,                                              0
bytes_cache,                                                0
bytes_disk,                                       33600831488
capture_link,                                              up
capture_link_uptime,                                0D 3H 28M
capture_link_speed,                                     10000
capture_bytes,                                    27200000000
capture_packets,                                    400000000
capture_bps,                                                0
capture_pps,                                                0
capture_name,                                            none
capture_active,                                         false
御覧のように、これは簡単に構文解析できる単純なフォーマットで、コンパクトモニタリングスクリプトの使用に優れています。例えば:
$ curl -s -u user:pass "http://192.168.11.75/sysmaster/status" | grep capture_active
capture_active,                                          true
CLI インターフェイス: キャプチャを開始
CLIからキャプチャを開始することも非常に簡単で、次のURLフォーマットを使います。
http://capture.sys.ip/sysmaster/capture_start?StreamName=enter_stream_name_here
これがキャプチャを開始し、JSONフォーマットでリクエスト結果をリターンします。次の例は、"cli_capture"という名前でキャプチャを開始し、そのキャプチャステータスを確認しています。
$ curl -u user:pass "http://192.168.11.75/sysmaster/capture_start?StreamName=cli_capture"
{"Status":true,"Str":"[Sat Jun 20 20:28:55 2015] successfully started capture [cli_capture]"}


$ curl -u user:pass "http://192.168.11.75/sysmaster/status"
uptime,                                              0D 0H 3M
packets_received,                                           0
packets_dropped,                                            0
packets_errors,                                             0
packets_captured,                                           0
bytes_captured,                                             0
bytes_pending,                                              0
bytes_cache,                                                0
bytes_disk,                                       22325755904
capture_link,                                              up
capture_link_uptime,                                 0D 0H 3M
capture_link_speed,                                     10000
capture_bytes,                                              0
capture_packets,                                            0
capture_bps,                                                0
capture_pps,                                                0
capture_name,                                     cli_capture
capture_active,                                          true
CLI インターフェイス:キャプチャを停止
CLIを通したキャプチャの停止は、ストリームの名前を必要としないのでさらに簡単です。 現在作動中のどんなキャプチャを停止する場合にも、次のURLを使ってください。
http://capture.sys.ip/sysmaster/capture_stop
次の例は以前のキャプチャステータスを示していて、キャプチャを停止し、キャプチャが停止しているかどうか確かめています。
$ curl -u user:pass "http://192.168.11.75/sysmaster/status"
uptime,                                              0D 0H 9M
packets_received,                                   101000000
packets_dropped,                                            0
packets_errors,                                             0
packets_captured,                                   101000000
bytes_captured,                                    6867999744
bytes_pending,                                     7142375424
bytes_cache,                                                0
bytes_disk,                                       23657971712
capture_link,                                              up
capture_link_uptime,                                 0D 0H 9M
capture_link_speed,                                     10000
capture_bytes,                                     6868000000
capture_packets,                                    101000000
capture_bps,                                                0
capture_pps,                                                0
capture_name,                                     cli_capture
capture_active,                                          true


$ curl -u user:pass "http://192.168.11.75/sysmaster/capture_stop"
{"Status":true,"Str":"[Sat Jun 20 20:39:17 2015] successfully stopped capture [cli_capture]"}


$ curl -u user:pass "http://192.168.11.75/sysmaster/status"
uptime,                                             0D 0H 11M
packets_received,                                   101000000
packets_dropped,                                            0
packets_errors,                                             0
packets_captured,                                   101000000
bytes_captured,                                    6867999744
bytes_pending,                                              0
bytes_cache,                                                0
bytes_disk,                                       30809784320
capture_link,                                              up
capture_link_uptime,                                0D 0H 11M
capture_link_speed,                                     10000
capture_bytes,                                     6868000000
capture_packets,                                    101000000
capture_bps,                                                0
capture_pps,                                                0
capture_name,                                            none
capture_active,                                         false
とてもシンプルで簡単なので、重要なタスクに時間を使えます。
CLIインターフェイス: 概略
CLI操作の概略は次の通りです:
| 操作 | URL |
| キャプチャの開始 |
http://capture.sys.ip/sysmaster/capture_start?StreamName=insert_stream_name_here
|
| キャプチャの停止 |
http://capture.sys.ip/sysmaster/capture_stop
|
| キャプチャステータス |
http://capture.sys.ip/sysmaster/status
|
PCAPのダウンロード (Web)
PCAPの簡単で使いやすいダウンロードは、FMADIOのキャプチャシステムの重要な目的です。FMADIOのキャプチャシステムは、データの同時複合的なビューを提供します。例えば、PCAP1秒分割、PCAP 1時間分割、1GB分割などです。もちろん、PCAPごとシングルファイルとしてフェッチすることもサポートしています。
サポートされたPCAP分割オプションのリストは以下の通りです。
- シングルファイル
- 1秒分割
- 10秒分割
- 1分分割
- 10分分割
- 15分分割
- 1時間分割
- 1 MBサイズ分割
- 10 MBサイズ分割
- 100 MBサイズ分割
- 1 GBサイズ分割
- 10 GBサイズ分割
- 100 GBサイズ分割
- 1 TB 分割
すべてのビュー/分割は、同時にあらゆるキャプチャに利用できます。
1時間分割でキャプチャを見たり、ダウンロードしたり、分析出来ますが、コンフィグレーションの変更なしでも一秒分割でもできます。弊社の非常に最適化されたソフトウェアは、効果的なネットワークトラブルシューティングを可能にした多様な方法でキャプチャ分割を可能にします。
Web: PCAPをダウンロード
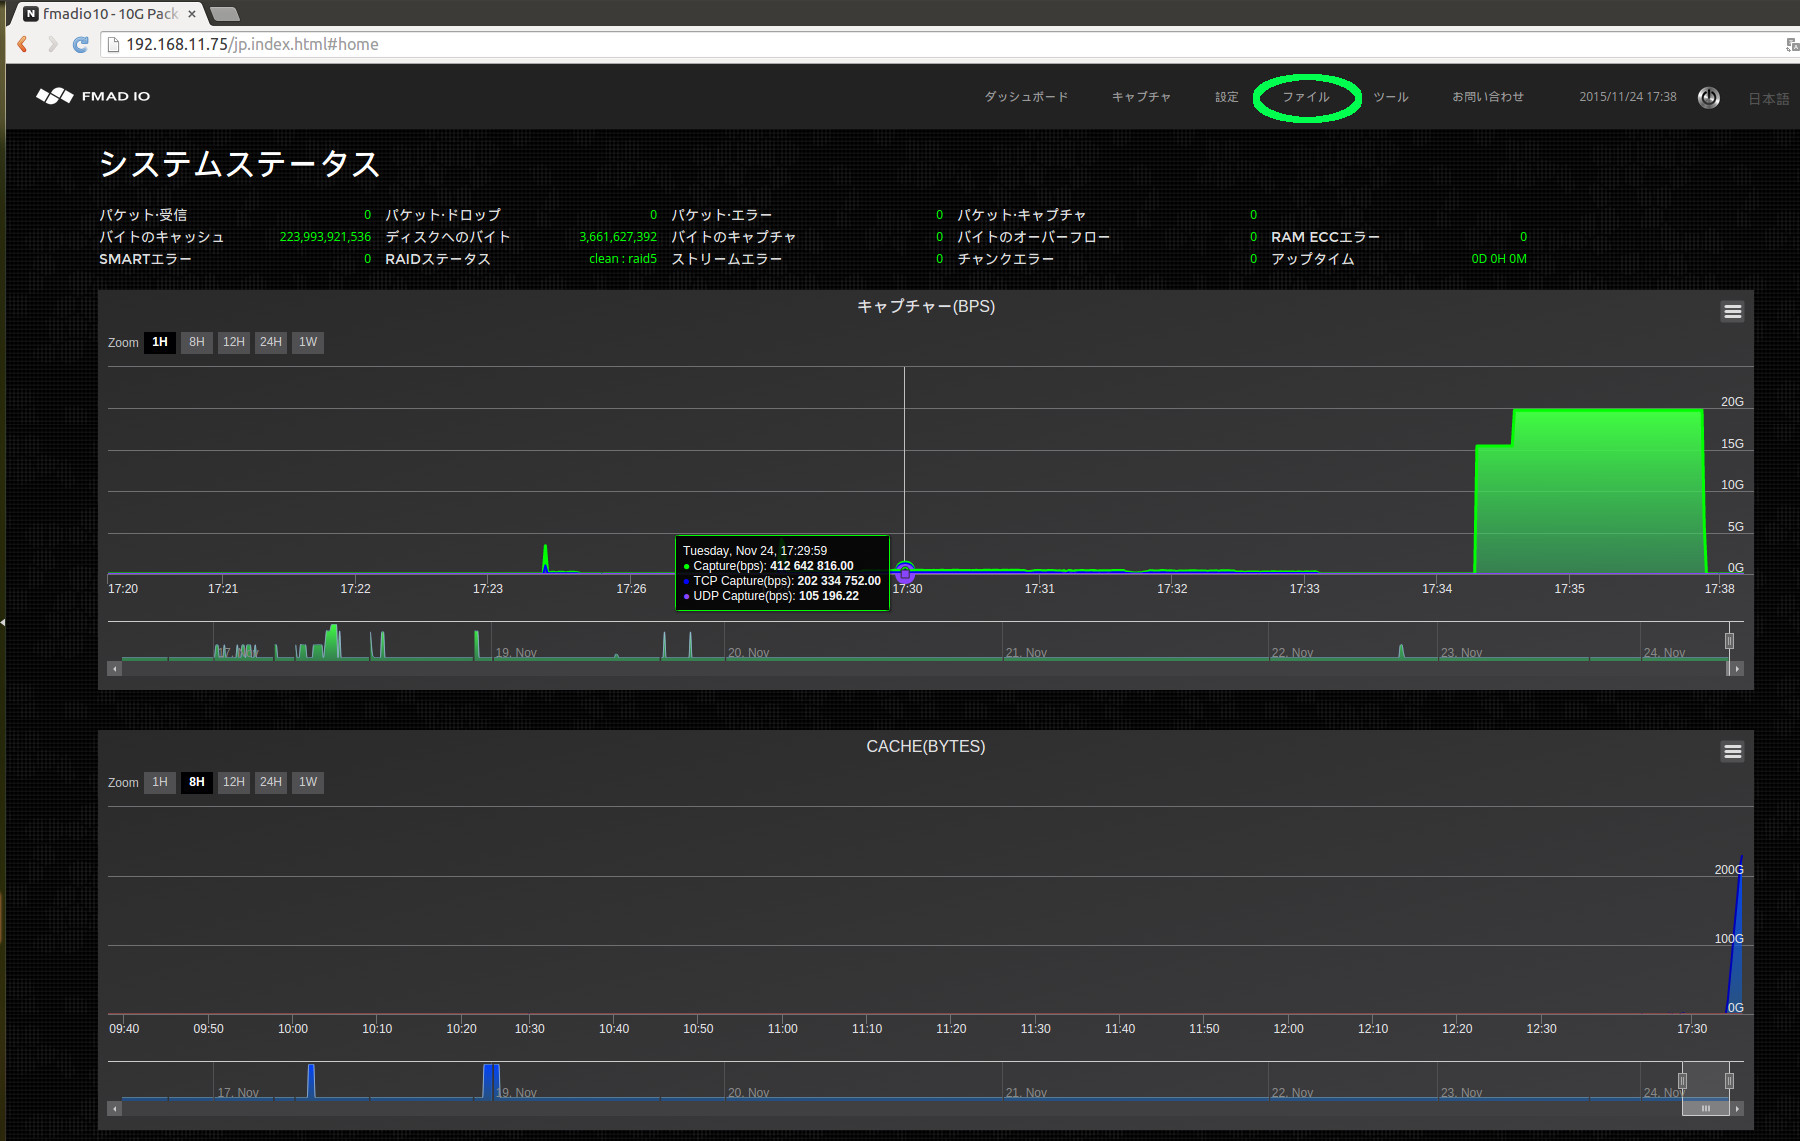
以下に緑で印をつけているようにファイルメニューにアクセスして始めてください。
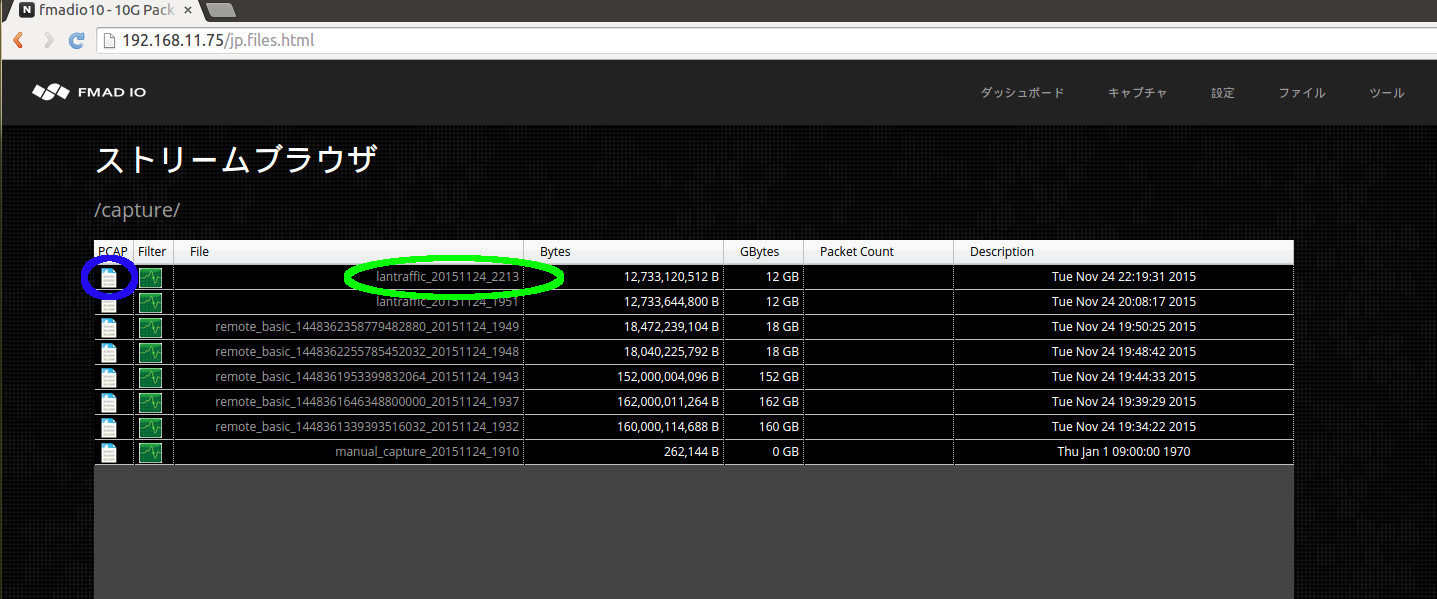
ファイルメニューをクリックすると、システム上の現在のすべてのキャプチャが表示されます。下の例では、"lantraffic_20151124_2213"と名付けられたキャプチャを欲しいと思っていて、青で印をつけているアイコンが、PCAPシングルファイルとして全てのキャプチャをダウンロードするためのクイックリンクです。
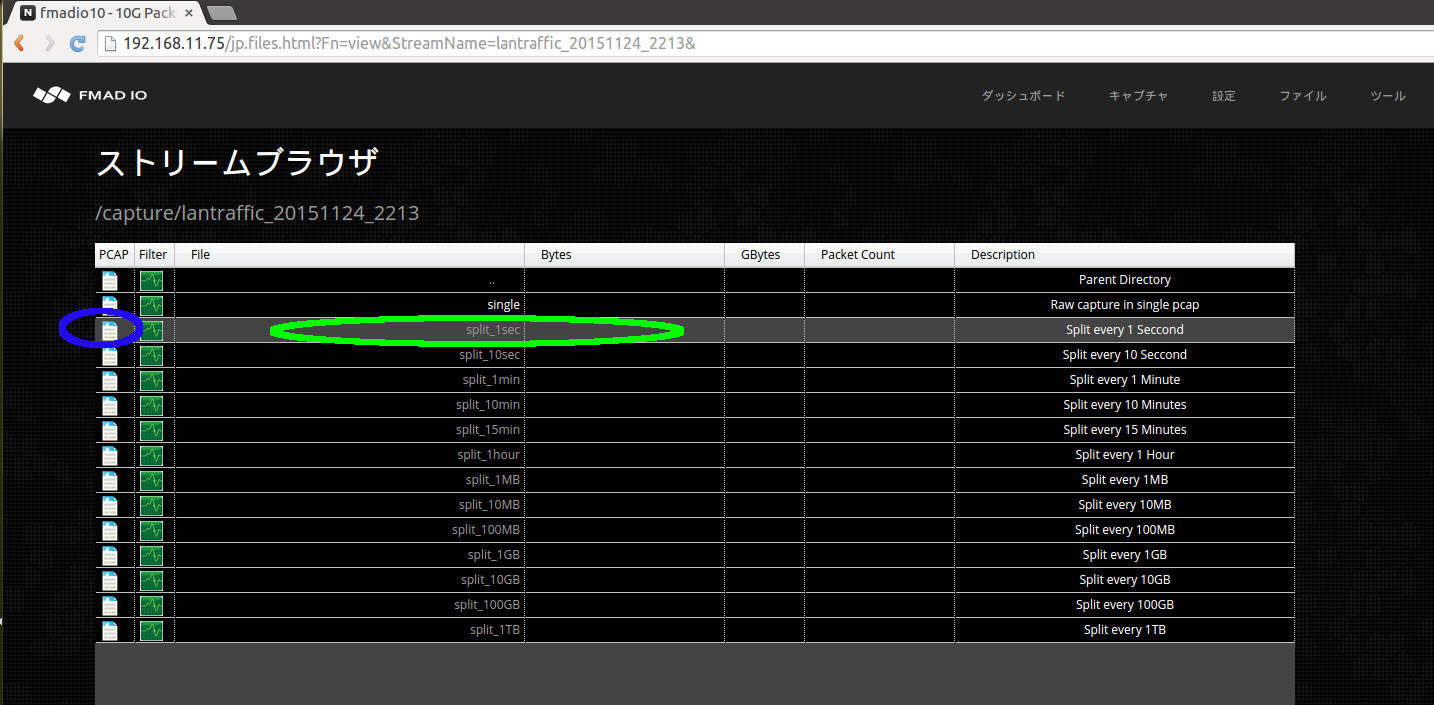
上に緑で印をつけているリンクをクリックすると、システムはキャプチャのすべての分割とビューを表示します (下の画像に示している)。キャプチャのすべてのビューが表示されると、 手元にあるタスクのための最も適切なビューを選ぶことが可能になります。この場合は、緑で印をつけているように1秒分割を選びます。
上の画像から一秒ビューをクリックした後、下のスクリーンショットでは毎秒分割の全リストを見ることができます。
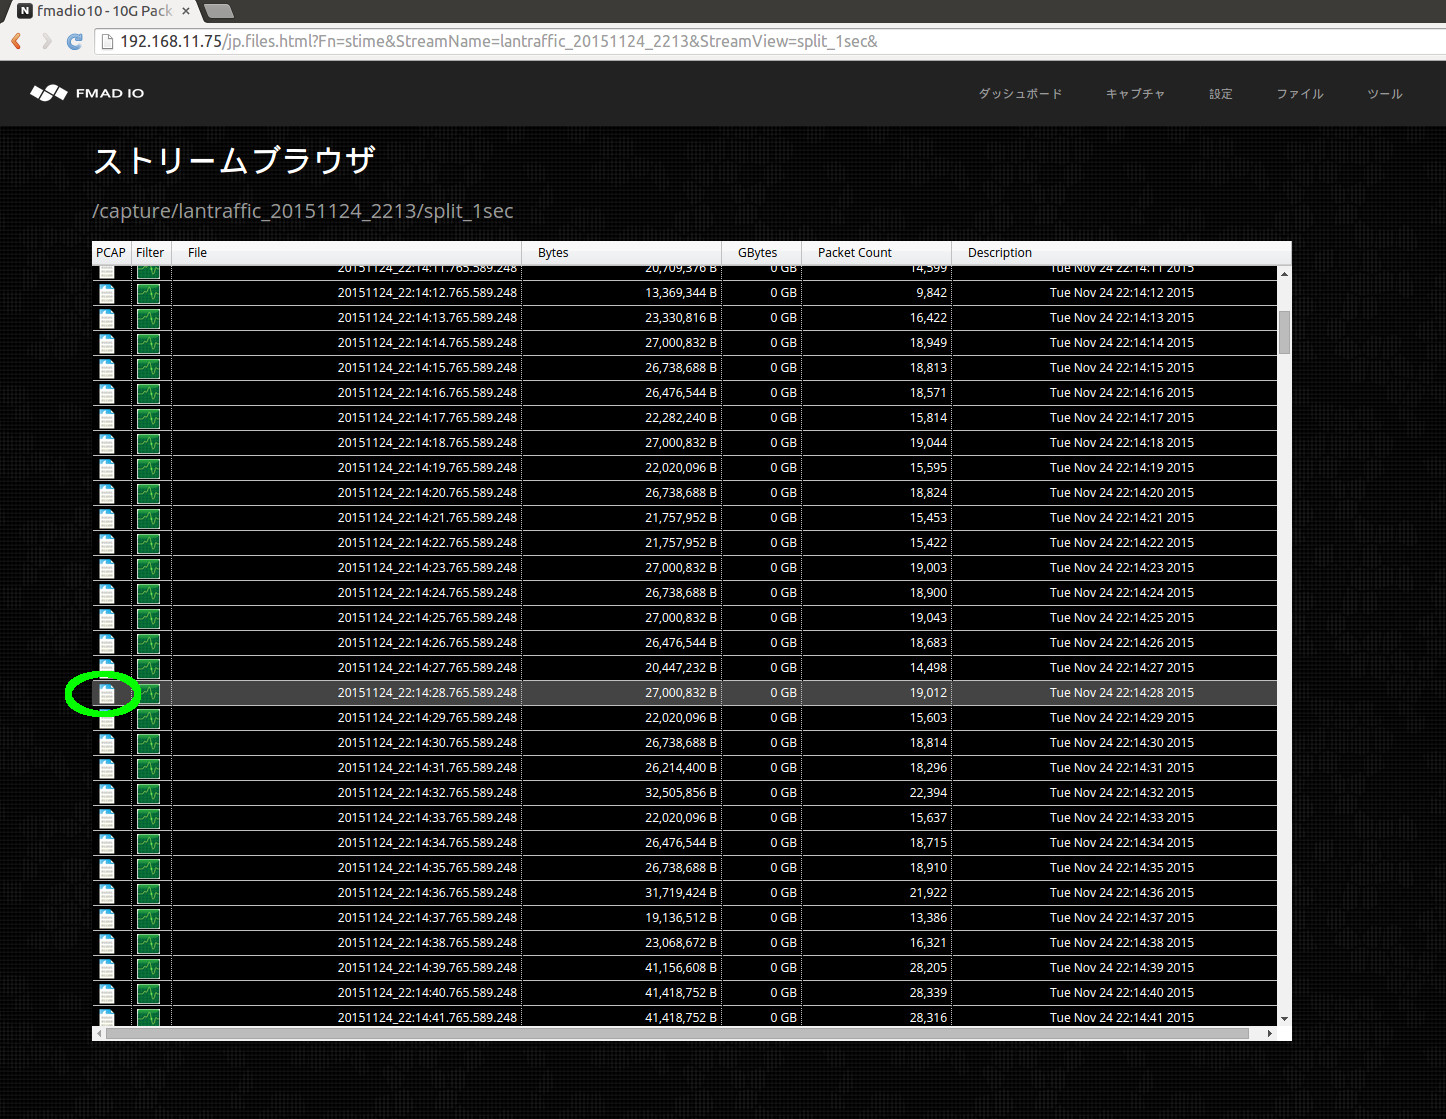
PCAPアイコン(上に緑で印をつけている)をクリックすると、ローカルディスクにファイルのダウンロードが始まります。ダウンロードが完了した後、ファイルはワイヤシャークか他のPCAP 処理ユーティリティーで開くことができます。下の例では、ワイヤシャークが要求されたファイルをロードしています。
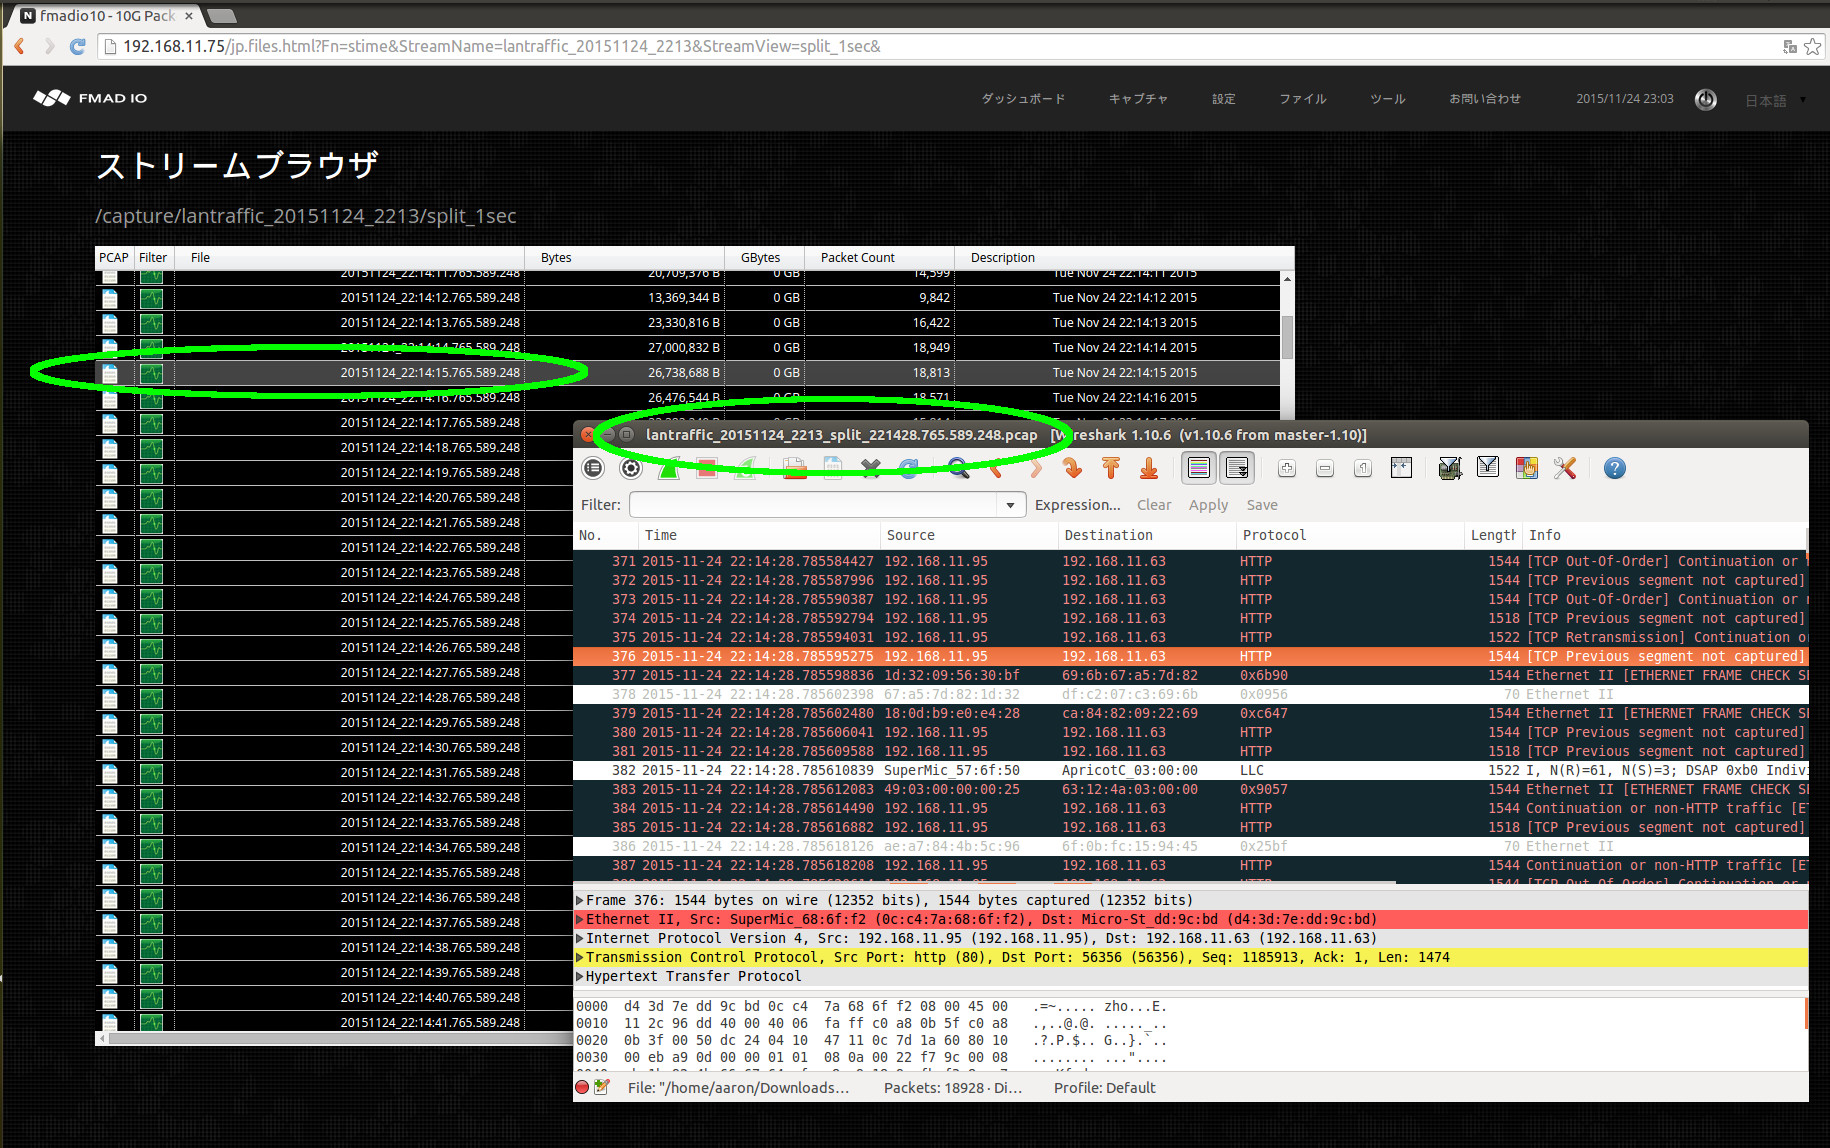
これが、PCAPファイルをシステムから抽出する方法の手短な例です。他のアプローチについての詳細は上級セクションを御覧ください。
PCAPのダウンロード(CLI)
Webインターフェイスを通したダウンロードは直感的で、シンプルですが、既存のスクリプトとインフラと統合する場合には適していません。このセクションでは、あなたの必要なPCAPを見つけ、ダウンロードするために、HTTPリクエストと単純なコマンドラインインターフェイス(CLI)の使用方法を説明します。
CLI: PCAPをダウンロード
次のURLフォーマットを使って、カンマ区切りのテキストファイルに、装置上のすべてのストリームを列挙し、開始してください。
http://192.168.11.75/plain/list
例:
$ curl -u user:pass "http://192.168.11.75/plain/list"

Filename                                                    , Size Bytes    , Packet Count  , Date                   ,Single PCAP Link,File Link,
cli_capture_20150620_2028                                   ,     8484028416,      101000000, Sat Jun 20 20:28:56 2015,/pcap/single?StreamName=cli_capture_20150620_2028&,/en.files.html?Fn=view&StreamName=cli_capture_20150620_2028&,
manual_capture_cli_20150620_1836                            ,    84000112640,     1000000000, Sat Jun 20 18:36:12 2015,/pcap/single?StreamName=manual_capture_cli_20150620_1836&,/en.files.html?Fn=view&StreamName=manual_capture_cli_20150620_1836&,
remote_split_1434790902645_20150620_1802                    ,     8400142336,      100000000, Sat Jun 20 18:02:06 2015,/pcap/single?StreamName=remote_split_1434790902645_20150620_1802&,/en.files.html?Fn=view&StreamName=remote_split_1434790902645_20150620_1802&,
remote_split_1434790250968_20150620_1751                    ,     8400142336,      100000000, Sat Jun 20 17:51:14 2015,/pcap/single?StreamName=remote_split_1434790250968_20150620_1751&,/en.files.html?Fn=view&StreamName=remote_split_1434790250968_20150620_1751&,
manual_capture_20150620_1730                                ,         262144,              0, Sat Jun 20 17:30:13 2015,/pcap/single?StreamName=manual_capture_20150620_1730&,/en.files.html?Fn=view&StreamName=manual_capture_20150620_1730&,
remote_split_1434781447634_20150620_1524                    ,     8400142336,      100000000, Sat Jun 20 15:24:31 2015,/pcap/single?StreamName=remote_split_1434781447634_20150620_1524&,/en.files.html?Fn=view&StreamName=remote_split_1434781447634_20150620_1524&,
remote_split_1434780537092_20150620_1509                    ,     8400142336,      100000000, Sat Jun 20 15:09:21 2015,/pcap/single?StreamName=remote_split_1434780537092_20150620_1509&,/en.files.html?Fn=view&StreamName=remote_split_1434780537092_20150620_1509&,
remote_capture_reboot_1434777911130445056_20150620_1425     ,     8399880192,       99998575, Sat Jun 20 14:25:35 2015,/pcap/single?StreamName=remote_capture_reboot_1434777911130445056_20150620_1425&,/en.files.html?Fn=view&StreamName=remote_capture_reboot_1434777911130445056_20150620_1425&,
remote_capture_reboot_1434777685258077952_20150620_1421     ,     8399880192,       99998575, Sat Jun 20 14:21:49 2015,/pcap/single?StreamName=remote_capture_reboot_1434777685258077952_20150620_1421&,/en.files.html?Fn=view&StreamName=remote_capture_reboot_1434777685258077952_20150620_1421&,
remote_capture_reboot_1434777459172079104_20150620_1418     ,     8399880192,       99998575, Sat Jun 20 14:18:03 2015,/pcap/single?StreamName=remote_capture_reboot_1434777459172079104_20150620_1418&,/en.files.html?Fn=view&StreamName=remote_capture_reboot_1434777459172079104_20150620_1418&,
remote_capture_reboot_1434777233614947072_20150620_1414     ,     8399880192,       99998575, Sat Jun 20 14:14:17 2015,/pcap/single?StreamName=remote_capture_reboot_1434777233614947072_20150620_1414&,/en.files.html?Fn=view&StreamName=remote_capture_reboot_1434777233614947072_20150620_1414&,
remote_capture_reboot_1434777007262298880_20150620_1410     ,     8399880192,       99998575, Sat Jun 20 14:10:31 2015,/pcap/single?StreamName=remote_capture_reboot_1434777007262298880_20150620_1410&,/en.files.html?Fn=view&StreamName=remote_capture_reboot_1434777007262298880_20150620_1410&,
remote_capture_reboot_1434776760119515904_20150620_1406     ,     8399880192,       99998575, Sat Jun 20 14:06:24 2015,/pcap/single?StreamName=remote_capture_reboot_1434776760119515904_20150620_1406&,/en.files.html?Fn=view&StreamName=remote_capture_reboot_1434776760119515904_20150620_1406&,
remote_capture_reboot_1434776535094639104_20150620_1402     ,     8399880192,       99998575, Sat Jun 20 14:02:39 2015,/pcap/single?StreamName=remote_capture_reboot_1434776535094639104_20150620_1402&,/en.files.html?Fn=view&StreamName=remote_capture_reboot_1434776535094639104_20150620_1402&,
remote_capture_reboot_1434776309877481984_20150620_1358     ,     8399880192,       99998575, Sat Jun 20 13:58:54 2015,/pcap/single?StreamName=remote_capture_reboot_1434776309877481984_20150620_1358&,/en.files.html?Fn=view&StreamName=remote_capture_reboot_1434776309877481984_20150620_1358&,
remote_capture_reboot_1434776084655464960_20150620_1355     ,     8399880192,       99998575, Sat Jun 20 13:55:09 2015,/pcap/single?StreamName=remote_capture_reboot_1434776084655464960_20150620_1355&,/en.files.html?Fn=view&StreamName=remote_capture_reboot_1434776084655464960_20150620_1355&,
remote_capture_reboot_1434775857769832960_20150620_1351     ,     8399880192,       99998575, Sat Jun 20 13:51:22 2015,/pcap/single?StreamName=remote_capture_reboot_1434775857769832960_20150620_1351&,/en.files.html?Fn=view&StreamName=remote_capture_reboot_1434775857769832960_20150620_1351&,
remote_split_1434775647869_20150620_1347                    ,     8400142336,      100000000, Sat Jun 20 13:47:52 2015,/pcap/single?StreamName=remote_split_1434775647869_20150620_1347&,/en.files.html?Fn=view&StreamName=remote_split_1434775647869_20150620_1347&,
remote_reboot1434773930619883008_20150620_1319              ,     8400142336,      100000000, Sat Jun 20 13:19:15 2015,/pcap/single?StreamName=remote_reboot1434773930619883008_20150620_1319&,/en.files.html?Fn=view&StreamName=remote_reboot1434773930619883008_20150620_1319&,
remote_reboot1434773735263832064_20150620_1315              ,     8400142336,      100000000, Sat Jun 20 13:15:59 2015,/pcap/single?StreamName=remote_reboot1434773735263832064_20150620_1315&,/en.files.html?Fn=view&StreamName=remote_reboot1434773735263832064_20150620_1315&,
remote_reboot1434773540472738048_20150620_1312              ,     8400142336,      100000000, Sat Jun 20 13:12:44 2015,/pcap/single?StreamName=remote_reboot1434773540472738048_20150620_1312&,/en.files.html?Fn=view&StreamName=remote_reboot1434773540472738048_20150620_1312&,
remote_reboot1434773345743976960_20150620_1309              ,     8400142336,      100000000, Sat Jun 20 13:09:30 2015,/pcap/single?StreamName=remote_reboot1434773345743976960_20150620_1309&,/en.files.html?Fn=view&StreamName=remote_reboot1434773345743976960_20150620_1309&,
remote_reboot1434773148835964928_20150620_1306              ,     8400142336,      100000000, Sat Jun 20 13:06:13 2015,/pcap/single?StreamName=remote_reboot1434773148835964928_20150620_1306&,/en.files.html?Fn=view&StreamName=remote_reboot1434773148835964928_20150620_1306&,
remote_reboot1434772955000894976_20150620_1302              ,     8400142336,      100000000, Sat Jun 20 13:02:59 2015,/pcap/single?StreamName=remote_reboot1434772955000894976_20150620_1302&,/en.files.html?Fn=view&StreamName=remote_reboot1434772955000894976_20150620_1302&,
remote_reboot1434772759495929088_20150620_1259              ,     8400142336,      100000000, Sat Jun 20 12:59:44 2015,/pcap/single?StreamName=remote_reboot1434772759495929088_20150620_1259&,/en.files.html?Fn=view&StreamName=remote_reboot1434772759495929088_20150620_1259&,
remote_reboot1434772564984750080_20150620_1256              ,     8400142336,      100000000, Sat Jun 20 12:56:29 2015,/pcap/single?StreamName=remote_reboot1434772564984750080_20150620_1256&,/en.files.html?Fn=view&StreamName=remote_reboot1434772564984750080_20150620_1256&,
remote_reboot1434772368323953920_20150620_1253              ,     8400142336,      100000000, Sat Jun 20 12:53:12 2015,/pcap/single?StreamName=remote_reboot1434772368323953920_20150620_1253&,/en.files.html?Fn=view&StreamName=remote_reboot1434772368323953920_20150620_1253&,
remote_reboot1434772173499830016_20150620_1249              ,     8400142336,      100000000, Sat Jun 20 12:49:58 2015,/pcap/single?StreamName=remote_reboot1434772173499830016_20150620_1249&,/en.files.html?Fn=view&StreamName=remote_reboot1434772173499830016_20150620_1249&,
remote_reboot1434771978707971072_20150620_1246              ,     8400142336,      100000000, Sat Jun 20 12:46:43 2015,/pcap/single?StreamName=remote_reboot1434771978707971072_20150620_1246&,/en.files.html?Fn=view&StreamName=remote_reboot1434771978707971072_20150620_1246&,
上にあるものは、構文解析がわかりやすく、簡単な出力の例です。この場合、シングルファイルとしてダウンロードするために、"manual_capture_cli_20150620_1836"のストリームを選択します。
CLI: PCAPダウンロードシングルファイル
"manual_capture_cli_20150620_1836"のキャプチャをシングルPCAPとしてダウンロードするために、次のURLフォーマットを使ってください。
curl -u user:pass http://192.168.11.75/pcap/single?StreamName=InsertName > /capture/todays.pcap
例えば、"manual_capture_cli_20150620_1836"のキャプチャをそっくりそのままダウンロードする場合。
$ curl -u user:pass "http://192.168.11.75/pcap/single?StreamName=manual_capture_cli_20150620_1836" > /capture/todays.pcap

  % Total    % Received % Xferd  Average Speed   Time    Time     Time  Current
                                 Dload  Upload   Total   Spent    Left  Speed
 60 78.2G   60 47.3G    0     0  1010M      0  0:01:19  0:00:47  0:00:32 1024M

$
優秀なダウンロード速度は、10Gbitの管理ポートのキャパシティーの限界に達することに注意してください。
CLI: PCAP分割ダウンロード
キャプチャのすべての分割オプションを見るために、次のURLパターンを使ってください。
curl -u user:pass http://192.168.11.75/plain/view?StreamName=InsertName
例えば、以下にあるように次のリクエストは、"manual_capture_cli_20150620_1836"と名付けられたキャプチャのすべての分割オプションを示しています。
$ curl -u user:pass "http://192.168.11.75/plain/view?StreamName=manual_capture_cli_20150620_1836"
SplitMode                     , Link
split_1sec                    , /plain/split?StreamName=manual_capture_cli_20150620_1836&StreamView=split_1sec
split_10sec                   , /plain/split?StreamName=manual_capture_cli_20150620_1836&StreamView=split_10sec
split_1min                    , /plain/split?StreamName=manual_capture_cli_20150620_1836&StreamView=split_1min
split_10min                   , /plain/split?StreamName=manual_capture_cli_20150620_1836&StreamView=split_10min
split_15min                   , /plain/split?StreamName=manual_capture_cli_20150620_1836&StreamView=split_15min
split_1hour                   , /plain/split?StreamName=manual_capture_cli_20150620_1836&StreamView=split_1hour
split_1GB                     , /plain/split?StreamName=manual_capture_cli_20150620_1836&StreamView=split_1GB
split_10GB                    , /plain/split?StreamName=manual_capture_cli_20150620_1836&StreamView=split_10GB
split_100GB                   , /plain/split?StreamName=manual_capture_cli_20150620_1836&StreamView=split_100GB
split_1TB                     , /plain/split?StreamName=manual_capture_cli_20150620_1836&StreamView=split_1TB
最初のコラムが分割動作で、2つ目のコラムが分割ファイルを列挙するURLです。分割モードについて決めた後に、次のURLパターンをすべてのファイルを列挙するのに使います。
curl -u user:pass http://192.168.11.75/plain/split?StreamName=InsertName&StreamView=InsertView
例えば、"manual_capture_cli_20150620_1836"と名付けられたキャプチャから1秒分割のリストを抽出する場合。
$ curl -u user:pass "http://192.168.11.75/plain/split?StreamName=manual_capture_cli_20150620_1836&StreamView=split_1sec"
Name                          ,     Size Bytes, Packet Count, URL
20150620_18:36:47.780.373.248 ,     1193017344,     14202589, /pcap/splittime?StreamName=manual_capture_cli_20150620_1836&Start=1434793007780373366ULL&Stop=1434793008780383914ULL
20150620_18:36:48.780.384.000 ,     1193279488,     14205708, /pcap/splittime?StreamName=manual_capture_cli_20150620_1836&Start=1434793008780383914ULL&Stop=1434793009780514262ULL
20150620_18:36:49.780.514.304 ,     1193017344,     14202588, /pcap/splittime?StreamName=manual_capture_cli_20150620_1836&Start=1434793009780514262ULL&Stop=1434793010780424945ULL
20150620_18:36:50.780.424.960 ,     1193279488,     14205708, /pcap/splittime?StreamName=manual_capture_cli_20150620_1836&Start=1434793010780424945ULL&Stop=1434793011780555292ULL
20150620_18:36:51.780.555.264 ,     1193017344,     14202587, /pcap/splittime?StreamName=manual_capture_cli_20150620_1836&Start=1434793011780555292ULL&Stop=1434793012780465900ULL
20150620_18:36:52.780.465.920 ,     1193017344,     14202588, /pcap/splittime?StreamName=manual_capture_cli_20150620_1836&Start=1434793012780465900ULL&Stop=1434793013780376583ULL
20150620_18:36:53.780.376.576 ,     1193279488,     14205708, /pcap/splittime?StreamName=manual_capture_cli_20150620_1836&Start=1434793013780376583ULL&Stop=1434793014780506931ULL
20150620_18:36:54.780.506.880 ,     1193017344,     14202587, /pcap/splittime?StreamName=manual_capture_cli_20150620_1836&Start=1434793014780506931ULL&Stop=1434793015780417554ULL
20150620_18:36:55.780.417.536 ,     1193279488,     14205708, /pcap/splittime?StreamName=manual_capture_cli_20150620_1836&Start=1434793015780417554ULL&Stop=1434793016780547901ULL
20150620_18:36:56.780.547.840 ,     1193017344,     14202588, /pcap/splittime?StreamName=manual_capture_cli_20150620_1836&Start=1434793016780547901ULL&Stop=1434793017780458591ULL
20150620_18:36:57.780.458.496 ,     1193279488,     14205708, /pcap/splittime?StreamName=manual_capture_cli_20150620_1836&Start=1434793017780458591ULL&Stop=1434793018780588947ULL
20150620_18:36:58.780.589.056 ,     1193017344,     14202587, /pcap/splittime?StreamName=manual_capture_cli_20150620_1836&Start=1434793018780588947ULL&Stop=1434793019780499570ULL
.
.
.
上にあるものは、1秒分割間隔での"manual_capture_cli_20150620_1836"のキャプチャのすべての分割ファイル名を示しています。例にある"20150620_18:36:58"での1秒キャプチャのような特定の分割をダウンロードする場合は、上で入手したリンクを使ってください。それから、 下に示したCURLのgetコマンドを出してください。この例では、標準入力を使って出力をtcpdumpに送っています。
$ curl -u user:pass "http://192.168.11.75/pcap/splittime?StreamName=manual_capture_cli_20150620_1836&Start=1434793018780588947ULL&Stop=1434793019780499570ULL" | ./tcpdump_ns -r - -nn

  % Total    % Received % Xferd  Average Speed   Time    Time     Time  Current
                                 Dload  Upload   Total   Spent    Left  Speed
100    24    0    24    0     0      2      0 --:--:--  0:00:08 --:--:--     0reading from file -, link-type EN10MB (Ethernet)
18:36:58.780.589.081 66:77:88:99:aa:bb > 00:33:33:33:33:33 Null Information, send seq 76, rcv seq 18, Flags [Command], length 54
18:36:58.780.589.163 66:77:88:99:aa:bb > 00:33:33:33:33:33 Null Information, send seq 82, rcv seq 18, Flags [Command], length 54
18:36:58.780.589.222 66:77:88:99:aa:bb > 00:33:33:33:33:33 Null Information, send seq 88, rcv seq 18, Flags [Command], length 54
18:36:58.780.589.297 66:77:88:99:aa:bb > 00:33:33:33:33:33 Null Information, send seq 94, rcv seq 18, Flags [Command], length 54
18:36:58.780.589.364 66:77:88:99:aa:bb > 00:33:33:33:33:33 Null Information, send seq 100, rcv seq 18, Flags [Command], length 54
18:36:58.780.589.438 66:77:88:99:aa:bb > 00:33:33:33:33:33 Null Information, send seq 106, rcv seq 18, Flags [Command], length 54
18:36:58.780.589.506 66:77:88:99:aa:bb > 00:33:33:33:33:33 Null Information, send seq 112, rcv seq 18, Flags [Command], length 54
18:36:58.780.589.573 66:77:88:99:aa:bb > 00:33:33:33:33:33 Null Information, send seq 118, rcv seq 18, Flags [Command], length 54
18:36:58.780.589.655 66:77:88:99:aa:bb > 00:33:33:33:33:33 Null Information, send seq 124, rcv seq 18, Flags [Command], length 54
既存のスクリプトとインフラとの統合は、わかりやすい単純なHTTP/HTTPSリクエストを使うことで達成できます。
CLI ダウンロード: 概略
CLIダウンロード操作の概略:
| 操作 | URL |
| キャプチャを列挙 |
http://capture.sys.ip/plain/list
|
| シングルファイルをダウンロード |
http://capture.sys.ip/pcap/single?StreamName=InsertName
|
| キャプチャの様々な分割を列挙 |
http://capture.sys.ip/plain/view?StreamName=InsertName
|
| キャプチャの特定のファイルリストを列挙 |
http://capture.sys.ip/plain/split?StreamName=InsertName?StreamView=InsertView
|
PCAP File Upload
All FMADIO Packet capture systems can also uploaded raw PCAP files into the system. This allows Packetscope, Tcpscope and Analysis plugins to work on external and archived historical data. The upload functionality is heavily used internally for our own testing and regression frameworks.
Capturing must be stopped. Running Capture and Upload simultaneously results in undefined behavior
Upload Local PCAP
If the PCAP your uploading is small, you can
Step 1) scp the PCAP onto the OS disk. e.g. /mnt/store0/tmp2/
scp upload.pcap fmadio@192.168.1.1:/mnt/store0/tmp2/
Step 2) Upload using the utility stream_upload. The upload fetchs data via stdin allowing a wide range of options from a local PCAP file, to remote PCAP, to a curl URL or PCAP generation utility running on the system. The following example is a simple upload a PCAP thats on the local filesystem.
fmadio@fmadio20-049:/mnt/store0/tmp2$ cat hitcon_small.pcap | sudo stream_upload --name test_upload
FSPrefetch
FSPrefetch Chunk: 5000.184ms 5000ms
FSPrefetch Chunk timeoued: 5000.000ms max
create stream [test_upload_20170725_1625]
     0.178GB Uploaded
     0.610GB Uploaded
     0.864GB Uploaded
     1.116GB Uploaded
     1.335GB Uploaded
     1.472GB Uploaded
     1.667GB Uploaded
     1.793GB Uploaded
     1.947GB Uploaded
     2.225GB Uploaded
fmadio@fmadio20-049:/mnt/store0/tmp2$
Note: the timestamp resolution of the uploaded PCAP is automatically detected and converted to FMADIO native nanosecond format.
Step 3) Confirm upload.
fmadio@fmadio20-049:/mnt/store0/tmp2$ sudo stream_dump
Streams:
 [0000]    [this should be empty]      0GB Chunk(Cnt:       0 Start:       1 End:       0) Inv:-nan Cap:-nan CacheI:-nan Cache:-nan Disk:-nan Drop:-nan Pkt:0
 [0001] test_upload_20170725_1625      2GB Chunk(Cnt:    9341 Start:       8 End:    9348) Inv:0.000 Cap:0.000 CacheI:0.000 Cache:0.000 Disk:1.000 Drop:0.000 Pkt:10851045
Upload Remote PCAP
Sometimes you need to upload very large multi TB PCAP to the FMADIO Packet Capture System. In such cases there isn't enough local storage on the OS disk for the scp method to work. To upload a large PCAP use the streaming/pipe functionality of the stream_upload utility. In this example we are uploading a raw PCAP over SSH into the system. Starting with an SSH shell on the capture system the command SSH`s into the remote system where the PCAP is stored and issues a "cat" command on the PCAP to be uploaded. Effectively piping the remote PCAP down the ssh connection. This is then read by the stream_upload command in --stdin mode, instead of reading from the local file system. For maximum performance its best to use the 10G management port for the connection.
fmadio@fmadio20-049:~$ ssh remote_username@remote.ip.address.com cat path_to_pcap.pcap | sudo /opt/fmadio/bin/stream_upload --name remote_upload  --stdin
FSPrefetch
FSPrefetch Chunk: 5000.184ms 5000ms
FSPrefetch Chunk timeoued: 5000.000ms max
create stream [remote_upload_20170725_1625]
     0.178GB Uploaded
     0.610GB Uploaded
     0.864GB Uploaded
     1.116GB Uploaded
     1.335GB Uploaded
     1.472GB Uploaded
     1.667GB Uploaded
     1.793GB Uploaded
     1.947GB Uploaded
     2.225GB Uploaded
        .
        .
        .
        .
fmadio@fmadio20-049:~$
Using this approach the PCAP is streamed onto the system via SSH, with no temporarily files created. The maximum PCAP that can be uploaded is limited by the capture systems total storage capacity.
パケットのフィルタリング
ポストキャプチャの分析のために、フィルターブロックとフィルター式が複雑でほとんど任意のフィルタリング性能を可能にします。私たちは、フィルタリングを単純にパケットごとの"フィルターブロック"に分けています。例えば、パケットがUDPかどうかは、より複雑な"フィルター式"になります。これで、あなたの必要条件に基づいた複雑なフィルター式をつなぎ、組み立てることが可能になります。
単純フィルター
最も単純なフィルターである"Extract all TCP packets"を使って開始しましょう。"Extract all TCP packets"は次の方法で組み立てます。
手順1)
下に緑で印をつけているフィルターブロックにフィルター式"ipv4.proto == tcp"を入力してください。エンターを押すと、画面が下の画像のようになります。
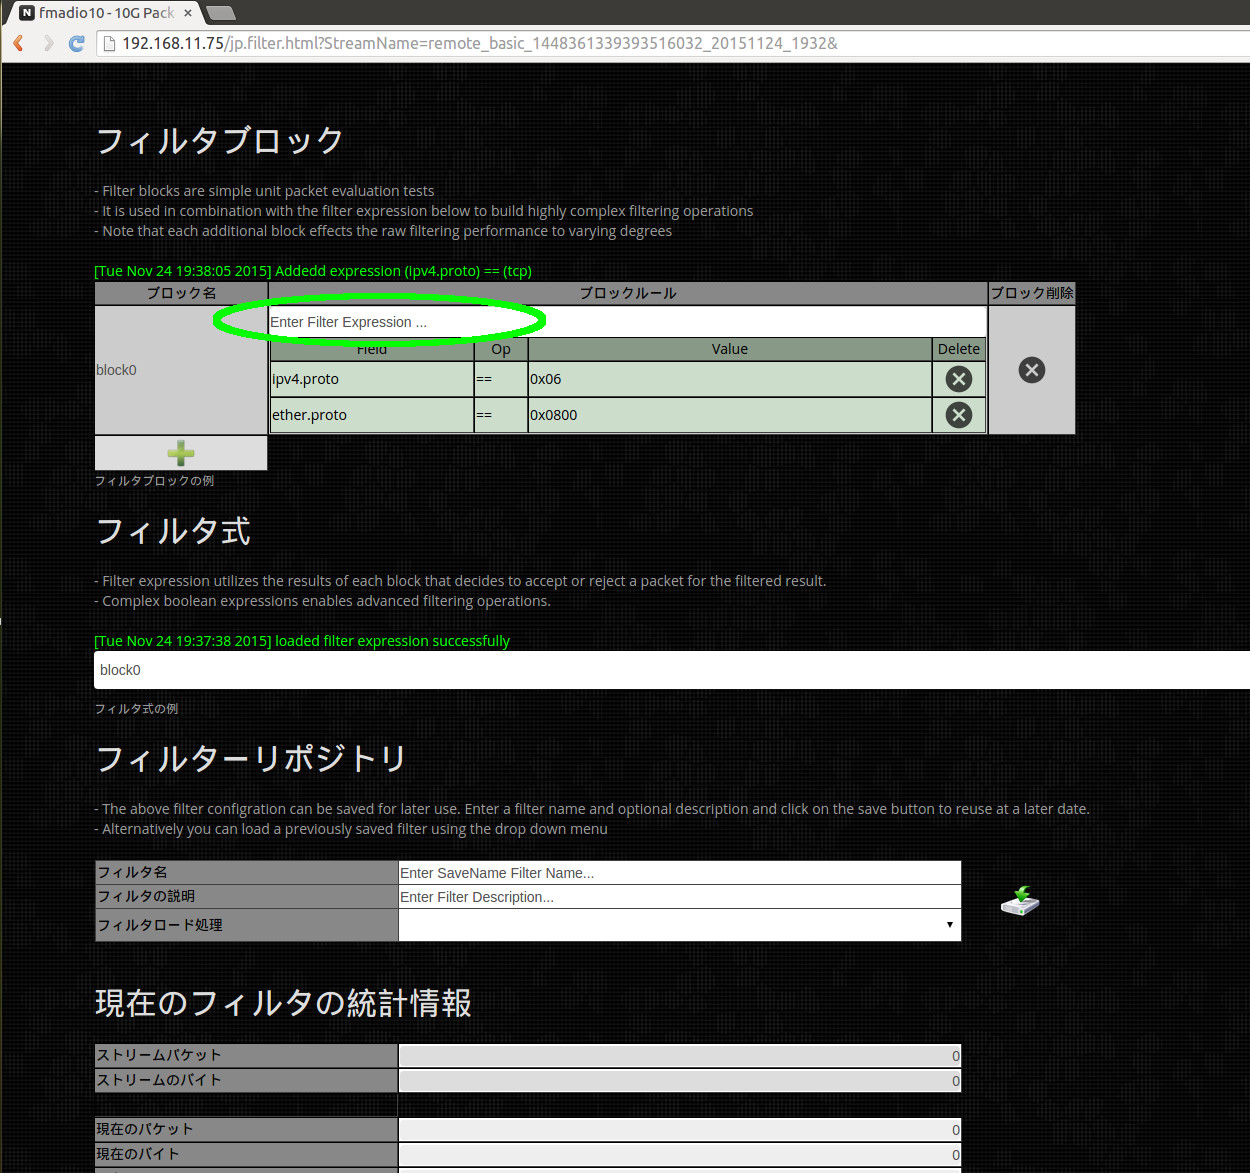
手順2) 下に緑で印をつけている場所をクリックし、テキストを編集して、フィルター式を"all_tcp"に改名してください。これで読みやすくなりますが、必須ではありません。
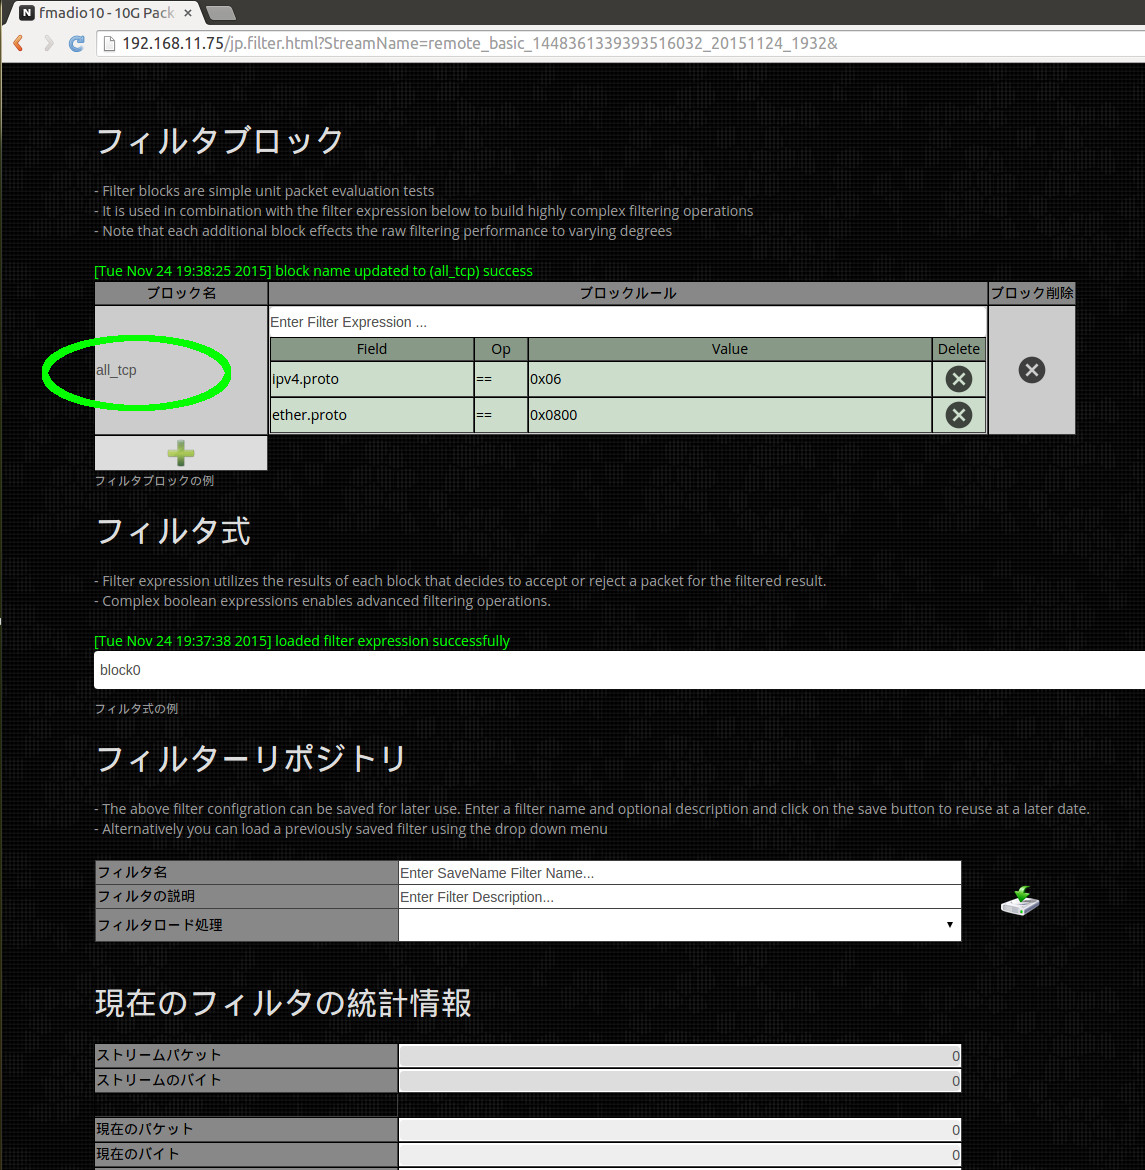
手順3) 新しく"all_tcp"に名前を変えたフィルターブロックを参照するために、下に緑で印をつけている場所をクリックし、編集してフィルター式をアップデートしてください。単純フィルターでは、デフォルト値の"block0"を使うことができます。
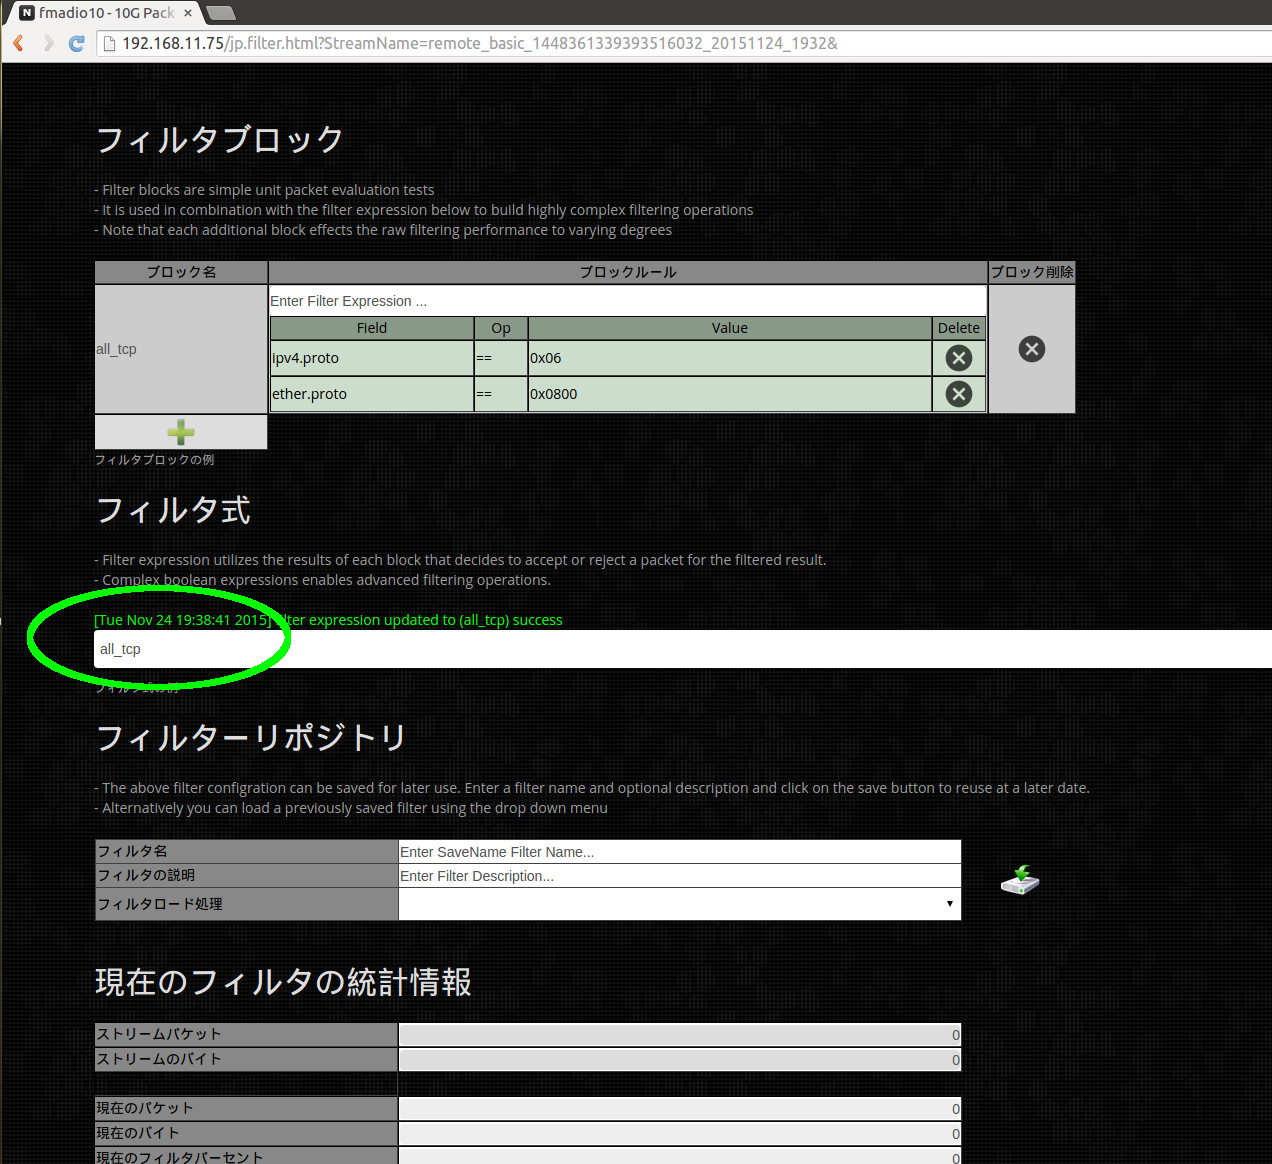
手順4)
下に示したふさわしい方のアイコンを選択して、パケットの分析を作動するかPCAPにダウンロードしてください。(下に示した緑が分析の作動、青がPCAPとしてのダウンロード)
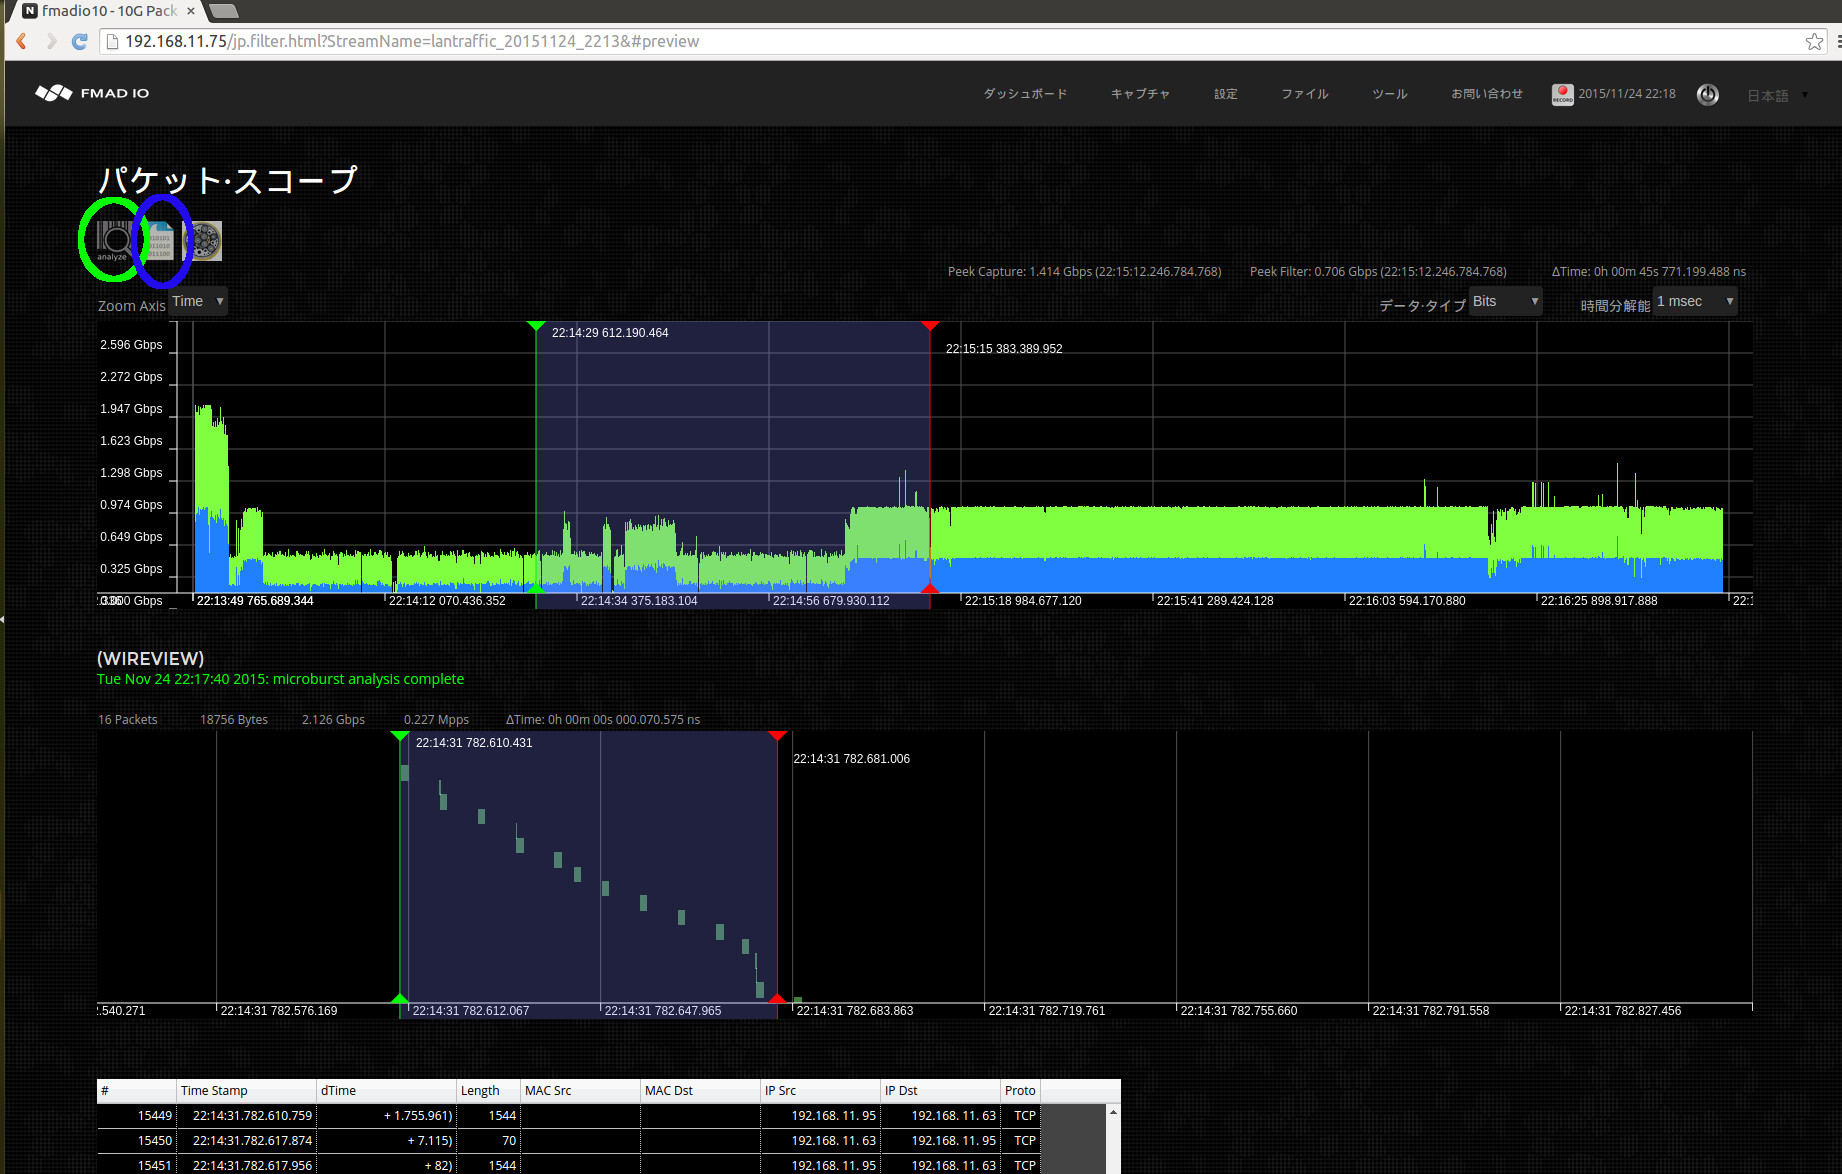
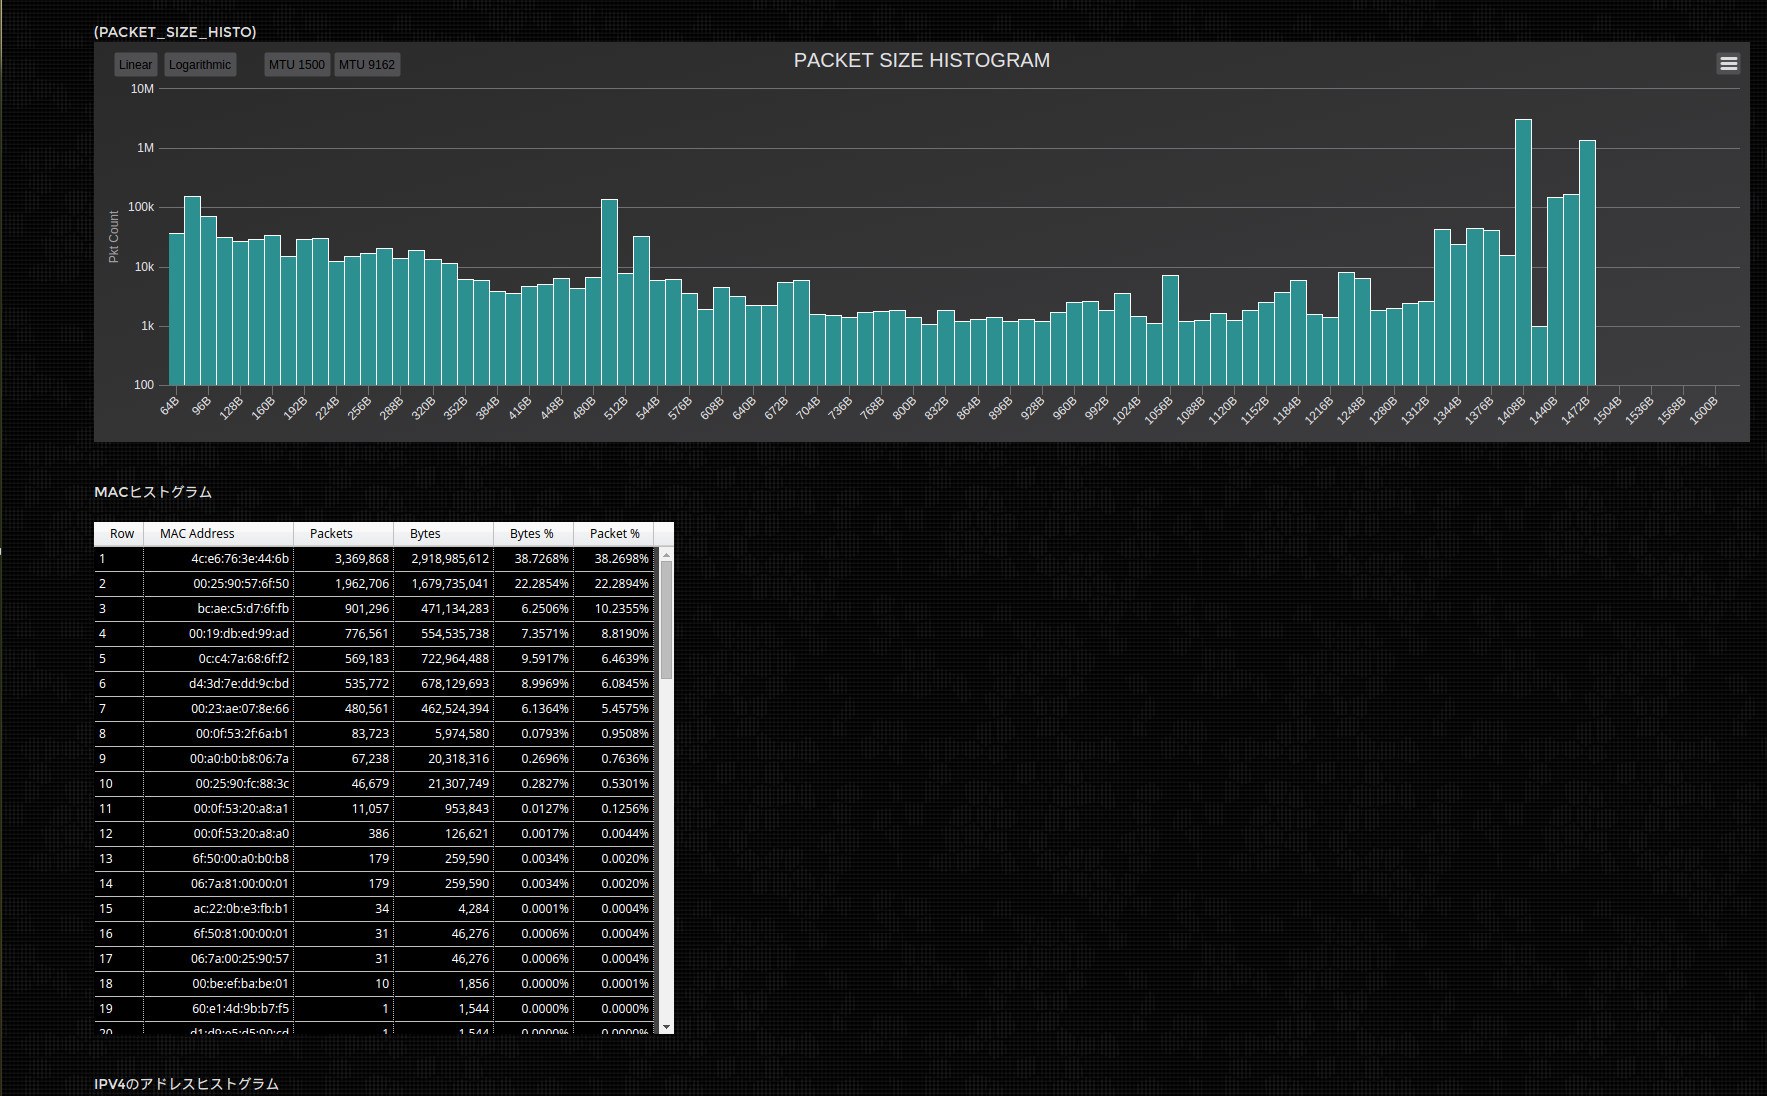
下にあるものは現在サポートされているフィルター例のクイックリストです。追加のフィルターが必要な場合は、弊社までお知らせください。
| ether.proto == ipv4 | select all IPv4 traffic |
| ether.addr == 00:ba:be: | select all ethernet mac address starting with wild card 00:ba:be:*:*:* |
| ether.addr == 00:ba:be:11:22:33 | select all packets with exact mac address (src or dest) of 00:ba:be:11:22:33 |
| ether.addr == 00:* | select all packets with wildcard mac address (src or dest) |
| ether.fcs == fail | select all packets with invalid ethernet frame FCS |
| ipv4.addr == 192.168.1.1 | select all ipv4 packets with address of 192.168.1.1 |
| ipv4.addr == 192.168.1.0/24 | select all ipv4 packets on subnet 192.168.1.0/24 |
| ipv4.addr.src == 192.168.1.0/24 | select all ipv4 packets whose source address is on subnet 192.168.1.0/24 |
| ipv4.proto == tcp | select all ipv4 TCP packets |
| ipv4.proto == udp | select all ipv4 UDP packets |
| ipv4.proto == icmp | select all ipv4 ICMP packets |
| ipv4.proto == igmp | select all ipv4 IGMP packets |
| tcp.port == 1000 | select all tcp traffic with port number 1000 |
| tcp.port == 1000-2000 | select all tcp traffic with port number range from 1000 to 2000 |
| tcp.port.src == 1000 | select all tcp traffic with source port number 1000 |
| udp.port == 3000 | select all udp traffic with port number 3000 |
| udp.port == 3000-4000 | select all udp traffic with port number range from 3000 to 4000 |
| udp.port.src == 3000 | select all udp traffic with source port number 3000 |
| frame.time == 20141225_08:00:00.100.200.300 | select all packets after the date 2014 12(Dec) 25th from 8:00:00.100.200.300 |
| frame.time == 20141225_08:00:00.100.200.300-20141225_17:00:00.400.500.600 | select all packets after the date 2014 12(Dec) 25th from 8:00:00.100.200.300 but before 2014 12(Dec) 25th at 17:00:00.400.500.600 |
| frame.time == 07:00:00 | select all packets after todays date at 07:00:00am |
| frame.size <= 128 | select all packets less than or equal to 128 bytes in length |
| frame.size >= 1024 | select all packets greater than or equal to 1024 bytes in length |
| frame.size == 64 | select all packets equal to 64 bytes in length |
| vlan.id == 1234 | select vlan tag id 1234 |
複雑なフィルター
複雑なフィルターは、フィルター式を使った様々なフィルターブロックを組み合わせることで可能です。システムは、上に挙げたフィルターブロックを参照した単純なブール論理式を構文解析します。
フィルターの例 (単純):
すべてのイーサネットMACアドレスに適応する単純な1ブロック式(事実上フィルタリングではない)。フィルターブロック名(下の緑)を"default"に編集して、フィルター式(下の青)を"default"に置き換えてください。
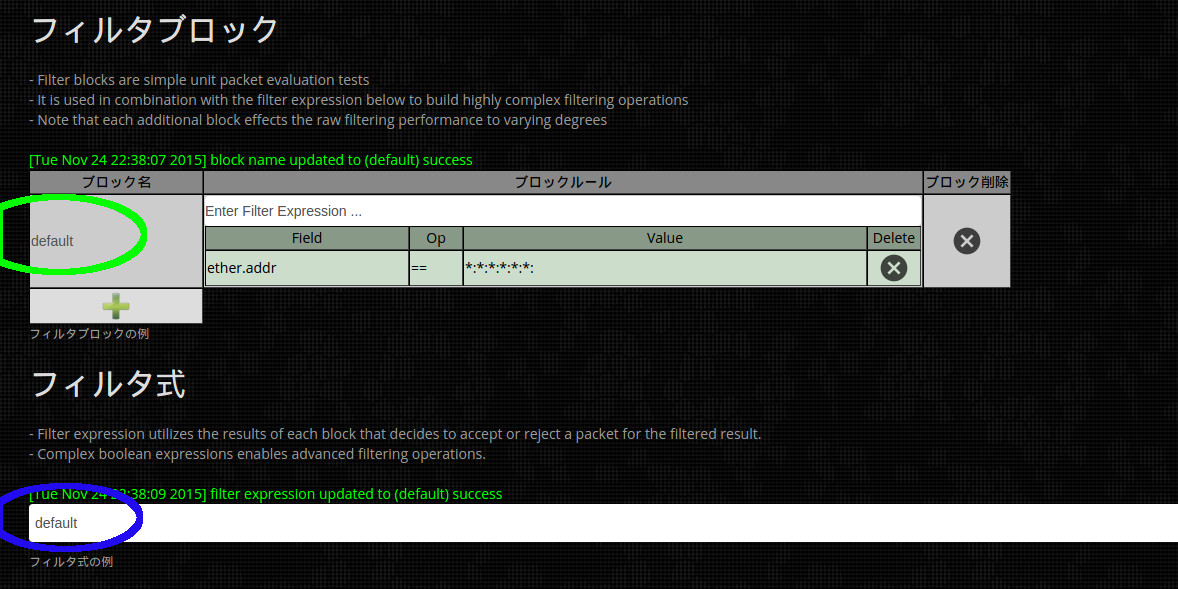
フィルターの例 (UDPとTCPトラフィック):
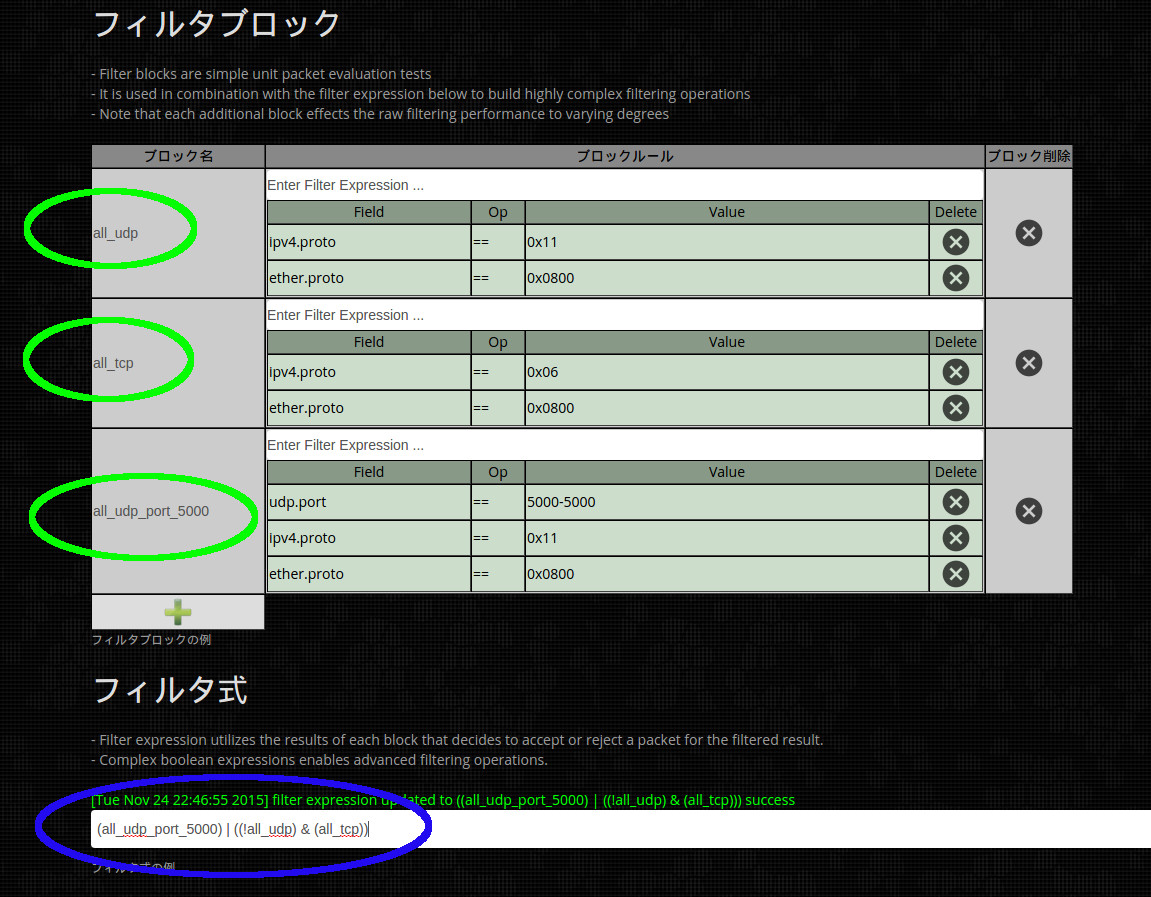
これは、2ブロックのフィルターです。1つ目のブロック"all_udp" (下の緑)はすべてのUDPパケットを選び出します。2つ目のブロック"all_tcp" (下の緑)はすべてのTCPパケットを選び出します。そして、フィルター式(下の青)は"all_udp"パケットまたは、"all_tcp"パケットのどちらかを選び出します。 最終結果は、TCP パケットかUDPパケットのどちらか片方のフィルタリングです。
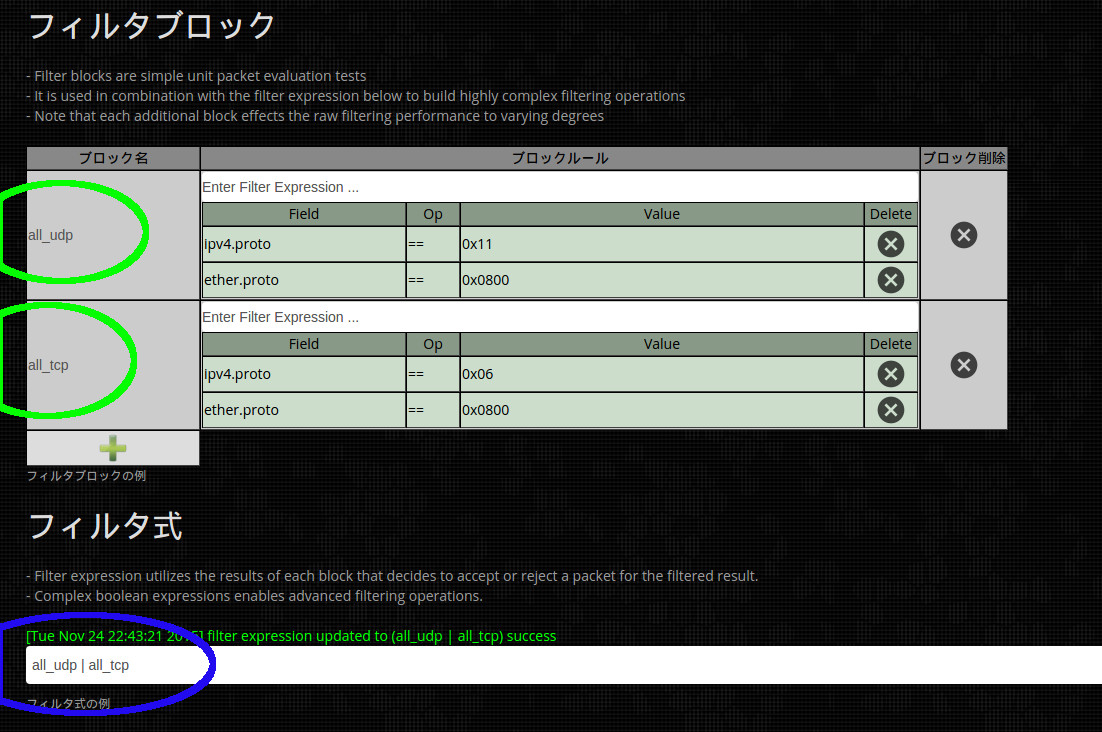
フィルターの例(UDPポート5000とTCPトラフィック):
これは3ブロックのフィルターです。1つ目のブロック"all_udp" (下の緑)はすべてのUDPパケットを選び出します。2つ目のブロック"all_tcp" (下の緑)はTCPパケットを選び出します。3つ目のブロック"all_udp_port_5000"はポート5000上のUDPパケットを選び出します。
フィルター式(下の青)は、TCPを選び出すと文字数がいくぶんか多くなります(UDPではならない)。"((!all_udp) & (all_tcp))"は、正式には“all_tcp”だけで十分ですが、説明の目的で詳細に書いています。また、ポート5000上のすべてのUDPパケットは"all_udp_port_5000"となります。最終結果は、選び出されたすべてのTCPパケットとポート5000上のUDPパケットです。
Text based Filters
Entering the same filters via the GUI can sometimes get annoying and is error prone. Thus you can edit and build filter scripts using a configuration file which in many cases is far easier to write and edit.
Configuration File
The Configuration file is located in
/opt/fmadio/etc/packetscope_filter.html
If your has no filter configuration file please download the template from HERE and transfer to the appropriate directory.
The pre-defined filter configuration file looks like this, its a LUA based script file
local FilterList = {}

-- check for all FCS errors
FilterList["FCS Errors"] =
{
    ["Block0"]      = "frame.fcs == fail",

    ["Expression"]  = "Block0",
}

-- simple BPF Host Filter
FilterList["HostCheck 192.168.40.1"] =
{
    ["Block0"]      = "bpf == ip src 192.168.40.1",

    ["Expression"]  = "Block0",
}

-- just for demonstration purposes, how to use multiple blocs
FilterList["tcp data"] =
{
    ["Block0"]      = "bpf == tcp",
    ["Block1"]      = "bpf == vlan and tcp",
    ["Block2"]      = "bpf == mpls and tcp",

    ["Expression"]  = "Block0 | (Block1 | Block2)",
}

return FilterList
This configuration file results in the following Filter Load list show below
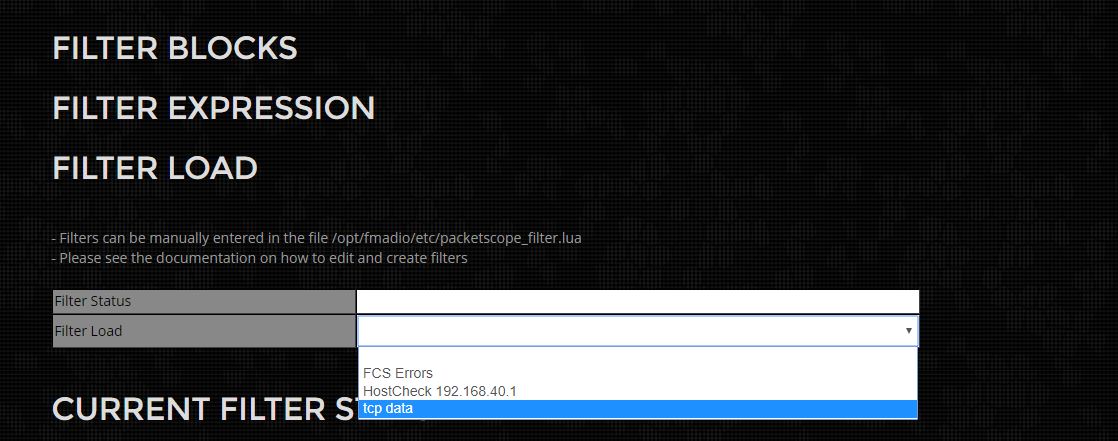
After selecting the filter "tcp data" the following capture Blocks and Expressions are loaded (shown below). As you can see
the Blocks and Expression matches the configuration file.
-- just for demonstration purposes, how to use multiple blocs
FilterList["tcp data"] =
{
    ["Block0"]      = "bpf == tcp",
    ["Block1"]      = "bpf == vlan and tcp",
    ["Block2"]      = "bpf == mpls and tcp",

    ["Expression"]  = "Block0 | (Block1 | Block2)",
}
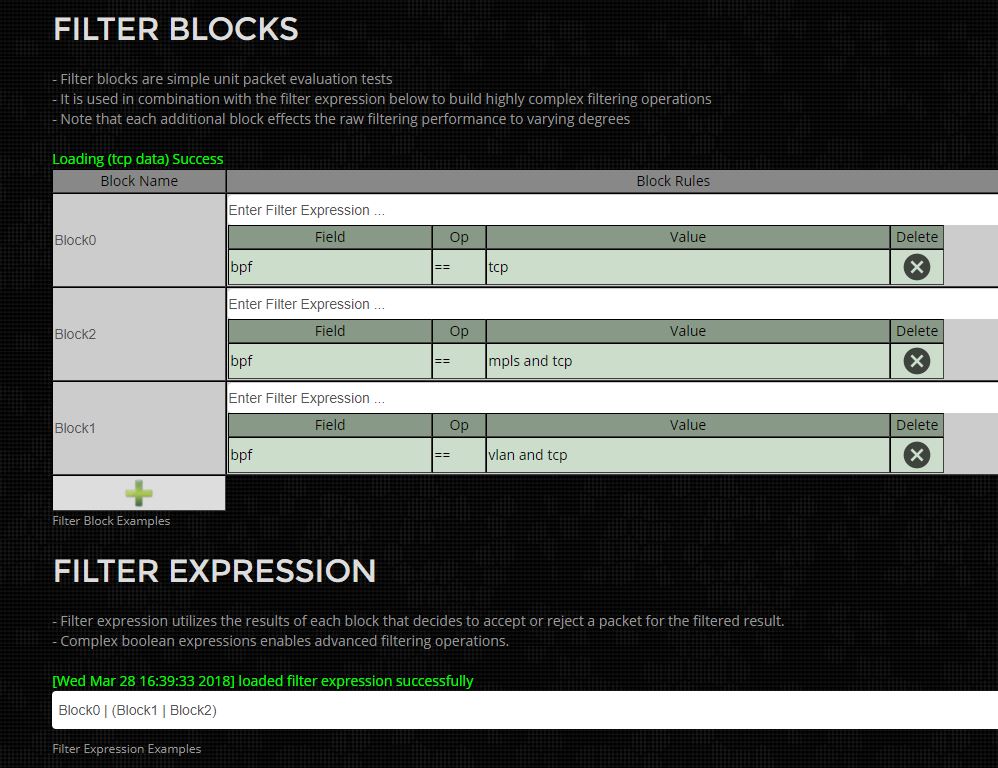
Use a text editor to modify the filter configuration file list to add new filters, then refresh the browser to reload.
システムログの作成
あらゆる問題の解決の最初のステップは問題の性質を正確に把握するための分析を行うため、詳細なログファイルを作成することです。弊社のシステムでは以下のステップを使用してログファイル情報を自動で作成します。
ステップ1)
下図の緑色で示したツールメニューを選択します。
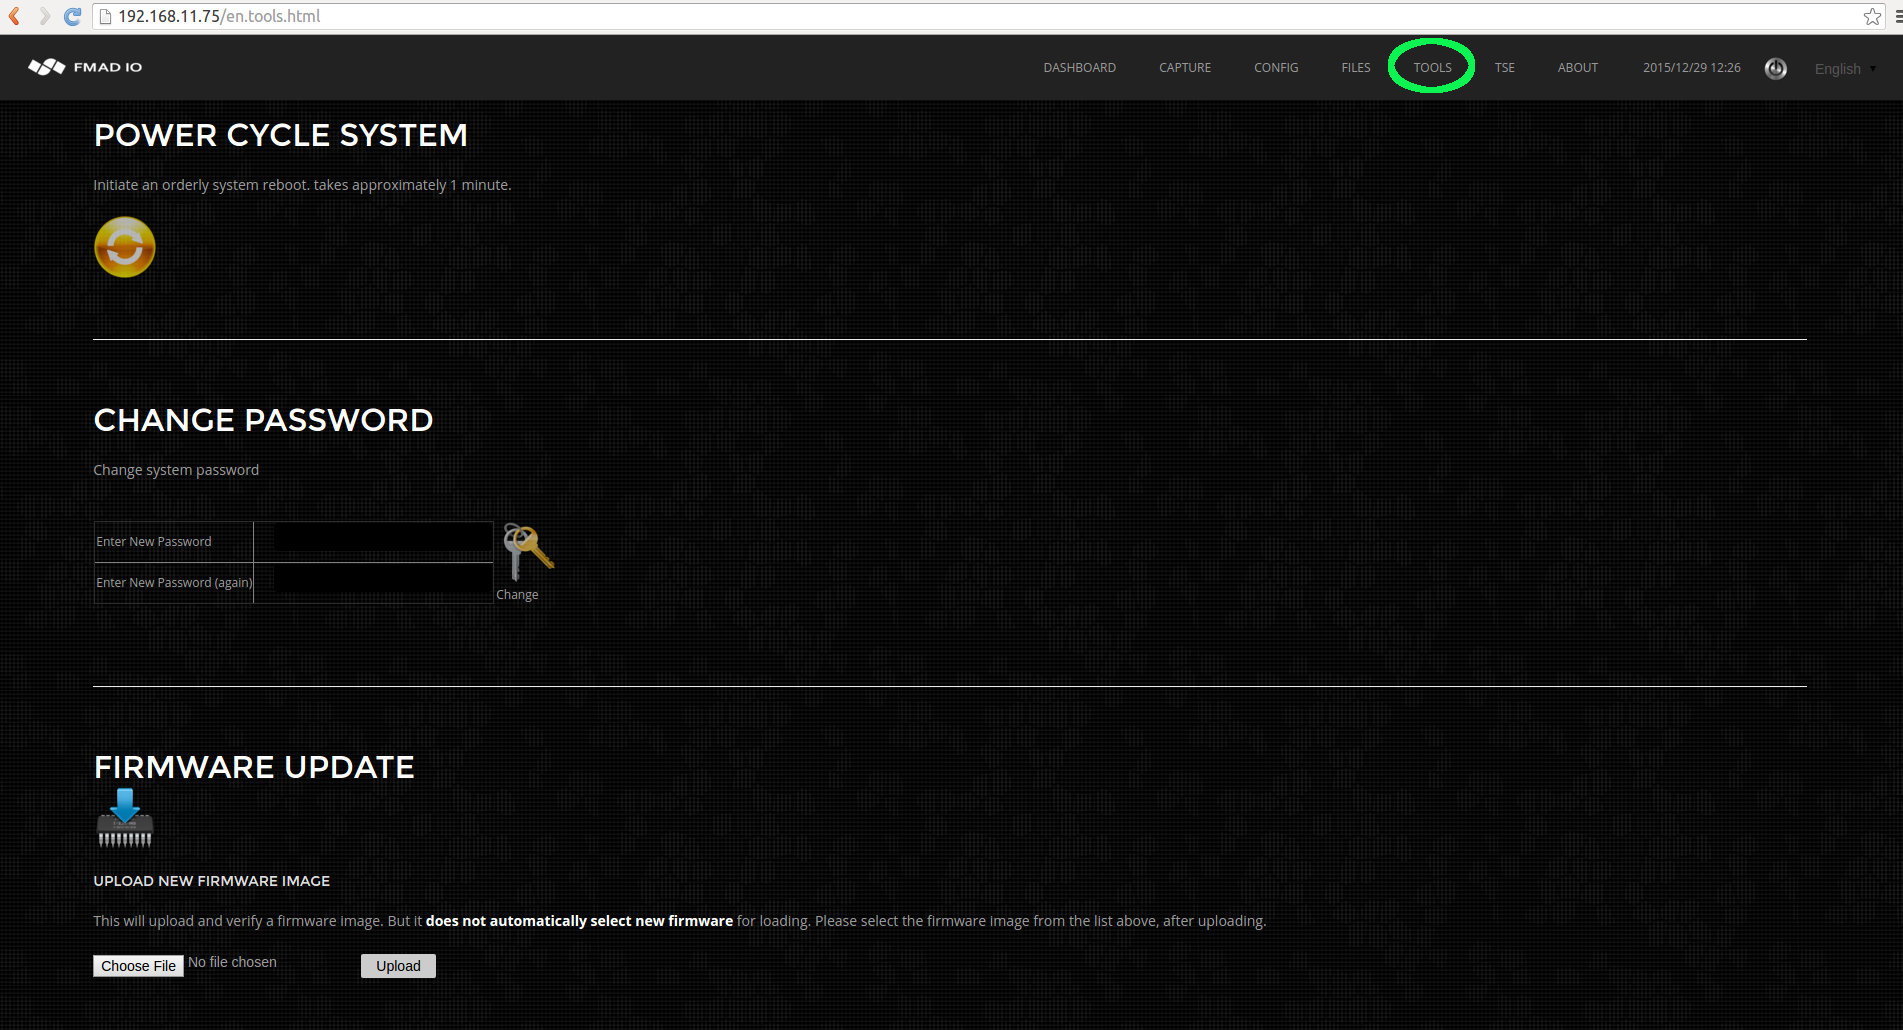
ステップ2)
下図の緑色で示したアイコンをクリックしてシステムログ作成を開始します。
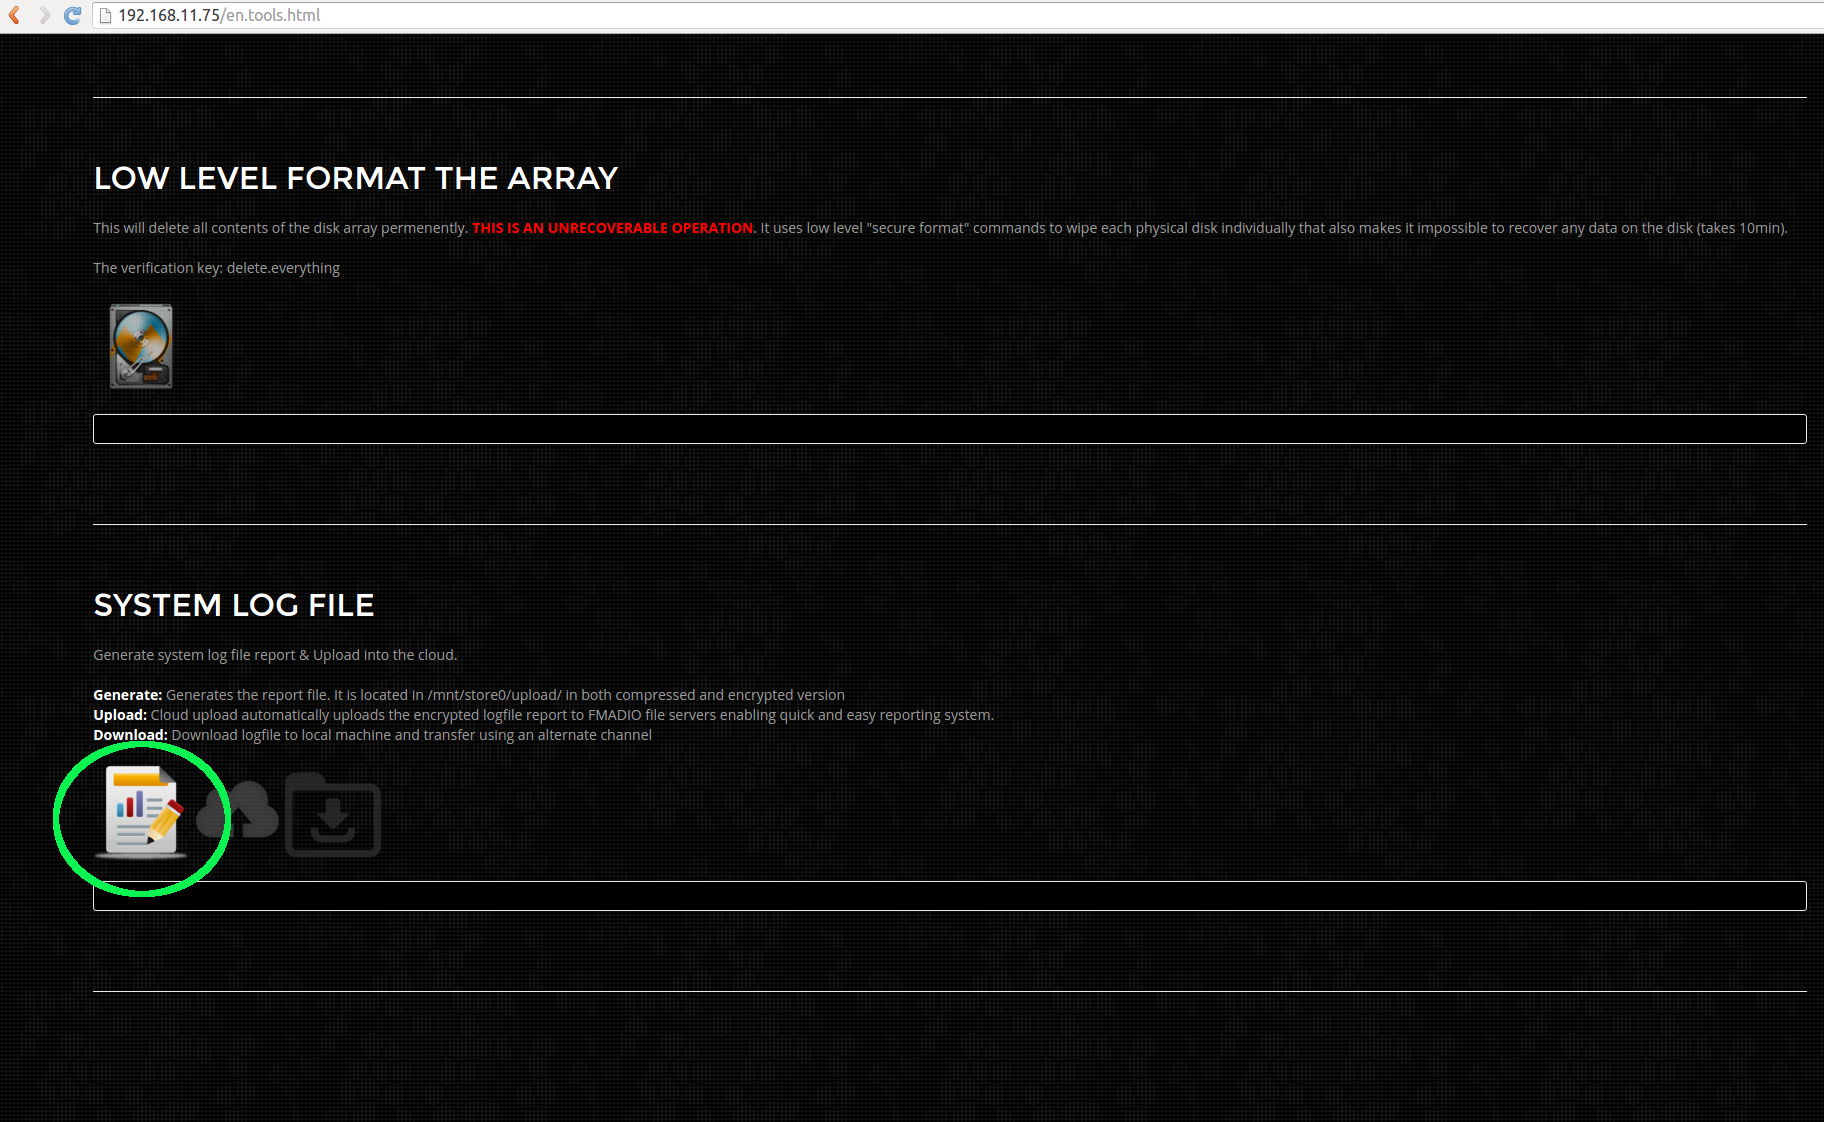
ステップ3)
ログファイル作成が開始されると、緑色で強調された領域内にステータス情報が表示されます。ログファイルのサイズにより、完了までに1から15分かかります。
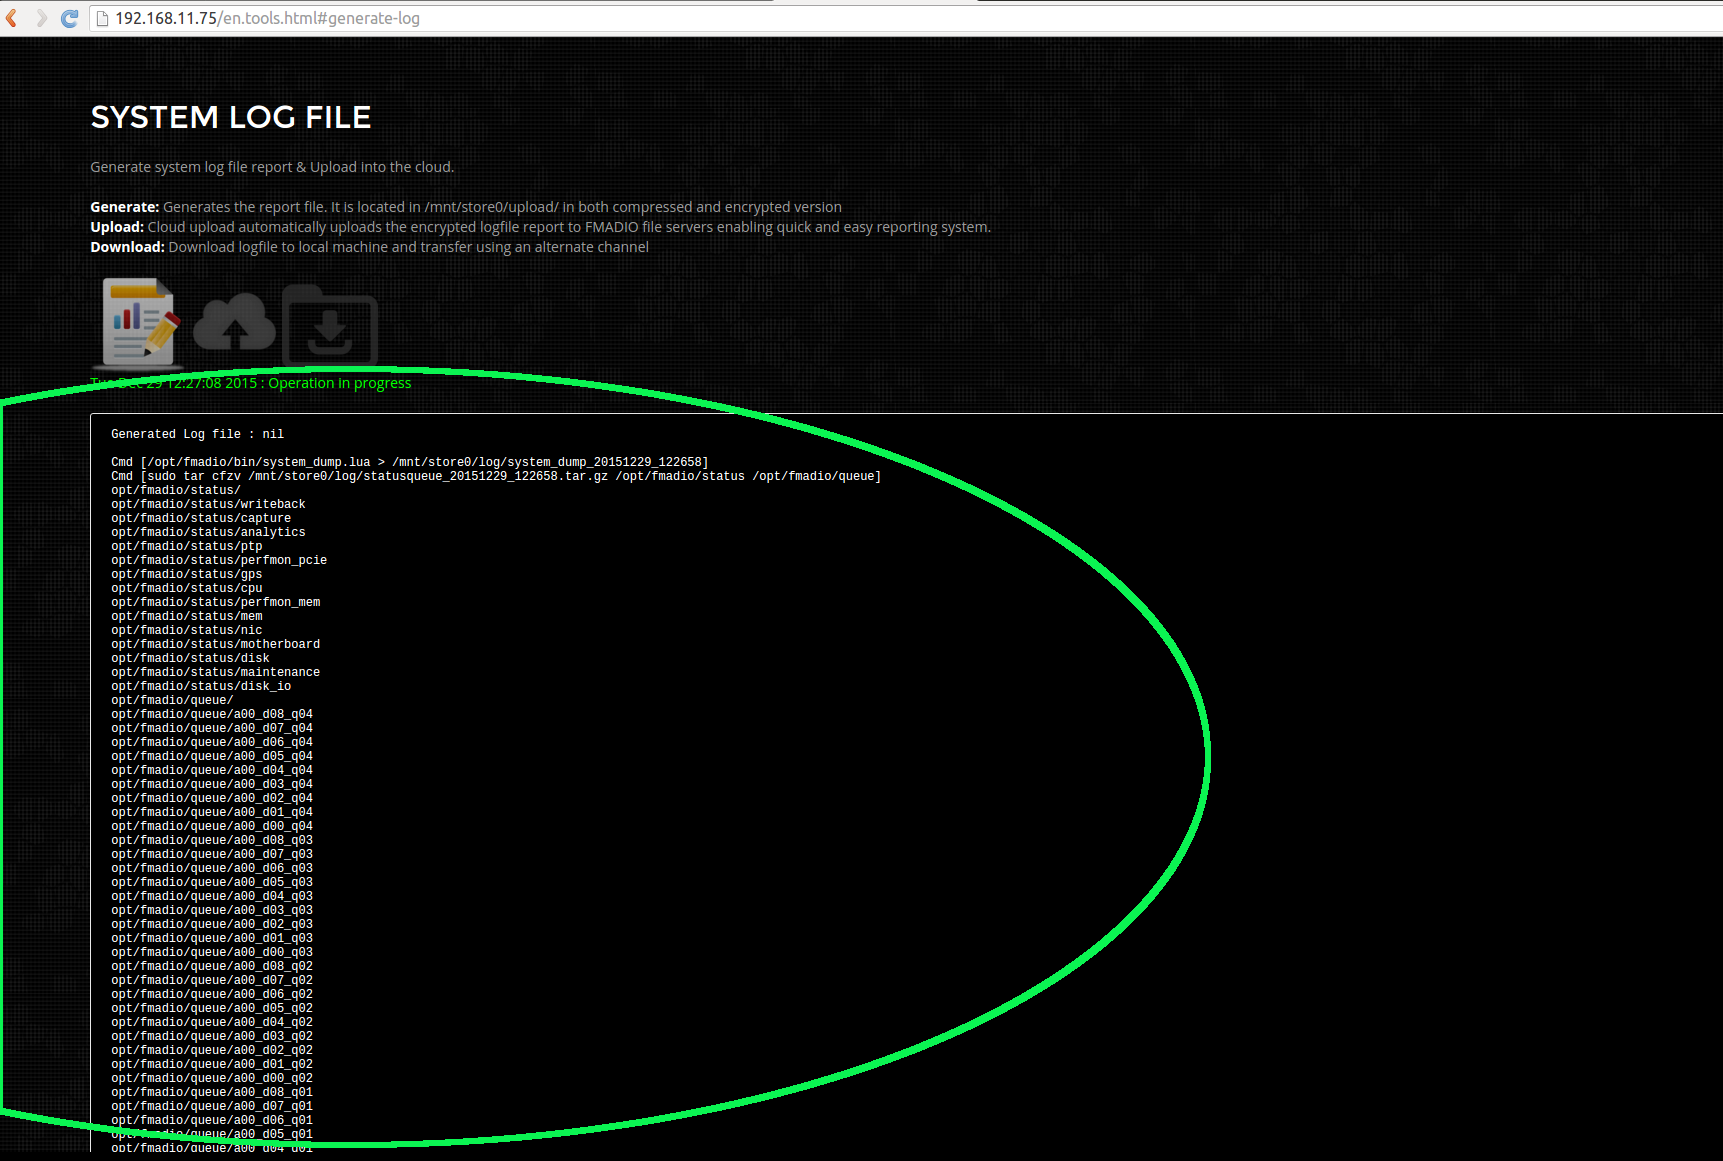
ステップ4)
完了すると、ステータスは下図で緑色で示すように変化します。
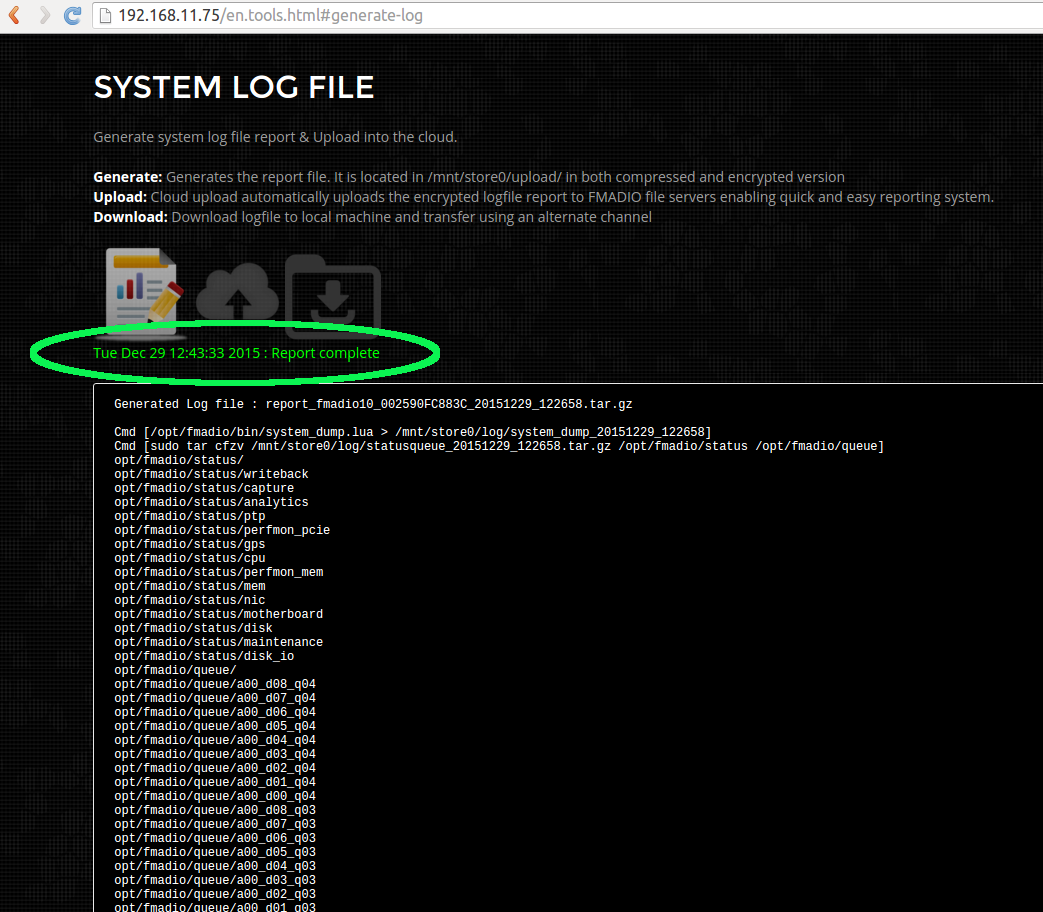
ステップ5)
ここまでくると、緑色で示したアイコンからレポートをダウンロードすることができます。ダウンロードしたログファイルの一例を下図で青色で示しています。ダウンロードの後、弊社宛に転送していただくと詳細な分析を行います。
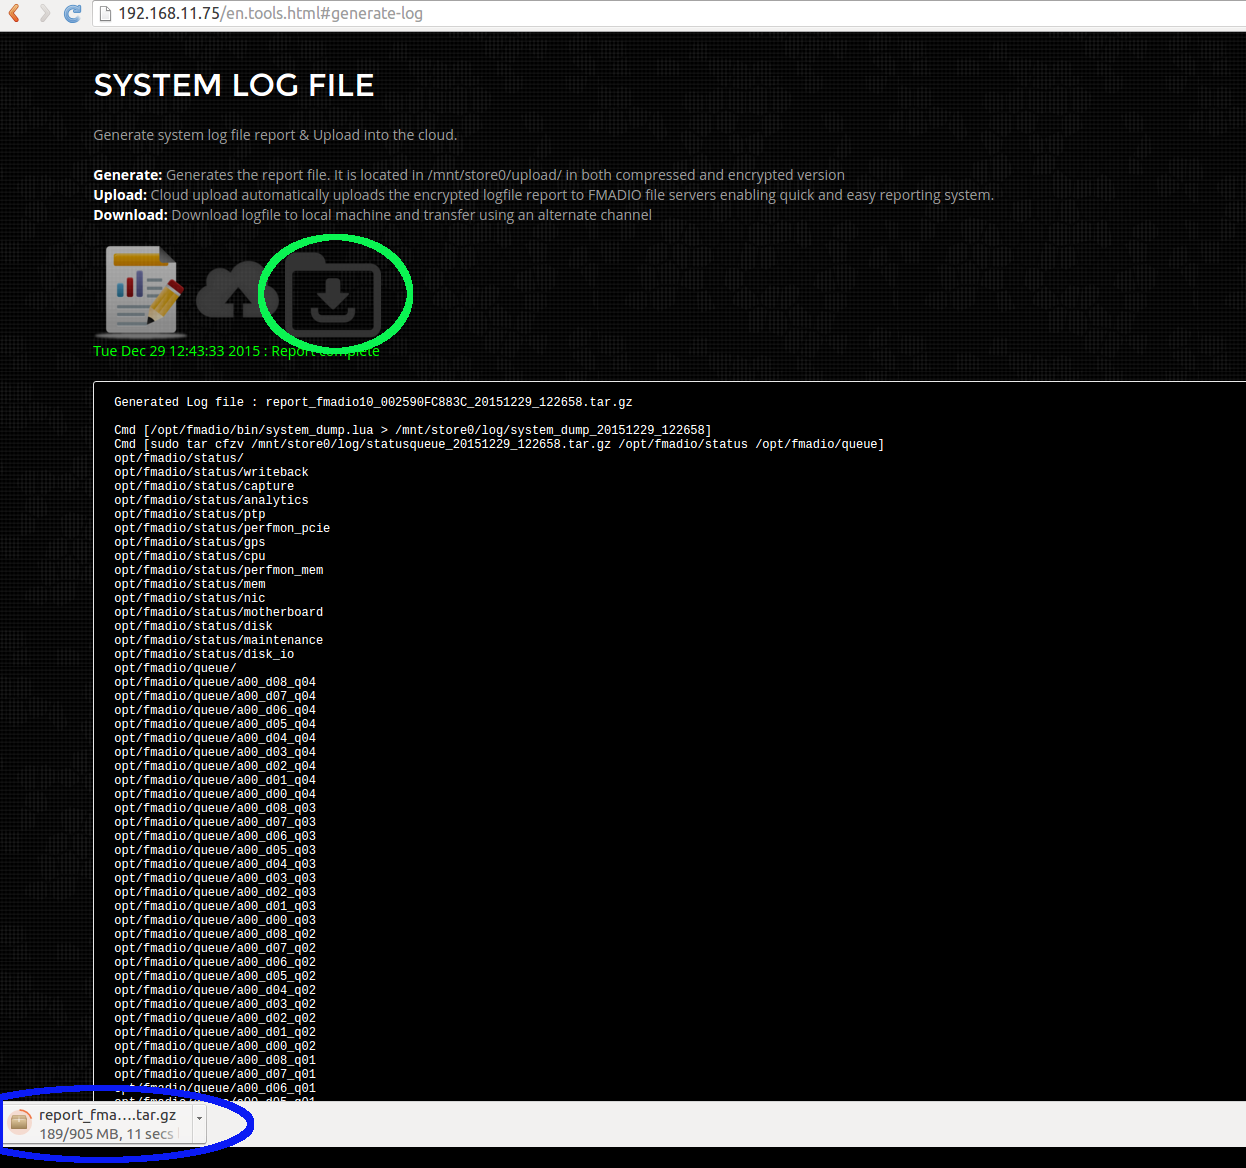
バックアップa)
なんらかの理由でWeb GUIが失敗した場合、ログファイルはこのディレクトリ内にあります
fmadio@fmadio20-049:/mnt/store0/upload$ ls -al
total 2874860
drwxr-xr-x    2 root     root         36864 Dec 29 12:43 ./
drwxr-xr-x  169 fmadio   staff        12288 Dec 29 12:27 ../
-rw-r--r--    1 root     root        145024 Dec 29 12:27 filelist
lrwxrwxrwx    1 root     root            70 Dec 29 12:43 report.tar.gz -> /mnt/store0/upload/report_fmadio10_002590FC883C_20151229_122658.tar.gz
-rw-r--r--    1 root     root     1285506376 Dec 29 12:43 report.tar.gz.asc
-rw-r--r--    1 root     root     949296603 Dec 29 12:43 report_fmadio10_002590FC883C_20151229_122658.tar.gz
filelistという名前のファイルはログファイルに含まれるファイルのリストです。この中に標準のタールボールと暗号化されたタールボールがあります。ログファイルにはパケットデータが含まれているため、コンテンツを開き、自社のセキュリティポリシーに準拠しているかを確認してください。
バックアップ b)
ログファイル作成に失敗した場合、下に示すように、コマンドライン経由でシステムログ作成を呼び出す操作を行うこともできます
fmadio@fmadio20-049:/mnt/store0/upload$ sudo /opt/fmadio/bin/syslog_report.lua
fmad fmadlua Dec 22 2015
calibrating...
0 : 00000000d09dad48           3.5000 cycles/nsec
Cycles/Sec 3499994440.0000 Std:       0cycle std(  0.00000000)
loading filename [/opt/fmadio/bin/syslog_report.lua]
Cmd [/opt/fmadio/bin/system_dump.lua > /mnt/store0/log/system_dump_20151229_132103]
loading filename [/opt/fmadio/bin/system_dump.lua]
[       iosched_direct.stdouterr_20151229]      1283855            1 MB
[            iosched_direct_20151229_1205]      1365723            2 MB
[               monitor_gps_20151229_1205]      9834318           12 MB
[            monitor_memory_20151229_1205]       809724           13 MB
[               monitor_nic_20151229_1205]      1179945           14 MB
[      statusqueue_20151229_132103.tar.gz]        40916           14 MB
[       stream_capture_sf20_20151229_1205]       288414           14 MB
[               monitor_cpu_20151229_1205]       642415           15 MB
[                 scheduler_20151229_1205]       404614           15 MB
[                             sfptp_stats]      3276884           19 MB
[     stream_writeback.stdouterr_20151229]       973105           20 MB
[          stream_writeback_20151229_1205]      1054488           21 MB
[             system_dump_20151229_132103]      1089180           22 MB
[      monitor_ptp.lua.stdouterr_20151229]        22197           22 MB
[               monitor_ptp_20151229_1205]       676222           23 MB
[        analytics.lua.stdouterr_20151229]        30954           23 MB
.
.
.
.
.
.
IPMI Port Access
The Intelligent Platform Management Interface (IPMI) is designed as an out-of-band communication channel, used when normal connectivity with the server has been compromised. If your unable to connect with the system using SSH or HTTP(s) this out-of-band management interface can log into the FMADIO system via the serial port over ethernet.
From the rear port view of the FMADIO10/20 packet capture system, there is are dedicated RJ45 sockets for the IPMI interface highlighted in green. These are connected to your out-of-band management infrastructure, ideally on completely separate subnets and switch`s.
FMADIO10

FMADIO20

The interfaces support ICMP ping, HTTP and SSH protocols IP Address can be configured via the system BIOS or preferable using the FMADIO web interface as highlighted in green below. In this example IPMI port has a static IPv4 Address of 192.168.11.83 on the 192.168.11.0/24 subnet.
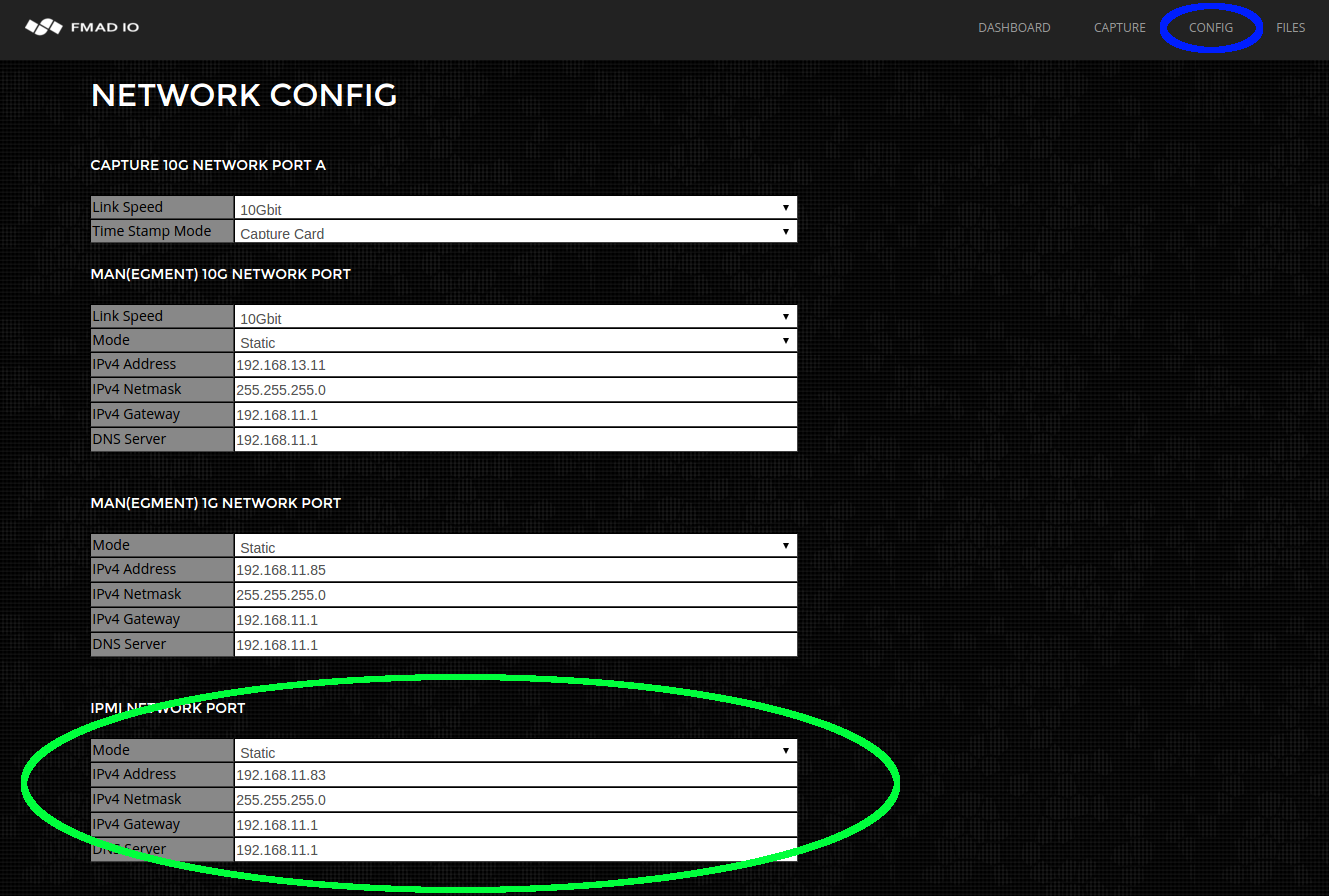
Serial Port Login
Serial port B on the system is connected to the IPMI interface. This allows us to login into the system on the Serial port and is very helpful if the regular network is down for some reason. The procedure is as follows:
16:15:47$ ssh ADMIN@192.168.11.83
ADMIN@192.168.11.83's password:
ATEN SMASH-CLP System Management Shell, version 1.05
Copyright (c) 2008-2009 by ATEN International CO., Ltd.
All Rights Reserved
-> cd system1
/system1
-> cd sol1
/system1/sol1
-> start
/system1/sol1
press
And you now have full access to the system, even when the regular network is down.
Power Cycle
Power cycling / Power Reset the system can be done using the IPMI interface as shown below.
$ ssh ADMIN@192.168.11.83
ADMIN@192.168.11.83's password:

ATEN SMASH-CLP System Management Shell, version 1.05
Copyright (c) 2008-2009 by ATEN International CO., Ltd.
All Rights Reserved

-> cd system1
/system1

-> cd pwrmgtsvc1
/system1/pwrmgtsvc1

-> reset
/system1/pwrmgtsvc1
reset done...
The system will then power down and reboot, it may take a 1 minute for regular SSH and HTTP access to be restored.
Power Off
To power off the system follow the following commands:
$ ssh ADMIN@192.168.11.83
ADMIN@192.168.11.83's password:

ATEN SMASH-CLP System Management Shell, version 1.05
Copyright (c) 2008-2009 by ATEN International CO., Ltd.
All Rights Reserved

-> cd system1
/system1

-> cd pwrmgtsvc1
/system1/pwrmgtsvc1

-> stop
/system1/pwrmgtsvc1
stop done...
The system will then power down completely.
Power On
To power On the system follow the following commands:
$ ssh ADMIN@192.168.11.83
ADMIN@192.168.11.83's password:

ATEN SMASH-CLP System Management Shell, version 1.05
Copyright (c) 2008-2009 by ATEN International CO., Ltd.
All Rights Reserved

-> cd system1
/system1

-> cd pwrmgtsvc1
/system1/pwrmgtsvc1

-> start
/system1/pwrmgtsvc1
start done...
The system will then power up.
API Summary
The FMADIO API is simple and designed for easy scripting integration.
Operating the device
| Description | URL | Example |
Device Operation |
||
| Start Capture on the device |
http://1.1.1.1/sysmaster/capture_start?StreamName=<capture name>
|
Example |
| Stop the current Capture |
http://1.1.1.1/sysmaster/capture_stop
|
Example |
| Get current Capture Status |
http://1.1.1.1/sysmaster/status
|
Example |
Downloading PCAP from the device |
||
| List all captures on the device |
http://1.1.1.1/stream/list
|
Example |
| Split a capture by file size |
http://1.1.1.1/stream/ssize?StreamName=<capture sname>&StreamView=<split mode>
|
Example |
| Split a capture by time |
http://1.1.1.1/stream/stime?StreamName=<capture sname>&StreamView=<split mode>
|
Example |
| Download full capture as single PCAP |
http://1.1.1.1/pcap/single?StreamName=<capture name>
|
Example |
| Download capture as single PCAP with gz compression |
http://1.1.1.1/pcap/single?StreamName=<capture name>?Compression=fast
|
Example |
| Download capture within a specific time |
http://1.1.1.1/pcap/splittime?StreamName=<capture name> |
Example |
| Download capture with BPF Filter |
http://1.1.1.1/pcap/single?StreamName=<capture name> |
Example |
| Download capture with BPF Filter and time range |
http://1.1.1.1/pcap/splittime?StreamName=<capture name> |
Example |
| Download capture with RegEx DPI Filter |
http://1.1.1.1/pcap/splittime?StreamName=<capture name> |
Example |
| Download capture based on Capture Port number |
http://1.1.1.1/pcap/splittime?StreamName=<capture name> |
Example |
Device Management |
||
| Get system status information |
http://1.1.1.1/sysmaster/stats_summary
|
Example |
Start Capture on the Device
This Command starts a capture running on the device
http://1.1.1.1/sysmaster/capture_start?StreamName=<capture name>
$ curl -u fmadio:100g http://192.168.2.75/sysmaster/capture_start?StreamName=TestCapture
{"Status":true,"Str":"[Mon Jul 2 11:18:04 2018] successfully started capture [TestCapture]"}
$
Stop Capture on the Device
Stops any currently capturing process.
NOTE: this does NOT stop scheduled captures.
http://1.1.1.1/sysmaster/capture_stop
$ curl -u fmadio:100g http://192.168.2.75/sysmaster/capture_stop
{"Status":true,"Str":"[Mon Jul 2 11:26:13 2018] successfully stopped capture [TestCapture]"}
$
Capture Status
Returns Capture status of currently active capture
http://1.1.1.1/sysmaster/status
$ curl -u fmadio:100g http://192.168.2.75/sysmaster/status
uptime, 0D 1H 57M
packets_received, 222652795259
packets_dropped, 0
packets_errors, 300000
packets_captured, 222265863667
bytes_captured, 20084978997482
bytes_pending, 0
bytes_disk, 21817945751552
bytes_overflow, 230924484608
bytes_overflow_now, 0
capture0_link, up
capture0_link_uptime, 0D 1H 57M
capture0_link_speed, 10000
capture1_link, up
capture1_link_uptime, 0D 1H 57M
capture1_link_speed, 10000
capture_bytes, 0
capture_packets, 0
capture_bps, 0
capture_pps, 0
capture_name, TestCapture
capture_active, true
Capture List
Lists all captures on the device
http://1.1.1.1/stream/list
$ curl -u fmadio:100g http://192.168.2.75/stream/list
{"Path":"/capture/","StreamList":true,"List":[
{"id":"1","Path":"TestCapture_20180702_1127","PCAP":"/pcap/single?StreamName=TestCapture_20180702_1127&","Filter":"/en.filter.html?StreamName=TestCapture_20180702_1127&","Analytics":"/en.analytics.html?StreamName=TestCapture_20180702_1127&","TCPScope":"/en.tcpscope.html?StreamName=TestCapture_20180702_1127&","Link":"/en.files.html?Fn=view&StreamName=TestCapture_20180702_1127&","Date":1.5304988337881e+18,"Size":168169046016,"Del":"/pcap/del?StreamName=TestCapture_20180702_1127&rand=1530498848939065088&","IsActive":false,"Type":"","Desc":"Mon . 11:33:53 . 02-07-2018"},
{"id":"2","Path":"TestCapture_20180702_1118","PCAP":"/pcap/single?StreamName=TestCapture_20180702_1118&","Filter":"/en.filter.html?StreamName=TestCapture_20180702_1118&","Analytics":"/en.analytics.html?StreamName=TestCapture_20180702_1118&","TCPScope":"/en.tcpscope.html?StreamName=TestCapture_20180702_1118&","Link":"/en.files.html?Fn=view&StreamName=TestCapture_20180702_1118&","Date":1.5304978842841e+18,"Size":0,"Del":"/pcap/del?StreamName=TestCapture_20180702_1118&rand=1530498848939096064&","IsActive":false,"Type":"","Desc":"Mon . 11:18:04 . 02-07-2018"}
]}
$
Capture Split By file size
Lists splits for a specific capture based on file size. Usually this is a 2 step process of
1) get the split list
2) download a specific split
Split options are:
Split_1MB
Split_10MB
Split_100MB
Split_250MB
Split_1GB
Split_2GB
Split_5GB
Split_10GB
Split_100GB
Split_1TB
The below example is using 1GB splits
http://1.1.1.1/stream/stime?StreamName=<capture sname>&StreamView=<split mode>
$ curl -u fmadio:100g "http://192.168.2.75/stream/ssize?StreamName=TestCapture_20180702_1127&StreamView=split_1GB&"
{"Path":"/capture/TestCapture_20180702_1127/split_1GB","SplitFile":true,"List":[
{"id":"0","Path":"20180702_11:32:37.575.806.976","PCAP":"/pcap/splittime?StreamName=TestCapture_20180702_1127&Start=1530498757575806976ULL&Stop=1530498763732682511ULL&&","Filter":"/en.filter.html?StreamName=TestCapture_20180702_1127&StartTS=1530498757575806976&StopTS=1530498763732682511&","Date":1.5304987575758e+18,"Size":1000079360,"PacketCnt":11905708,"ValidPct":100,"Type":"","Desc":"Mon . 11:32:37 . 02-07-2018"},
{"id":"1","Path":"20180702_11:32:43.732.682.511","PCAP":"/pcap/splittime?StreamName=TestCapture_20180702_1127&Start=1530498763732682511ULL&Stop=1530498764151788331ULL&&","Filter":"/en.filter.html?StreamName=TestCapture_20180702_1127&StartTS=1530498763732682511&StopTS=1530498764151788331&","Date":1.5304987637327e+18,"Size":1000079360,"PacketCnt":11905707,"ValidPct":100,"Type":"","Desc":"Mon . 11:32:43 . 02-07-2018"},
{"id":"2","Path":"20180702_11:32:44.151.788.331","PCAP":"/pcap/splittime?StreamName=TestCapture_20180702_1127&Start=1530498764151788331ULL&Stop=1530498764570894137ULL&&","Filter":"/en.filter.html?StreamName=TestCapture_20180702_1127&StartTS=1530498764151788331&StopTS=1530498764570894137&","Date":1.5304987641518e+18,"Size":1000079360,"PacketCnt":11905706,"ValidPct":100,"Type":"","Desc":"Mon . 11:32:44 . 02-07-2018"},
{"id":"3","Path":"20180702_11:32:44.570.894.137","PCAP":"/pcap/splittime?StreamName=TestCapture_20180702_1127&Start=1530498764570894137ULL&Stop=1530498764989999979ULL&&","Filter":"/en.filter.html?StreamName=TestCapture_20180702_1127&StartTS=1530498764570894137&StopTS=1530498764989999979&","Date":1.5304987645709e+18,"Size":1000079360,"PacketCnt":11905707,"ValidPct":100,"Type":"","Desc":"Mon . 11:32:44 . 02-07-2018"},
{"id":"4","Path":"20180702_11:32:44.989.999.979","PCAP":"/pcap/splittime?StreamName=TestCapture_20180702_1127&Start=1530498764989999979ULL&Stop=1530498765409105800ULL&&","Filter":"/en.filter.html?StreamName=TestCapture_20180702_1127&StartTS=1530498764989999979&StopTS=1530498765409105800&","Date":1.53049876499e+18,"Size":1000079360,"PacketCnt":11905707,"ValidPct":100,"Type":"","Desc":"Mon . 11:32:44 . 02-07-2018"},
{"id":"5","Path":"20180702_11:32:45.409.105.800","PCAP":"/pcap/splittime?StreamName=TestCapture_20180702_1127&Start=1530498765409105800ULL&Stop=1530498765828211598ULL&&","Filter":"/en.filter.html?StreamName=TestCapture_20180702_1127&StartTS=1530498765409105800&StopTS=1530498765828211598&","Date":1.5304987654091e+18,"Size":1000079360,"PacketCnt":11905706,"ValidPct":100,"Type":"","Desc":"Mon . 11:32:45 . 02-07-2018"},
{"id":"6","Path":"20180702_11:32:45.828.211.598","PCAP":"/pcap/splittime?StreamName=TestCapture_20180702_1127&Start=1530498765828211598ULL&Stop=1530498766247317455ULL&&","Filter":"/en.filter.html?StreamName=TestCapture_20180702_1127&StartTS=1530498765828211598&StopTS=1530498766247317455&","Date":1.5304987658282e+18,"Size":1000079360,"PacketCnt":11905707,"ValidPct":100,"Type":"","Desc":"Mon . 11:32:45 . 02-07-2018"},
{"id":"7","Path":"20180702_11:32:46.247.317.455","PCAP":"/pcap/splittime?StreamName=TestCapture_20180702_1127&Start=1530498766247317455ULL&Stop=1530498766666423276ULL&&","Filter":"/en.filter.html?StreamName=TestCapture_20180702_1127&StartTS=1530498766247317455&StopTS=1530498766666423276&","Date":1.5304987662473e+18,"Size":1000079360,"PacketCnt":11905707,"ValidPct":100,"Type":"","Desc":"Mon . 11:32:46 . 02-07-2018"},
.
.
.
.
Once you have the split list can select a specific URL from it and download. For example using split #3 from 20180702_11:32:44.570.894.137.
{"id":"3","Path":"20180702_11:32:44.570.894.137","PCAP":"/pcap/splittime?StreamName=TestCapture_20180702_1127&Start=1530498764570894137ULL&Stop=1530498764989999979ULL&&","Filter":"/en.filter.html?StreamName=TestCapture_20180702_1127&StartTS=1530498764570894137&StopTS=1530498764989999979&","Date":1.5304987645709e+18,"Size":1000079360,"PacketCnt":11905707,"ValidPct":100,"Type":"","Desc":"Mon . 11:32:44 . 02-07-2018"},
And then downloading the split and piping to tcpdump for example
$ curl -u fmadio:100g "http://192.168.2.75/pcap/splittime?StreamName=TestCapture_20180702_1127&Start=1530498764570894137ULL&Stop=1530498764989999979ULL&&" | tcpdump -r - -nn | head
11:32:44.570894 66:77:88:99:aa:bb > 00:33:33:33:33:33 Null Information, send seq 10, rcv seq 23, Flags [Command], length 54
0x0000: 0000 142e 0f3c 152e 0f3c 162e 0f3c 172e .....<...<...<..
0x0010: 0f3c 182e 0f3c 192e 0f3c 1a2e 0f3c 1b2e .<...<...<...<..
0x0020: 0f3c 1c2e 0f3c 1d2e 0f3c 1e2e 0f3c 1f2e .<...<...<...<..
0x0030: 0f3c c40d a204 .<....
11:32:44.570894 66:77:88:99:aa:bb > 00:44:44:44:44:44 Null Information, send seq 16, rcv seq 23, Flags [Command], length 54
0x0000: 0000 202e 0f4c 212e 0f4c 222e 0f4c 232e .....L!..L"..L#.
0x0010: 0f4c 242e 0f4c 252e 0f4c 262e 0f4c 272e .L$..L%..L&..L'.
0x0020: 0f4c 282e 0f4c 292e 0f4c 2a2e 0f4c 2b2e .L(..L)..L*..L+.
0x0030: 0f4c 232f 80c5 .L#/..
Capture Split By time
Lists splits for a specific capture based on a time unit. Usually this is a 2 step process of
1) get the split list
2) download a specific split
Split options are:
Split_1sec
Split_10sec
Split_1min
Split_10min
Split_15min
Split_1hour
Split_2hour
Split_4hour
Split_6hour
Split_8hour
Split_12hour
The below example is using 1sec splits
http://1.1.1.1/stream/stime?StreamName=<capture sname>&StreamView=<split mode>
$ curl -u fmadio:100g "http://192.168.2.75/stream/stime?StreamName=TestCapture_20180702_1127&StreamView=split_1sec&"
{"Path":"/capture/TestCapture_20180702_1127/split_1sec","SplitFile":true,"List":[
{"id":"0","Path":"20180702_11:32:37.000.000.000","PCAP":"/pcap/splittime?StreamName=TestCapture_20180702_1127&Start=1530498757000000000ULL&Stop=1530498758000000000ULL&&","Filter":"/en.filter.html?StreamName=TestCapture_20180702_1127&StartTS=1530498757000000000&StopTS=1530498758000000000&","Date":1.530498757e+18,"Size":167772160,"PacketCnt":1997289,"ValidPct":100,"Type":"","Desc":"Mon . 11:32:37 . 02-07-2018"},
{"id":"1","Path":"20180702_11:32:38.000.000.000","PCAP":"/pcap/splittime?StreamName=TestCapture_20180702_1127&Start=1530498758000000000ULL&Stop=1530498759000000000ULL&&","Filter":"/en.filter.html?StreamName=TestCapture_20180702_1127&StartTS=1530498758000000000&StopTS=1530498759000000000&","Date":1.530498758e+18,"Size":0,"PacketCnt":0,"ValidPct":100,"Type":"","Desc":"Mon . 11:32:38 . 02-07-2018"},
{"id":"2","Path":"20180702_11:32:39.000.000.000","PCAP":"/pcap/splittime?StreamName=TestCapture_20180702_1127&Start=1530498759000000000ULL&Stop=1530498760000000000ULL&&","Filter":"/en.filter.html?StreamName=TestCapture_20180702_1127&StartTS=1530498759000000000&StopTS=1530498760000000000&","Date":1.530498759e+18,"Size":0,"PacketCnt":0,"ValidPct":100,"Type":"","Desc":"Mon . 11:32:39 . 02-07-2018"},
{"id":"3","Path":"20180702_11:32:40.000.000.000","PCAP":"/pcap/splittime?StreamName=TestCapture_20180702_1127&Start=1530498760000000000ULL&Stop=1530498761000000000ULL&&","Filter":"/en.filter.html?StreamName=TestCapture_20180702_1127&StartTS=1530498760000000000&StopTS=1530498761000000000&","Date":1.53049876e+18,"Size":0,"PacketCnt":0,"ValidPct":100,"Type":"","Desc":"Mon . 11:32:40 . 02-07-2018"},
{"id":"4","Path":"20180702_11:32:41.000.000.000","PCAP":"/pcap/splittime?StreamName=TestCapture_20180702_1127&Start=1530498761000000000ULL&Stop=1530498762000000000ULL&&","Filter":"/en.filter.html?StreamName=TestCapture_20180702_1127&StartTS=1530498761000000000&StopTS=1530498762000000000&","Date":1.530498761e+18,"Size":0,"PacketCnt":0,"ValidPct":100,"Type":"","Desc":"Mon . 11:32:41 . 02-07-2018"},
{"id":"5","Path":"20180702_11:32:42.000.000.000","PCAP":"/pcap/splittime?StreamName=TestCapture_20180702_1127&Start=1530498762000000000ULL&Stop=1530498763000000000ULL&&","Filter":"/en.filter.html?StreamName=TestCapture_20180702_1127&StartTS=1530498762000000000&StopTS=1530498763000000000&","Date":1.530498762e+18,"Size":0,"PacketCnt":0,"ValidPct":100,"Type":"","Desc":"Mon . 11:32:42 . 02-07-2018"},
See Split by Size example above for more detail
Download Single Capture
Download entire capture as a single file. Exmaple shows downloading and piping via tcpdump. Piping to a file or any other analysis tools is possible.
http://1.1.1.1/pcap/single?StreamName=<capture name>?Compression=fast
$ curl -u fmadio:100g "http://192.168.2.75/pcap/single?StreamName=TestCapture_20180702_1127&" | tcpdump -r - -nn | head
11:32:37.575907 66:77:88:99:aa:bb > 00:44:44:44:44:44 Null Information, send seq 0, rcv seq 0, Flags [Command], length 54
0x0000: 0000 0000 0040 0100 0040 0200 0040 0300 .....@...@...@..
0x0010: 0040 0400 0040 0500 0040 0600 0040 0700 .@...@...@...@..
0x0020: 0040 0800 0040 0900 0040 0a00 0040 0b00 .@...@...@...@..
0x0030: 0040 e59d 3993 .@..9.
11:32:37.575907 66:77:88:99:aa:bb > 00:33:33:33:33:33 Null Information, send seq 0, rcv seq 0, Flags [Command], length 54
0x0000: 0000 0000 0030 0100 0030 0200 0030 0300 .....0...0...0..
0x0010: 0030 0400 0030 0500 0030 0600 0030 0700 .0...0...0...0..
0x0020: 0030 0800 0030 0900 0030 0a00 0030 0b00 .0...0...0...0..
0x0030: 0030 52a4 9d2a .0R..*
.
.
.
.
.
Download Single Capture With Compression
Download entire capture as a single file as above, execpt gip compress it before sending down the wire
http://1.1.1.1/pcap/single?StreamName=<capture name>?Compression=fast
$ curl -u fmadio:100g "http://192.168.2.75/pcap/single?StreamName=TestCapture_20180702_1127&Compression=fast" | gzip -d -c | tcpdump -r - -nn | head
11:32:37.575907 66:77:88:99:aa:bb > 00:44:44:44:44:44 Null Information, send seq 0, rcv seq 0, Flags [Command], length 54
0x0000: 0000 0000 0040 0100 0040 0200 0040 0300 .....@...@...@..
0x0010: 0040 0400 0040 0500 0040 0600 0040 0700 .@...@...@...@..
0x0020: 0040 0800 0040 0900 0040 0a00 0040 0b00 .@...@...@...@..
0x0030: 0040 e59d 3993 .@..9.
11:32:37.575907 66:77:88:99:aa:bb > 00:33:33:33:33:33 Null Information, send seq 0, rcv seq 0, Flags [Command], length 54
0x0000: 0000 0000 0030 0100 0030 0200 0030 0300 .....0...0...0..
0x0010: 0030 0400 0030 0500 0030 0600 0030 0700 .0...0...0...0..
0x0020: 0030 0800 0030 0900 0030 0a00 0030 0b00 .0...0...0...0..
0x0030: 0030 52a4 9d2a .0R..*
.
.
.
.
.
Download Capture with Time Filter
Download the capture with a time filter. Note the nanosecond Epoch Start is 1530498788000000000. Removing the nanosecond part convert epoch to date/time.
$ date -d @1530498788
Mon Jul 2 11:33:08 JST 2018
Which matches the timestamp TCPDUMP shows of 11:33:08.000000.
http://1.1.1.1/pcap/splittime?StreamName=<capture name>
    &Start=<nano second epoch start time>
    &Stop=<nano second epoch stop time>
$ curl -u fmadio:100g "http://192.168.2.75/pcap/splittime?StreamName=TestCapture_20180702_1127&&Start=1530498788000000000&Stop=1530498789000000000&" | tcpdump -r - -nn | head
11:33:08.000000 66:77:88:99:aa:bb > 00:44:44:44:44:44 Null Information, send seq 22, rcv seq 1, Flags [Poll], length 54
0x0000: 0000 2c03 153a 2d03 153a 2e03 153a 2f03 ..,..:-..:...:/.
0x0010: 153a 3003 153a 3103 153a 3203 153a 3303 .:0..:1..:2..:3.
0x0020: 153a 3403 153a 3503 153a 3603 153a 3703 .:4..:5..:6..:7.
0x0030: 153a a878 4e26 .:.xN&
11:33:08.000000 66:77:88:99:aa:bb > 00:33:33:33:33:33 Null Information, send seq 22, rcv seq 1, Flags [Poll], length 54
0x0000: 0000 2c03 152a 2d03 152a 2e03 152a 2f03 ..,..*-..*...*/.
0x0010: 152a 3003 152a 3103 152a 3203 152a 3303 .*0..*1..*2..*3.
0x0020: 152a 3403 152a 3503 152a 3603 152a 3703 .*4..*5..*6..*7.
0x0030: 152a 7b57 491d .*{WI.
.
.
.
.
.
Download Capture with BPF Filter
Download the capture with using a BPF filter expression. Note: the FilterBPF argument must be ESCAPE encoded. Luckly curl has a builtin function to do exactly this via the -G --data-urlencode command line argument. In this example we`re filter for TCP only data
http://1.1.1.1/pcap/single?StreamName=<capture name>
    &FilterBPF=<escape encoded BPF filter>
$ curl -u fmadio:100g "http://192.168.2.75/pcap/single?StreamName=hitcon_20180702_1503_58&" -G --data-urlencode "FilterBPF=tcp" | tcpdump -r - -nn | head
02:00:30.332313 IP 10.5.9.102.51697 > 54.183.128.64.22222: Flags [P.], seq 4050064906:4050064990, ack 2728668122, win 1444, options [nop,nop,TS val 215614 ecr 37355221], length 84
02:00:30.354576 IP 54.183.128.64.22222 > 10.5.9.102.51697: Flags [.], ack 168, win 1451, options [nop,nop,TS val 37355240 ecr 215614], length 0
02:00:30.354824 IP 54.183.128.64.22222 > 10.5.9.102.51697: Flags [P.], seq 1:85, ack 168, win 1452, options [nop,nop,TS val 37355240 ecr 215614], length 84
02:00:30.356871 IP 10.5.9.102.51697 > 54.183.128.64.22222: Flags [P.], seq 168:252, ack 85, win 1444, options [nop,nop,TS val 215620 ecr 37355240], length 84
02:00:30.409538 IP 130.0.41.22.17918 > 10.5.9.102.55190: Flags [.], ack 2140812904, win 63, options [nop,nop,TS val 1482614 ecr 1546733746], length 0
02:00:30.409689 IP 10.5.9.102.55557 > 74.125.224.174.443: Flags [.], ack 1325521504, win 16407, length 0
02:00:30.424368 IP 54.183.128.64.22222 > 10.5.9.102.51697: Flags [.], ack 252, win 1452, options [nop,nop,TS val 37355258 ecr 215620], length 0
02:00:30.461303 IP 54.183.128.64.22222 > 10.5.9.102.51697: Flags [P.], seq 85:169, ack 252, win 1452, options [nop,nop,TS val 37355266 ecr 215620], length 84
02:00:30.463300 IP 10.5.9.102.51697 > 54.183.128.64.22222: Flags [P.], seq 252:336, ack 169, win 1444, options [nop,nop,TS val 215646 ecr 37355266], length 84
02:00:30.485763 IP 54.183.128.64.22222 > 10.5.9.102.51697: Flags [.], ack 336, win 1452, options [nop,nop,TS val 37355273 ecr 215646], length 0
.
.
.
.
.
Download Capture with BPF and Time Filter
Download the capture with using a BPF and time range filter expression. Similar to above, but slightly differnt URL and BPF filter. Epoch time for reference is shown below
$ date -d @1407525720
Sat Aug 9 04:22:00 JST 2014
And the capture data
http://1.1.1.1/pcap/splittime?StreamName=<capture name>
    &FilterBPF=<escape encoded BPF filter>
    &Start=<nano second epoch start time>
    &Stop=<nano second epoch stop time>
$ curl -u fmadio:100g "http://192.168.2.75/pcap/splittime?StreamName=upload_20180702_1503_58&Start=1407525720000000000ULL&Stop=1407525780000000000ULL&&" -G --data-urlencode "FilterBPF=udp" | tcpdump -r - -nn | head
04:22:00.176594 IP 10.5.9.102.64905 > 111.221.77.176.33033: UDP, length 33
04:22:00.470634 IP 10.5.9.102.34853 > 8.8.8.8.53: 45853+ A? trello.com. (28)
04:22:00.470727 IP 10.5.9.102.34853 > 8.8.8.8.53: 19240+ AAAA? trello.com. (28)
04:22:00.470867 IP 10.5.9.102.49156 > 8.8.8.8.53: 10810+ A? trello.com. (28)
04:22:00.770120 IP 10.5.9.102.53156 > 157.56.52.13.33033: UDP, length 36
04:22:00.770316 IP 10.5.9.2.57485 > 10.5.9.1.53: 21292+ A? team9.defcon.legitbs.net. (42)
04:22:00.770325 IP 10.5.9.2.57485 > 10.5.9.1.53: 31759+ AAAA? team9.defcon.legitbs.net. (42)
04:22:00.770568 IP 10.5.9.1.53 > 10.5.9.2.57485: 21292* 1/1/2 A 10.5.9.2 (125)
04:22:00.770581 IP 10.5.9.1.53 > 10.5.9.2.57485: 31759* 0/1/0 (93)
04:22:00.792282 IP 10.5.9.2.54477 > 10.5.9.1.53: 23954+ A? team9.defcon.legitbs.net. (42)
.
.
.
.
.
Download Capture with a RegEx DPI filter
Download the capture with using a RegEx DPI filter. This example checks for the case-insensitve string "login"
http://1.1.1.1/pcap/splittime?StreamName=<capture name>
    &FilterRE=<escape encoded RegEx expression>
$ curl -u fmadio:100g "http://192.168.2.75/pcap/single?StreamName=upload_20180702_1503_58" -G --data-urlencode "FilterRE=/login/i" | tcpdump -r - -nn -XX | head -n 100
02:45:29.102245 IP 10.5.9.102.64023 > 10.5.6.108.81: Flags [P.], seq 1873767145:1873768135, ack 3186613245, win 8235, options [nop,nop,TS val 869215714 ecr 388587], length 990
0x0000: 0010 1872 003c e03f 496a afa1 0800 4500 ...r.<.?Ij....E.
0x0010: 0412 4763 4000 3f06 cca7 0a05 0966 0a05 ..Gc@.?......f..
0x0020: 066c fa17 0051 6faf 6ae9 bdef dbfd 8018 .l...Qo.j.......
0x0030: 202b b13b 0000 0101 080a 33cf 2de2 0005 .+.;......3.-...
0x0040: edeb 4745 5420 2f6c 6f67 696e 2f69 6e64 ..GET./login/ind
0x0050: 6578 2e70 6870 2048 5454 502f 312e 310d ex.php.HTTP/1.1.
0x0060: 0a48 6f73 743a 2031 302e 352e 362e 3130 .Host:.10.5.6.10
0x0070: 383a 3831 0d0a 436f 6f6b 6965 3a20 5f5f 8:81..Cookie:.__
0x0080: 7574 6d61 3d39 3632 3735 3835 302e 3135 utma=96275850.15
0x0090: 3530 3039 3837 3430 2e31 3430 3533 3333 50098740.1405333
0x00a0: 3833 362e 3134 3035 3932 3733 3236 2e31 836.1405927326.1
0x00b0: 3430 3539 3239 3530 382e 333b 205f 5f75 405929508.3;.__u
0x00c0: 746d 7a3d 3936 3237 3538 3530 2e31 3430 tmz=96275850.140
0x00d0: 3539 3239 3530 382e 332e 322e 7574 6d63 5929508.3.2.utmc
0x00e0: 7372 3d67 6f6f 676c 657c 7574 6d63 636e sr=google|utmccn
0x00f0: 3d28 6f72 6761 6e69 6329 7c75 746d 636d =(organic)|utmcm
0x0100: 643d 6f72 6761 6e69 637c 7574 6d63 7472 d=organic|utmctr
.
.
.
.
.
Download Capture With Port filter
Download the capture specifying the port capture number
http://1.1.1.1/pcap/splittime?StreamName=<capture name>
    &FilterPort=<numeric port number>
$ curl -u fmadio:100g "http://192.168.2.75/pcap/single?StreamName=upload_20180702_1503_58&FilterPort=0"  | tcpdump  -r - -nn -XX | head -n 100
11:32:37.575907 66:77:88:99:aa:bb > 00:44:44:44:44:44 Null Information, send seq 0, rcv seq 0, Flags [Command], length 54
        0x0000:  0000 0000 0040 0100 0040 0200 0040 0300  .....@...@...@..
        0x0010:  0040 0400 0040 0500 0040 0600 0040 0700  .@...@...@...@..
        0x0020:  0040 0800 0040 0900 0040 0a00 0040 0b00  .@...@...@...@..
        0x0030:  0040 e59d 3993                           .@..9.
11:32:37.575907 66:77:88:99:aa:bb > 00:33:33:33:33:33 Null Information, send seq 0, rcv seq 0, Flags [Command], length 54
        0x0000:  0000 0000 0030 0100 0030 0200 0030 0300  .....0...0...0..
        0x0010:  0030 0400 0030 0500 0030 0600 0030 0700  .0...0...0...0..
        0x0020:  0030 0800 0030 0900 0030 0a00 0030 0b00  .0...0...0...0..
        0x0030:  0030 52a4 9d2a                           .0R..*
.
.
.
.
.
Download Capture Time Only
Download the capture without name only start/stop times
http://1.1.1.1/pcap/timerange?TSBegin=<Epoch Time Start>&
                                 TSEnd=<Epoch Time Stop>&
                                 TSMode=<Epoch time unit default:nanos (optional)>&
                                 TSMax=<Max time duration (optional)>


TSMode : default is Nanoseconds
       : "msec" Milliseconds
       : "sec" Milliseconds
fmadio@fmadio20v2-149:~$ curl -u fmadio:100g "http://192.168.2.145/pcap/timerange?TSBegin=1497329459948411420&TSEnd=1597329469948411420"  | tcpdump  -r - -nn | head -n 100

00:43:18.033804 CALM FAST src:11:11:11:11:11:11; SrcNwref:17; DstNwref:17;
00:43:18.033804 22:22:22:22:22:22 > 00:22:22:22:22:22, ethertype Unknown (0x2222), length 64:
        0x0000:  2222 9499 f845 9599 f845 9699 f845 9799  ""...E...E...E..
        0x0010:  f845 9899 f845 9999 f845 9a99 f845 9b99  .E...E...E...E..
        0x0020:  f845 9c99 f845 9d99 f845 9e99 f845 4c6f  .E...E...E...ELo
        0x0030:  88df                                     ..
00:43:18.033804 CALM FAST src:11:11:11:11:11:11; SrcNwref:17; DstNwref:17;
00:43:18.033804 22:22:22:22:22:22 > 00:22:22:22:22:22, ethertype Unknown (0x2222), length 64:
        0x0000:  2222 9f99 f845 a099 f845 a199 f845 a299  ""...E...E...E..
        0x0010:  f845 a399 f845 a499 f845 a599 f845 a699  .E...E...E...E..
        0x0020:  f845 a799 f845 a899 f845 a999 f845 9746  .E...E...E...E.F
        0x0030:  7bb3                                     {.
00:43:18.033804 CALM FAST src:11:11:11:11:11:11; SrcNwref:17; DstNwref:17;
00:43:18.033804 22:22:22:22:22:22 > 00:22:22:22:22:22, ethertype Unknown (0x2222), length 64:
        0x0000:  2222 aa99 f845 ab99 f845 ac99 f845 ad99  ""...E...E...E..
        0x0010:  f845 ae99 f845 af99 f845 b099 f845 b199  .E...E...E...E..
        0x0020:  f845 b299 f845 b399 f845 b499 f845 96d7  .E...E...E...E..
        0x0030:  282a                                     (*
00:43:18.033804 CALM FAST src:11:11:11:11:11:11; SrcNwref:17; DstNwref:17;
00:43:18.033804 22:22:22:22:22:22 > 00:22:22:22:22:22, ethertype Unknown (0x2222), length 64:
        0x0000:  2222 b599 f845 b699 f845 b799 f845 b899  ""...E...E...E..
        0x0010:  f845 b999 f845 ba99 f845 bb99 f845 bc99  .E...E...E...E..
        0x0020:  f845 bd99 f845 be99 f845 bf99 f845 30cf  .E...E...E...E0.
        0x0030:  3fad                                     ?.
.
.
.
.
.
System Device Status
Download the capture with using a RegEx DPI filter. This example checks for the case-insensitve string "login"
$ curl -u fmadio:100g "http://192.168.2.75/sysmaster/stats_summary"
{
	"uptime":"0D 7H 16M",
	"packets_received":1454363817,
	"packets_dropped":0,
	"packets_errors":0,
	"packets_captured":1454363968,
	"packets_oldest":"19 May 2014 15:48:38",
	"packets_oldest_ts":"1400482118411568128",
	"capture_days":"1505D  0H 57M",
	"bytes_captured":105800185305,
	"bytes_pending":0,
	"bytes_disk":171117117440,
	"bytes_overflow":0,
	"smart_errors":0,
	"raid_errors":0,
	"raid_status":"clean : raid5",
	"stream_errors":0,
	"chunk_errors":0,
	"ecc_errors":0,
.
.
.
.
.
FMADIO10 and FMADIO20 devices are cost effective line rate 10Gbe and 20Gbe packet capture systems. These systems are designed for simple and easy operation with excellent integration into your existing environment. If you have any further questions or requirements please contact us at any time.

